系统安装过程
- 加载boot loader
- 加载启动安装菜单
- 加载内核和initrd文件
- 加载根系统
- 运行anaconda的安装向导
安装光盘中与安装相关的文件
安装autofs启动后会自动出现/misc目录。
在虚拟机设置中添加CD/DVD,使用系统ISO文件,登录系统后mount /dev/cdrom /misc 即可

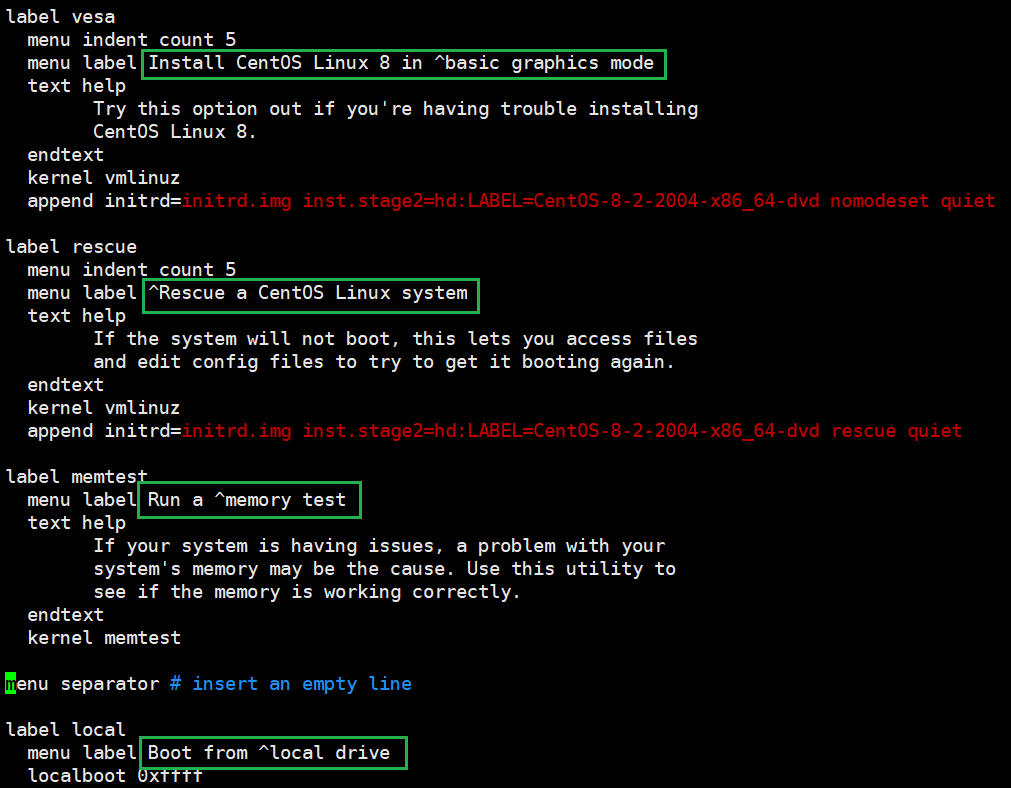
- boot.cat:相当于grub第一阶段
- isolinux.bin:光盘引导程序,在mkisofs的选项中需要明确给出文件路径,这个文件属于SYSLINUX项目
- isolinux.cfg:启动菜单的配置文件,当光盘启动后(即运行isolinux.bin),会自动去找isolinux.cfg文件
- vesmenu.c32:是光盘启动后的启动菜单图形界面,也属于SYSLINUX项目,menu.c32提供纯文本的菜单
- memtest:内存检测程序
- splash.png:光盘启动菜单界面的背景图
- vmlinuz:内核映像
- initrd.img:ramfs文件
isolinux.cfg参数
参数与安装过程对应关系
1、

2、


选择不同选项实际是内核参数的不同。
- 加载内核:isolinuz/vmlinuz
- 向内核传递参数:append initrd=initrd.img 参数
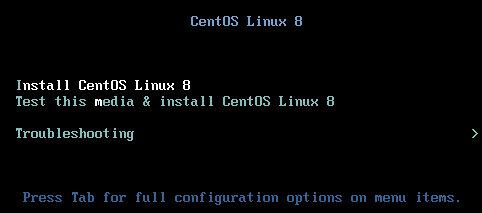
选择直接安装 Install CentOS Linux 8,内核参数为:append initrd=initrd.img inst.stage2=hd:LABEL=CentOS-8-2-2004-x86_64-dvd quiet
选择测试媒介,若无误则安装 Test this media & install CentOS Linux 8,内核参数为:append initrd=initrd.img inst.stage2=hd:LABEL=CentOS-8-2-2004-x86_64-dvd rd.live.check quiet
选择在基本图形模式下安装 Install CentOS Linux 8 in basic graphics mode,内核参数为:append initrd=initrd.img inst.stage2=hd:LABEL=CentOS-8-2-2004-x86_64-dvd nomodeset quiet
选择救援系统 Rescue a CentOS Linux system,内核参数为:append initrd=initrd.img inst.stage2=hd:LABEL=CentOS-8-2-2004-x86_64-dvd rescue quiet
比如进入救援模式可以这麽做
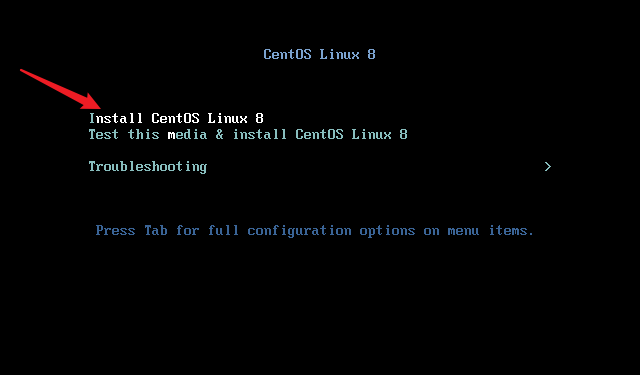
一、当光标定位在 Install Centos Linux 8 时,按Tab键
在末端输入救援模式的内核参数 rescue,即可进入救援模式


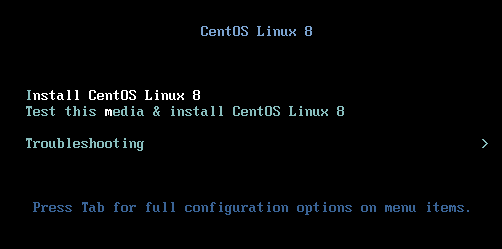
二、在此界面按ESC键,然后 boot:rescue,进入救援模式

常见内核参数
1、text:默认启动GUI图形界面安装接口,可以指定文本方式的安装界面
2、rescue:进入救援模式
3、inst.repo=path:指定安装源文件的路径,可以是以下格式
Centos 6
DVD drive repo=cdrom:device
Hard Drive repo=hd:device/path
HTTP Server repo=http://host/path
HTTPS Server repo=https://host/path
FTP Server repo=ftp://username:password@host/path
NFS Server repo=nfs:server:/path
ISO images on an NFS Server repo=nfsiso:server:/path
Centos 7
Any CD/DVD drive inst.repo=cdrom
Hard Drive inst.repo=hd:device:/path
HTTP Server inst.repo=http://host/path
HTTPS Server inst.repo=https://host/path
FTP Server inst.repo=ftp://username:password@host/path
NFS Server inst.repo=nfs:[options:]server:/path
askmethod:选择安装源文件的获取方法,提供了光盘,本地硬盘,NFS,FTP,HTTP多种安装源,此项Centos 7 以后版已废弃
ks=path: 指定自动化安装应答文件路径,如:initrd=initrd.img inst.ks=http://192.168.8.8/ksdir/ks8.cfg
ip= : 指定IP地址信息
ip=method,method 可以为dhcp
ip=interface:method 指定特定接口
ip=ip::gateway:netmask:hostname:interface:none 静态IP
anaconda
anaconda是Linux系统安装程序,提供两种风格安装界面
1、GUI:图形窗口
2、TUI:基于图形库的curses的文本窗口
anaconda工作过程
1、安装过程使用的语言
2、键盘类型
3、时区和时间
4、安装源文件路径
5、选定要安装的程序包
6、安装目标存储设备及分区设置
Basic Storage:本地磁盘
特殊设备:iSCSI
KDUMP功能
设定主机名和配置网络接口
安全策略
管理员密码
创建一个普通用户
anaconda的配置方式:
1、交互式配置方式
2、通过读取事先给定的配置文件自动完成配置,加内核参数:ks=/path实现指明kickstart文件的位置,各种路径格式如下:
DVD drive:ks=cdrom:/PATH/TO/KICKSTART_FILE
Hard drive:ks=hd:device:/directory/KICKSTART_FILE
HTTP server:ks=http://host:port/path/to/KICKSTART_FILE
FTP server:ks=ftp://host:port/path/to/KICKSTART_FILE
HTTPS server:ks=https://host:port/path/to/KICKSTART_FILE
NFS server:ks=nfs:host:/path/to/KICKSTART_FILE
实现自动化安装应答文件
实现自动安装需要提前制作对应的安装应答文件,称为kickstart文件,用于保存安装过程需要指定的选项。
kickstart文件使用过程
1、创建kickstart文件。
2、将kickstart文件放在可移动媒体、硬盘驱动器或网络位置上。
3、创建引导介质,将用于开始安装。
4、提供安装源。
5、启动kickstart安装。
kickstart文件格式
root家目录里有anaconda-ks.cfg文件,可参考
1、命令段
指明各种安装前配置,如键盘类型等
| keyboard | 设定键盘类型 |
| lang | 语言类型 |
| zerombr | 清除MBR |
| clearpart | 清除分区 |
| part | 创建分区 |
| rootpw | 设定root密码 |
| timezone | 时区 |
| text | 文本安装界面 |
| network | 指定网络设置 |
| firewall | 设置防火墙 |
| selinux | selinux设置 |
| reboot | 安装完自动重启 |
| user | 安装完为系统创建新用户 |
| url | 配置安装源 |
2、程序包段
指明要安装的程序包组或程序包,不安装的程序包等
%packages
@^environment group: 指定环境包组,如:@^minimal-environment
@group_name
package
-package
%end
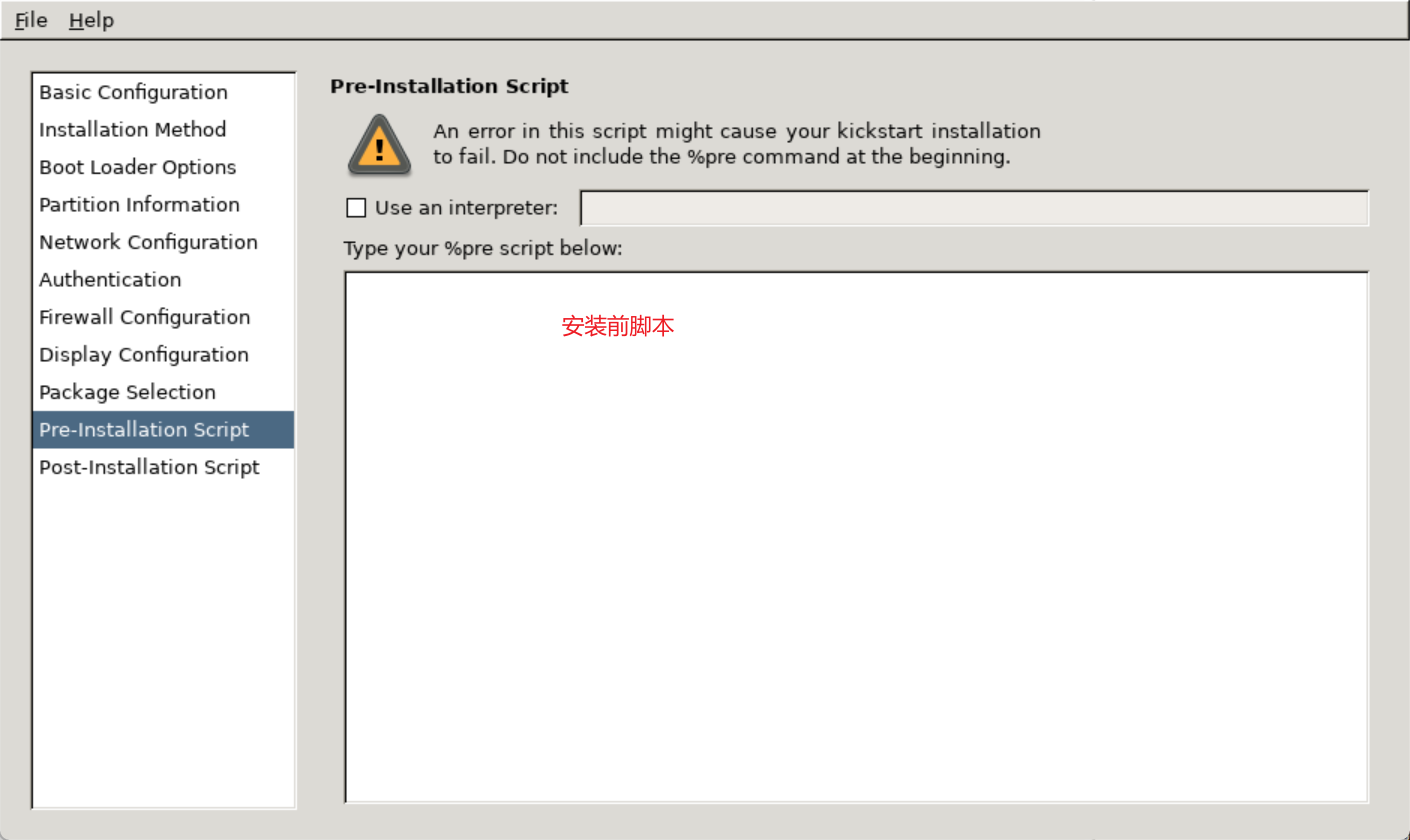
3、脚本段
%pre: 安装前脚本
%post: 安装后脚本
注意:
- CentOS 8,7,6 不同版本的kickstart文件格式不尽相同,不可混用
- %addon(拓展)、%packages(软件包)、%onerror、%pre、%post 必须以%end结束,否则安装失败
创建kickstart文件
方式
- 使用创建工具:system-config-kickstart ,注意:此方法 CentOS 8 不再支持
- 依据某模板修改并生成新配置;CentOS安装完后,会自动参考当前系统的安装过程,生成一个kickstart文件 /root/anaconda-ks.cfg
检查语法
安装pykickstart,使用ksvalidator工具检查kickstart语法错误
[root@wenzi ~]#ls
anaconda-ks.cfg
[root@wenzi ~]#yum -y install pykickstart.noarch[root@wenzi ~]#ksvalidator anaconda-ks.cfg
在centos7使用system-config-kickstart创建kickstart文件
centos7地址 192.168.28.141
1、物理机上安装xmanager进行图形化操作
2、
[root@wenzi ~]# yum list | grep pykickstart
pykickstart.noarch 1.99.66.22-1.el7 @base
#192.168.28.1是物理机VMware Network Adapter VMnet8的地址
[root@wenzi ~]# export DISPLAY=192.168.28.1:0.0[root@wenzi ~]# system-config-kickstart
会出现图形化界面
踩坑:
若图形化界面出现乱码
将Linux系统语言从 LANG="zh_CN.UTF-8" 修改为 LANG="en_US.UTF-8"
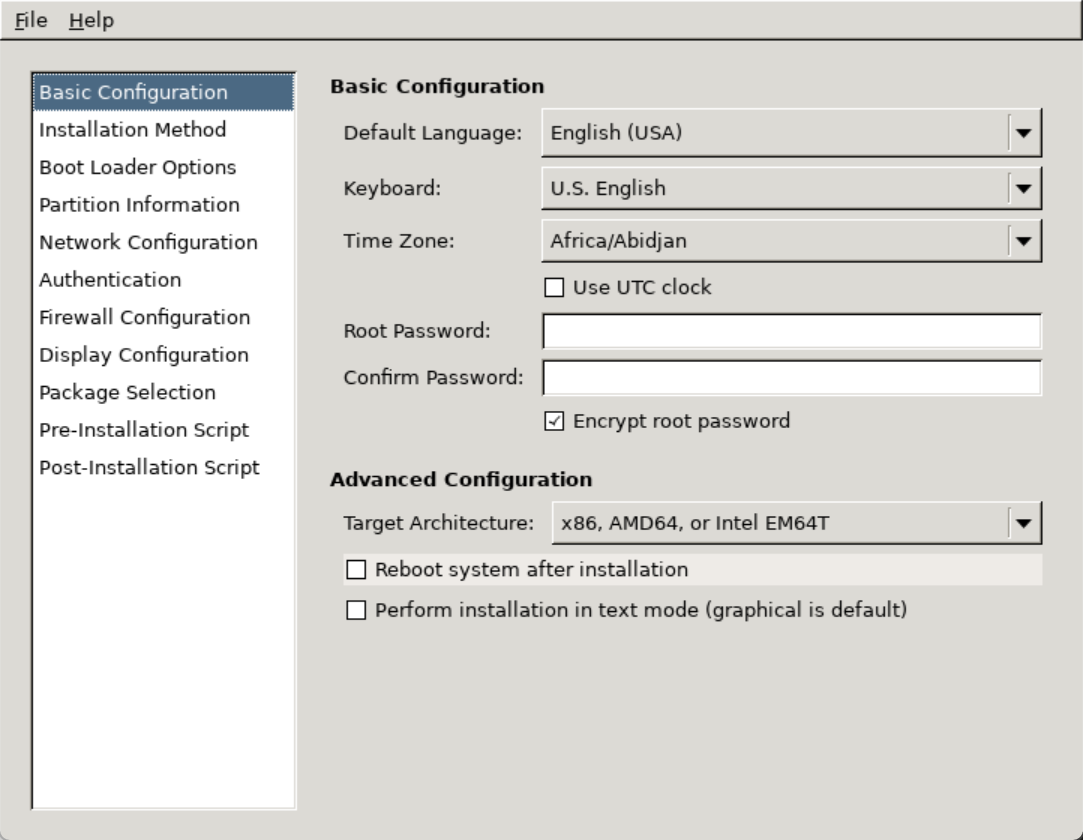
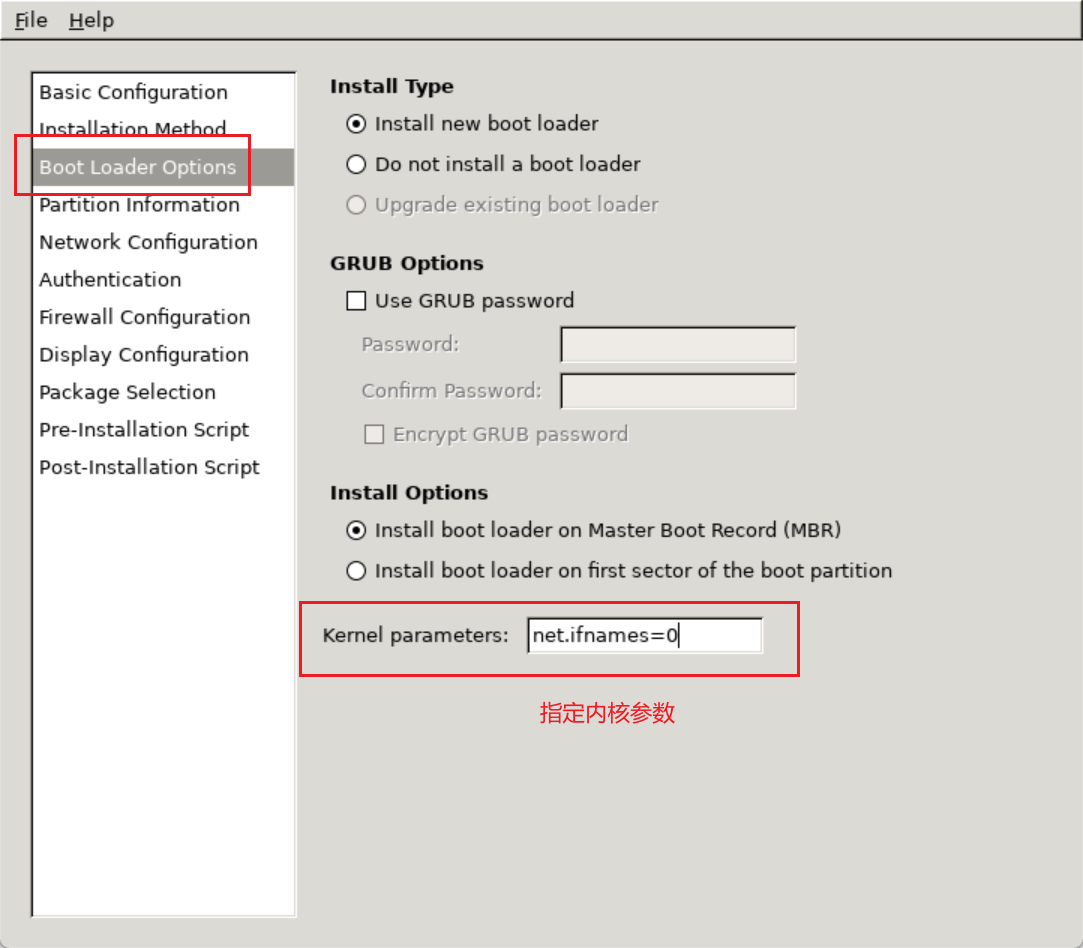
3、设置安装选项
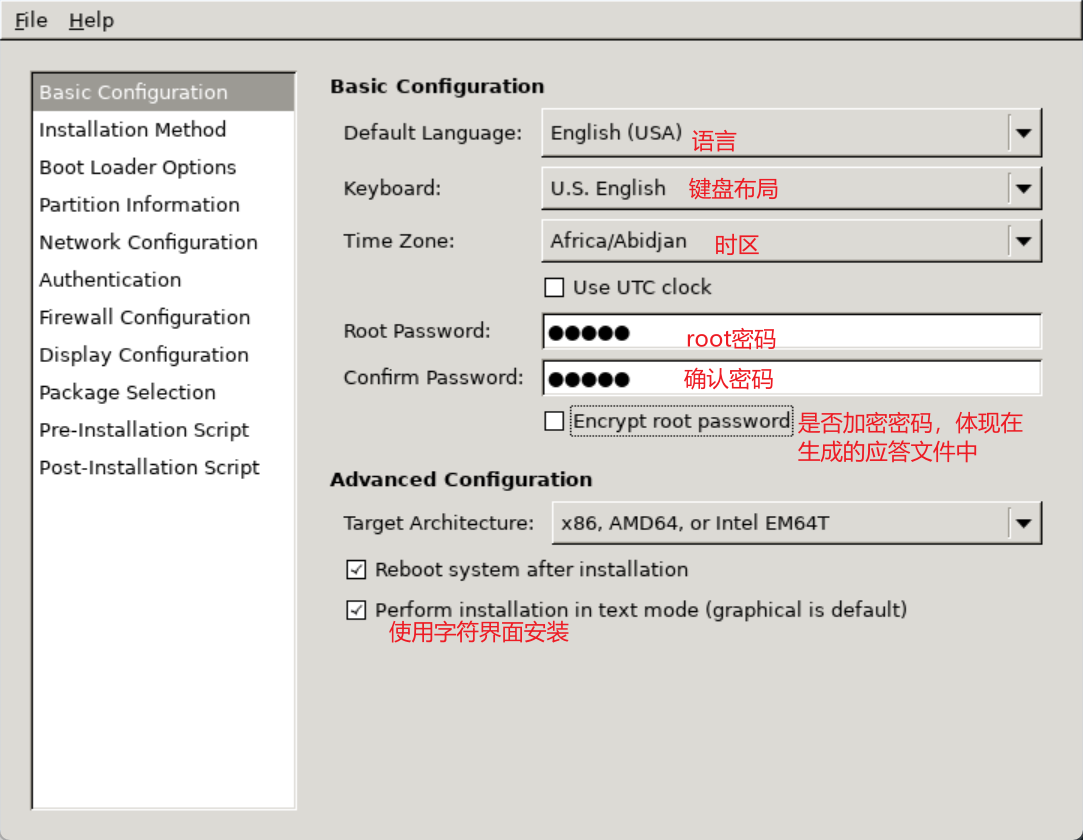
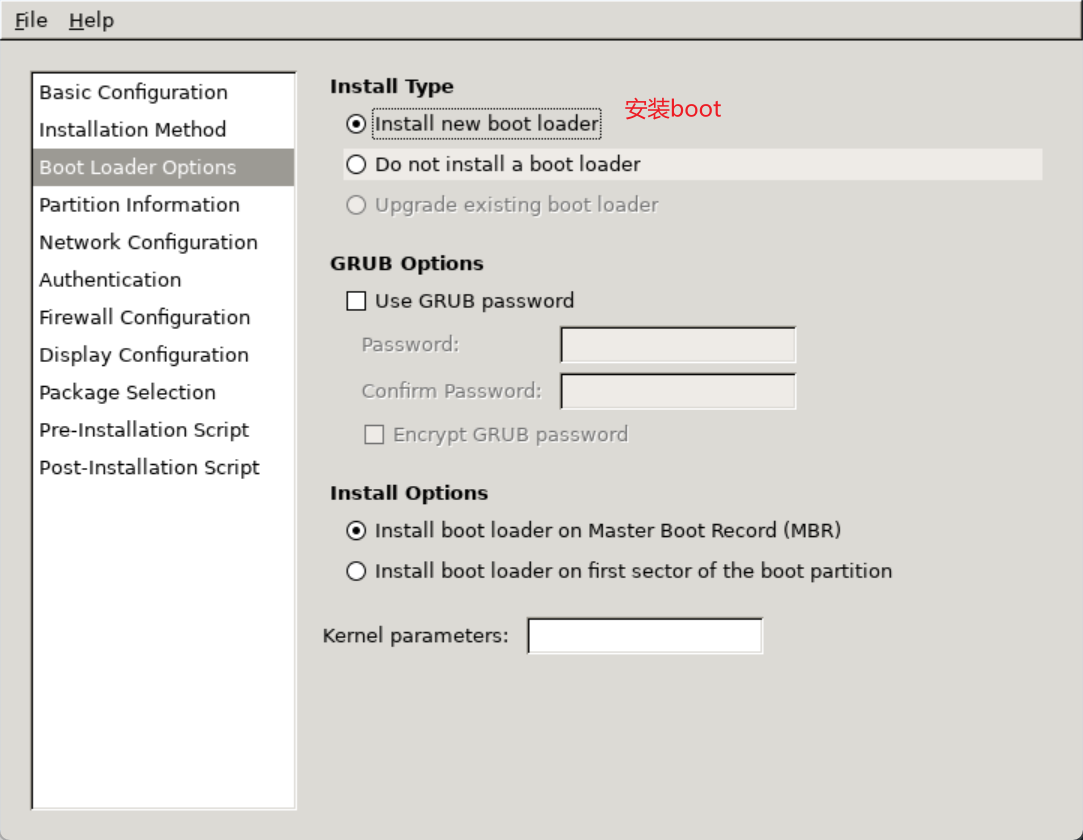

centos7默认网卡名为ens33。若此处写为eth0,需要修改内核参数 net.ifnames=0,使用网卡传统命名方式 eth0

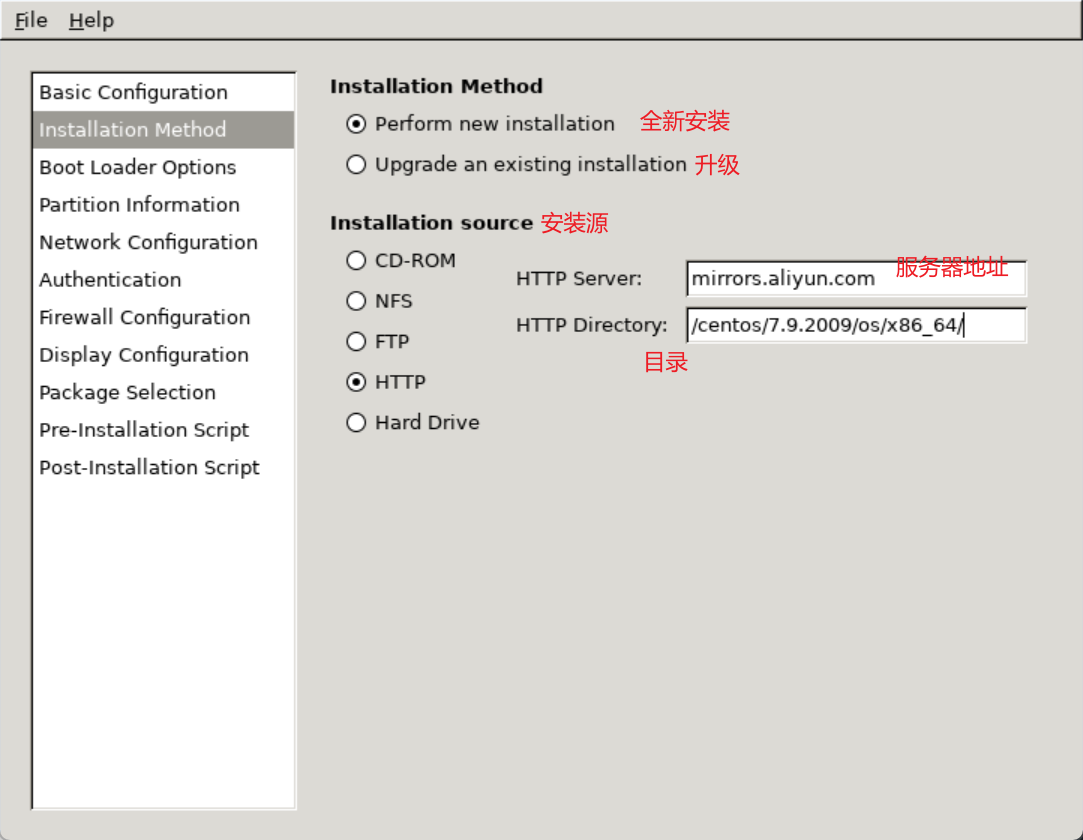
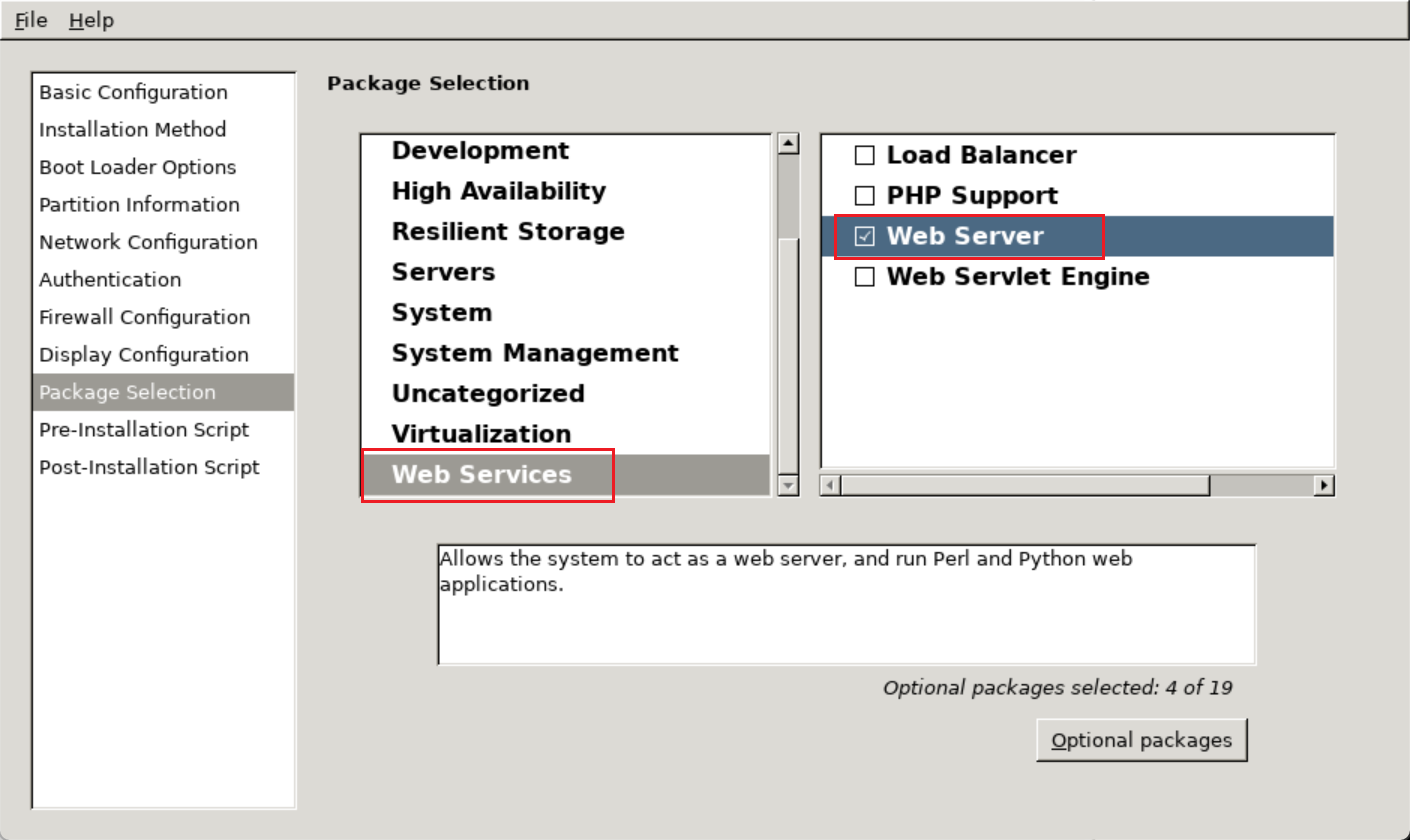
选择安装的软件包,以Web Server为例。
踩坑:
点击Package Selection右侧加载不出列表,修改文件 vim /etc/yum.repos.d/CentOS-Base.repo 为下图样式。注释掉[base],添加[development];重新system-config-kickstart即可
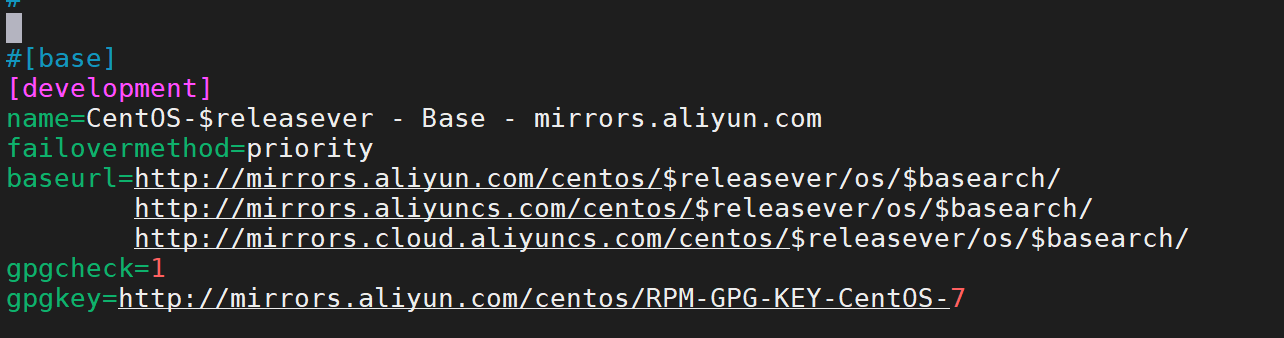
下图中注意yum源的写法,$releasever等变量前要加转义符

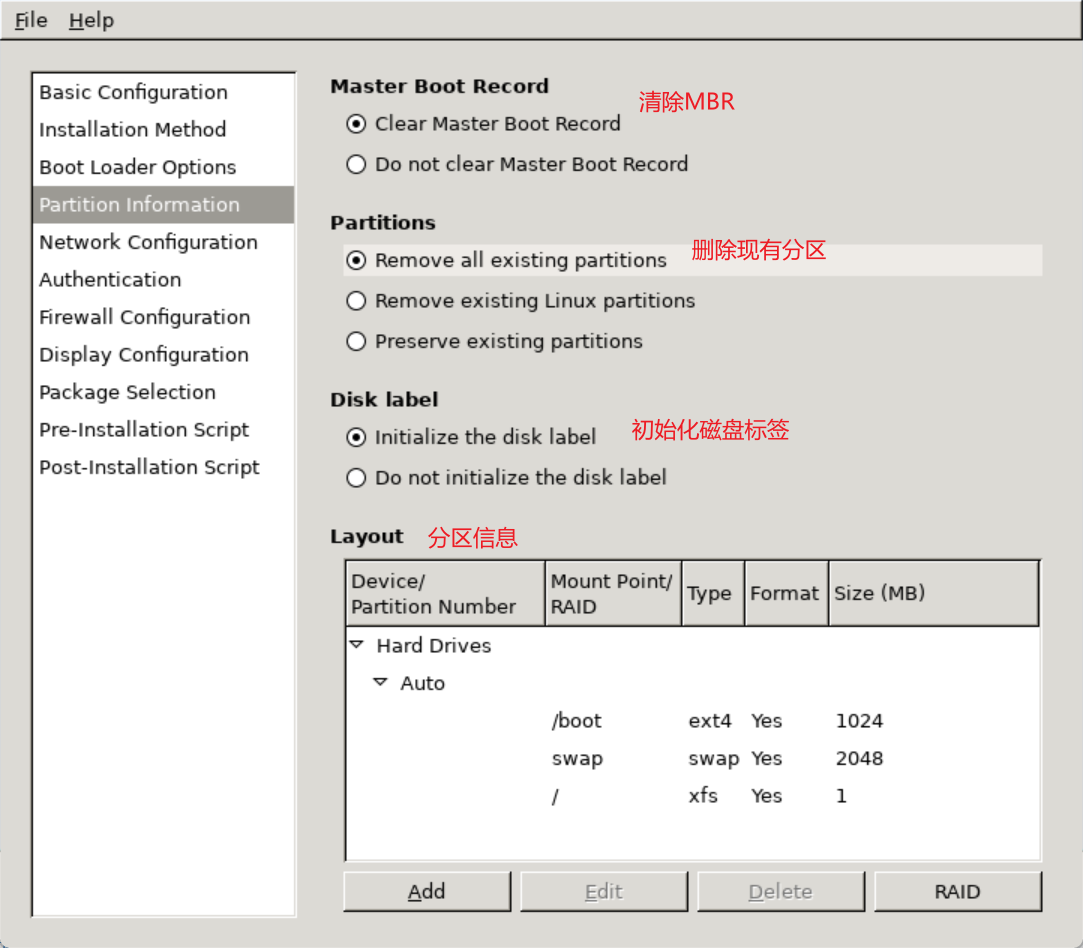
点击左上方File-save保存至系统中,查看ks.cfg文件内容即安装过程配置,还可继续手动修改该文件,比如将时区timezone Africa/Abidjan 改为 timezone Asia/Shanghai
对图形界面配置的修正,否则使用该ks.cfg文件安装系统会启动失败:
bootloader --append="net.ifnames=0" --location=mbr --boot-drive=sda
[root@wenzi ~]# ll
total 8
-rw-------. 1 root root 1333 Aug 11 04:39 anaconda-ks.cfg
-rw-r--r-- 1 root root 1580 Aug 12 10:56 ks.cfg[root@wenzi ~]# cat ks.cfg
#platform=x86, AMD64, or Intel EM64T
#version=DEVEL
# Install OS instead of upgrade
install
# Keyboard layouts
keyboard 'us'
# Root password
rootpw --plaintext admin
# System language
lang en_US
# System authorization information
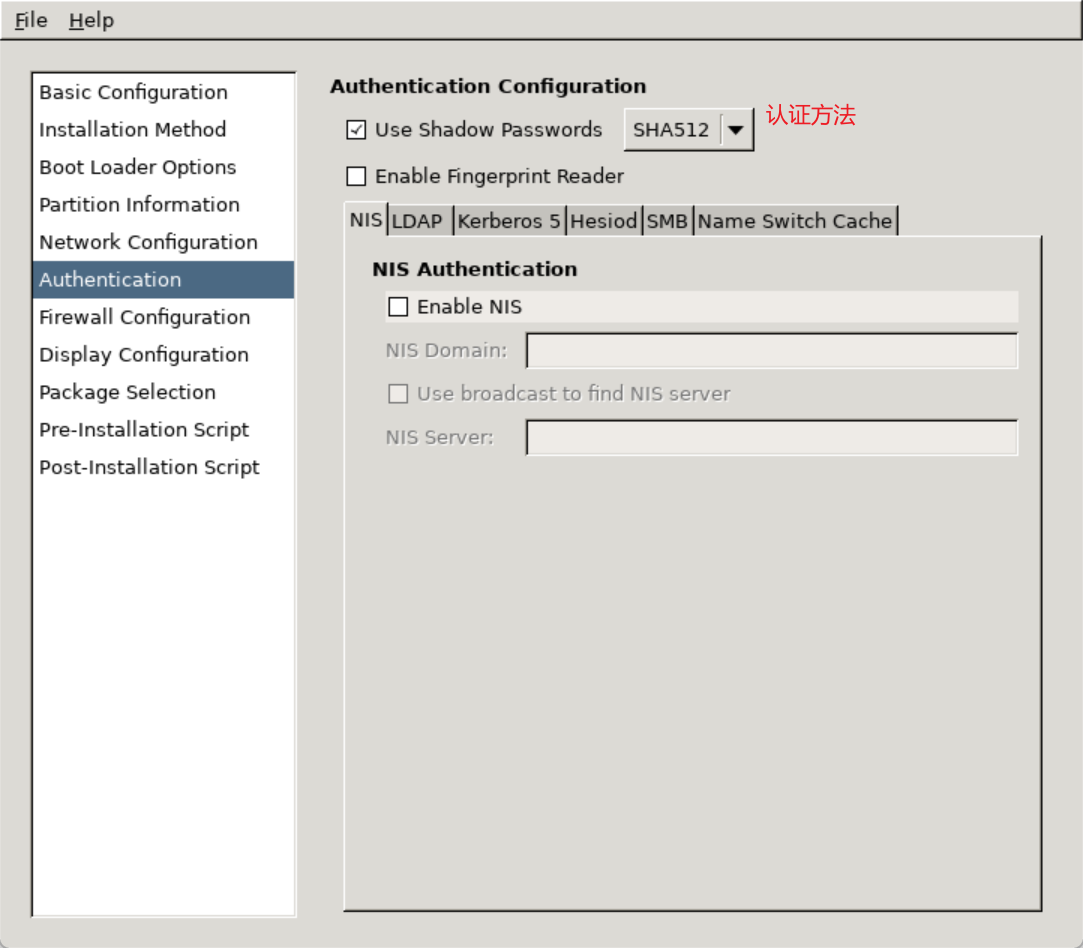
auth --useshadow --passalgo=sha512
# Use text mode install
text
firstboot --disable
# SELinux configuration
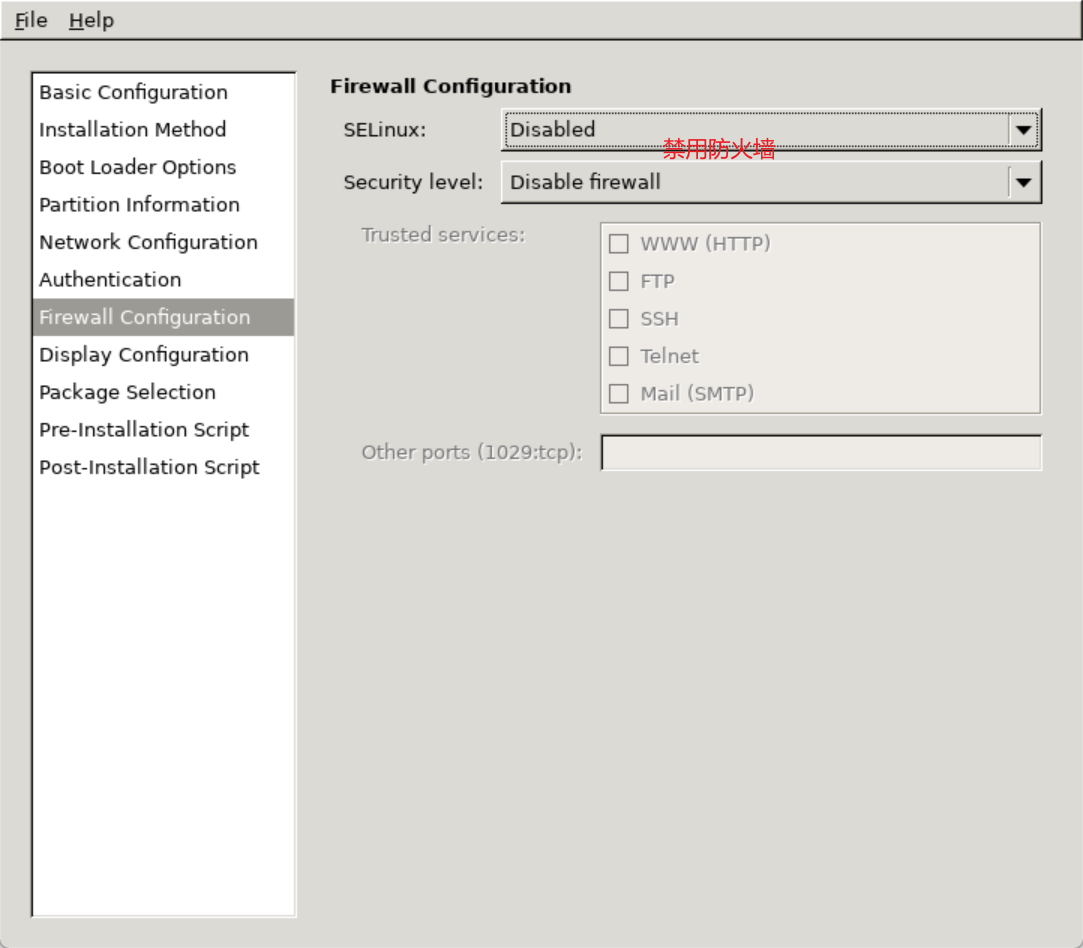
selinux --disabled
# Firewall configuration
firewall --disabled
# Network information
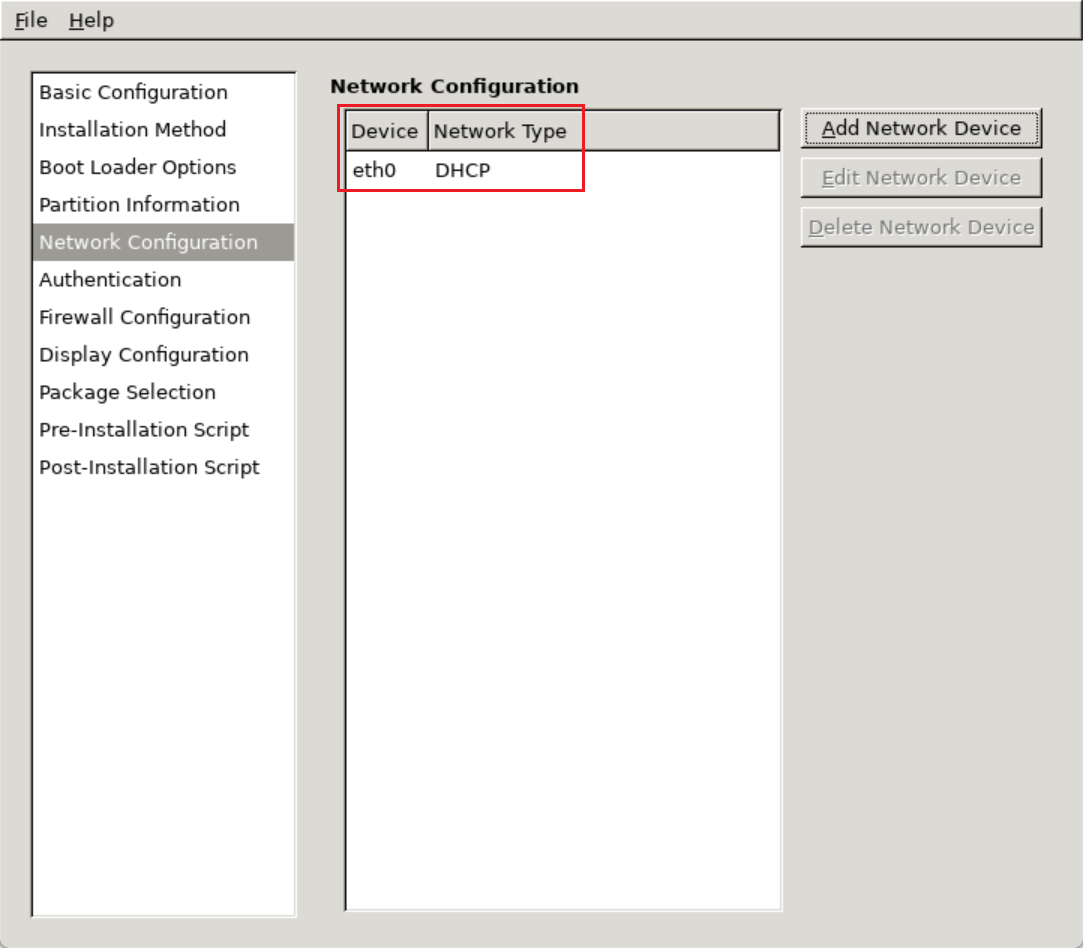
network --bootproto=dhcp --device=eth0
# Reboot after installation
reboot
# System timezone
timezone Asia/Shanghai
# Use network installation
url --url="http://mirrors.aliyun.com/centos/7.9.2009/os/x86_64/"
# System bootloader configuration
bootloader --append="net.ifnames=0" --location=mbr --boot-drive=sda
# Clear the Master Boot Record
zerombr
# Partition clearing information
clearpart --all --initlabel
# Disk partitioning information
part /boot --fstype="ext4" --size=1024
part swap --fstype="swap" --size=2048
part / --fstype="xfs" --grow --size=1%post
useradd wenzi
echo admin | passwd --stdin wenzimkdir /etc/yum.repos.d/backup
mv /etc/yum.repos.d/* /etc/yum.repos.d/backup
cat > /etc/yum.repos.d/Base.repo <<EOF
[development]
name=CentOS-\$releasever - Base - mirrors.aliyun.com
failovermethod=priority
baseurl=http://mirrors.aliyun.com/centos/\$releasever/os/\$basearch/
http://mirrors.aliyuncs.com/centos/\$releasever/os/\$basearch/
http://mirrors.cloud.aliyuncs.com/centos/\$releasever/os/\$basearch/
gpgcheck=1
gpgkey=http://mirrors.aliyun.com/centos/RPM-GPG-KEY-CentOS-7EOF
yum -y install vim
%end%packages
@web-server%end
使用应答文件
在centos7上把ks,cfg文件共享,可通过物理机浏览器进行访问测试,能看到文件内容成功
[root@wenzi ~]# yum -y install httpd
[root@wenzi ~]# mv ks.cfg /var/www/html/
[root@wenzi ~]# systemctl start httpd
新建一台虚拟机,在启动时指定应答文件。在开机进入读条界面时按ESC进入下面流程
在下面界面选中第二个,按ESC
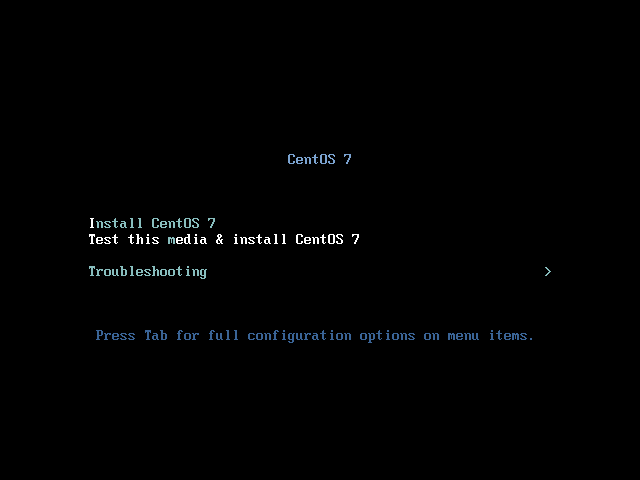
进入此界面后输入 linux ks=http://192.168.28.141/ks.cfg 然后回车开始安装

centos6、centos7、centos8三个系统的kickstart文件各有不同,不可混用。各自最小化安装的kickstart文件可参考自动安装的应答文件 - 运维派
实现基于ISO文件的Linux半自动化安装
centos8准备工作
centos8地址 192.168.28.151
#安装httpd,作为系统镜像、kickstart应答文件网络存放地址
[root@wenzi ~]# dnf -y install httpd
[root@wenzi ~]# systemctl start httpd
一、定制kickstart应答文件
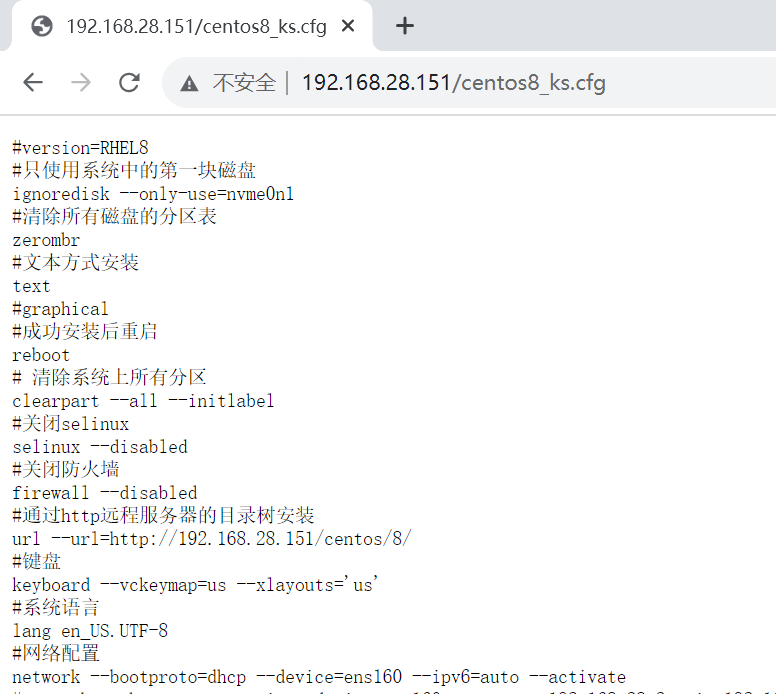
[root@wenzi ~]# cp anaconda-ks.cfg centos8_ks.cfg
[root@wenzi ~]# vim centos8_ks.cfg
#version=RHEL8
#只使用系统中的第一块磁盘
ignoredisk --only-use=nvme0n1
#清除所有磁盘的分区表
zerombr
#文本方式安装
text
#graphical
#成功安装后重启
reboot
# 清除系统上所有分区
clearpart --all --initlabel
#关闭selinux
selinux --disabled
#关闭防火墙
firewall --disabled
#通过http远程服务器的目录树安装
url --url=http://192.168.28.151/centos/8/
#键盘
keyboard --vckeymap=us --xlayouts='us'
#系统语言
lang en_US.UTF-8
#网络配置
network --bootproto=dhcp --device=ens160 --ipv6=auto --activate
#network  --bootproto=static --device=ens160 --gateway=192.168.28.2 --ip=192.168.28.152 --nameserver=223.5.5.5,180.76.76.76 --netmask=255.255.255.0 --ipv6=auto --activate
#主机名
network  --hostname=wenzi
#root加密后的密码
rootpw --iscrypted $6$CEK/siEJwPyzpudd$cJ/rz9oiqDmc8LmI1uZmI8BRFxje4OnuGS0qLBRZ4cAFWqKg482sPuN1BstCMY62NN58ivBzZ.bGD.0QFaYnf/
# Run the Setup Agent on first boot
firstboot --enable
#不启动图形化
skipx
#开机时启动或关闭的服务
services --disabled="chronyd"
#系统时区
timezone Asia/Shanghai --isUtc --nontp
#分区信息
part /boot --fstype="ext4" --ondisk=nvme0n1 --size=1024
part /swap --fstype="swap" --ondisk=nvme0n1 --size=2048
part / --fstype="xfs" --ondisk=nvme0n1 --grow --size=1  #根分区/使用磁盘剩余的所有空间

#需要的安装包
%packages
@^minimal-environment
kexec-tools
vim
%end

%addon com_redhat_kdump --enable --reserve-mb='auto'

%end

%anaconda
pwpolicy root --minlen=6 --minquality=1 --notstrict --nochanges --notempty
pwpolicy user --minlen=6 --minquality=1 --notstrict --nochanges --emptyok
pwpolicy luks --minlen=6 --minquality=1 --notstrict --nochanges --notempty
%end
二、定制启动菜单
centos8安装autofs启动后会自动出现/misc目录。
在虚拟机设置中添加CD/DVD,使用系统ISO文件,登录系统后mount /dev/cdrom /misc
#创建定制ISO文件目录
[root@wenzi ~]# mkdir /data/myiso -p
[root@wenzi ~]# cp -r /misc/isolinux/ /data/myiso/
[root@wenzi ~]# tree /data/myiso/
/data/myiso/
└── isolinux
├── boot.cat
├── boot.msg
├── grub.conf
├── initrd.img
├── isolinux.bin
├── isolinux.cfg
├── ldlinux.c32
├── libcom32.c32
├── libutil.c32
├── memtest
├── splash.png
├── TRANS.TBL
├── vesamenu.c32
└── vmlinuz
#编辑菜单文件
[root@wenzi ~]# vim /data/myiso/isolinux/isolinux.cfg
......
menu separator # insert an empty line
menu separator # insert an empty line
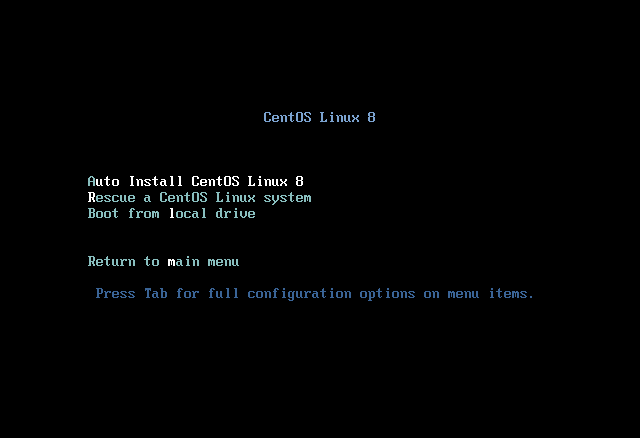
#自动安装系统
label linux
menu label ^Auto Install CentOS Linux 8 #菜单名字可自行修改
kernel vmlinuz
#指定应答文件路径
append initrd=initrd.img quiet ks=http://192.168.28.151/centos8_ks.cfg
#救援系统
label rescue
menu label ^Rescue a CentOS Linux system
kernel vmlinuz
#指定救援系统路径
append initrd=initrd.img rescue quiet inst.repo=http://192.168.28.151/centos/8
#启动本地系统
label local
menu default
menu label Boot from ^local drive
localboot 0xffff
menu separator # insert an empty line
menu separator # insert an empty line
#返回主菜单
label returntomain
menu label Return to ^main menu
menu exit
menu end
#安装mkisofs工具
[root@wenzi ~]# dnf install genisoimage.x86_64
#创建自己的ISO文件,此条命令可通用,只修改路径即可
[root@wenzi ~]# mkisofs -R -J -T -v --no-emul-boot --boot-load-size 4 --boot-info-table -V "CentOS 8.0 x86_64 boot" -b isolinux/isolinux.bin -c isolinux/boot.cat -o /root/boot.iso /data/myiso/
#boot.iso即是生成的定制ISO文件
[root@wenzi ~]# ls
anaconda-ks.cfg boot.iso centos8_ks.cfg三、将系统镜像资源、kickstart应答文件部署至httpd
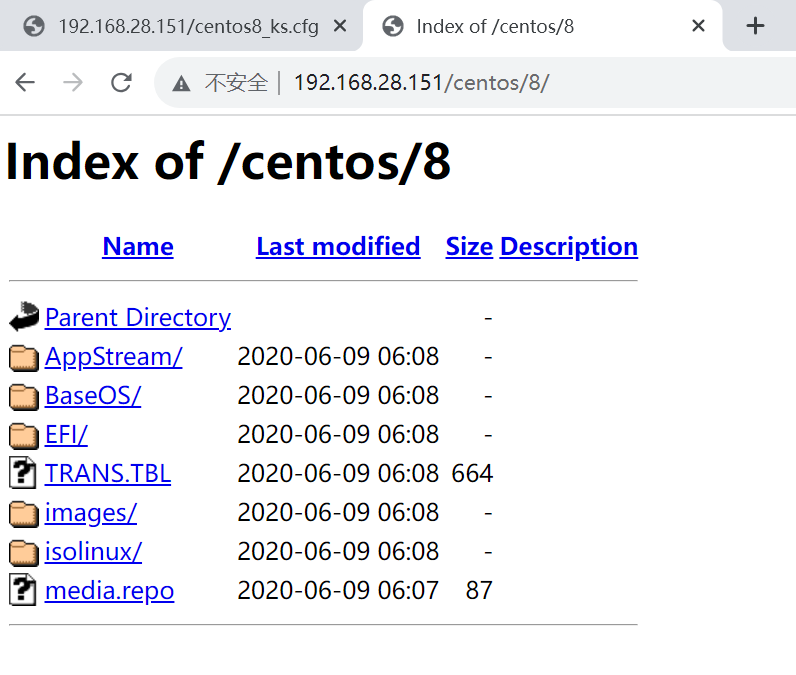
[root@wenzi ~]# mv centos8_ks.cfg /var/www/html/centos8_ks.cfg
[root@wenzi ~]# chmod 644 /var/www/html/centos8_ks.cfg
[root@wenzi ~]# mkdir /var/www/html/centos/8 -p
[root@wenzi ~]# mount /dev/cdrom /var/www/html/centos/8/
[root@wenzi ~]# ll /var/www/html/
total 4
drwxr-xr-x 3 root root   15 Aug 13 10:56 centos
-rw-r--r-- 1 root root 1719 Aug 13 17:11 centos8_ks.cfg
[root@wenzi ~]# systemctl restart httpd
通过浏览器访问测试
将boot.iso传送至物理机,新建虚拟机,使用boot.iso,选择第一个Auto Install Centos Linux 8,静等安装完毕出现登录界面即可。


![[管理与领导-23]:IT基层管理者 - 团队管理 - 新人来了,如何帮助新人快速进入角色?](/images/no-images.jpg)
