文章目录
- 一、JSON结构转换是什么?
- 二、案例之《JSON数组 To JSON数组》
- 三、代码实现
- 四、在线转换工具
- 五、技术资料
一、JSON结构转换是什么?
JSON结构转换指的是将一个JSON对象或JSON数组按照一定规则进行重组、筛选、映射或转换,生成新的JSON对象或数组的过程。这种转换可以包括改变JSON数据的结构、提取特定字段、合并多个JSON数据,或者对数据进行计算和处理等操作。
在JSON结构转换中,常见的操作包括:
- 提取字段:从一个JSON对象中提取特定字段,生成新的JSON对象。
- 过滤数据:根据条件过滤JSON数据,生成符合条件的新JSON对象或数组。
- 映射转换:将一个JSON对象中的字段映射到另一个字段,生成新的JSON对象。
- 合并数据:将多个JSON对象或数组合并成一个新的JSON对象或数组。
JSON结构转换通常在数据处理、数据清洗、数据分析等场景中广泛应用。通过结构转换,可以根据需求定制化地处理JSON数据,使其符合特定的业务逻辑或数据格式要求。
为此我们提供了一个简单开源的JS类库,接下来我们对此类库进行详细讲解。
二、案例之《JSON数组 To JSON数组》
源JSON结构:
json">{
  "a": [
    [
      {
        "c_child": "2"
      }
    ],
    [
      {
        "d_child": "3"
      }
    ],
    [
      {
        "e_child": "4"
      }
    ]
  ]
}
目标JSON结构:
json">{
  "b1": [
    [
      {
        "k1_child": "v1_child"
      }
    ],
    [
      {
        "k2_child": "v2_child"
      }
    ],
    [
      {
        "k3_child": "v3_child"
      }
    ]
  ]
}
转换需求:
以下需求分别执行
场景一:
- 将源结构的“a”值替换到目标结构的“b1[0]”中
- 将源结构的“a”值追加到目标结构的“b1[1]”中
- 将源结构的“a”值替换到目标结构的“b1[2]”中
场景二:
- 将源结构的“a[0]”值替换到目标结构的“b1[0]”中
- 将源结构的“a[0]”值追加到目标结构的“b1[1]”中
- 将源结构的“a[0]”值替换到目标结构的“b1[2]”中
场景三:
- 将源结构的“a[0]”值追加到目标结构的“b1[0]”中
- 将源结构的“a[1]”值追加到目标结构的“b1[0]”中
- 将源结构的“a[2]”值追加到目标结构的“b1[0]”中
三、代码实现
场景一:
- 将源结构的“a”值替换到目标结构的“b1[0]”中
- 将源结构的“a”值追加到目标结构的“b1[1]”中
- 将源结构的“a”值替换到目标结构的“b1[2]”中
import JsonTranferUtil from './json_transfer_new'
const jsonOrg = {
  "a": [
    [
      {
        "c_child": "2"
      }
    ],
    [
      {
        "d_child": "3"
      }
    ],
    [
      {
        "e_child": "4"
      }
    ]
  ]
};
const jsonAim = {
  "b1": [
    [
      {
        "k1_child": "v1_child"
      }
    ],
    [
      {
        "k2_child": "v2_child"
      }
    ],
    [
      {
        "k3_child": "v3_child"
      }
    ]
  ]
};
/// 转换类型
/// 1:源Key->目标Key
/// 2:源Key->目标Value
/// 3:源Value->目标Key
/// 4:源Value->目标Value
const mappings = [
  {
    "AimJsonPath": "root.b1[0]",
    "OrgJsonPath": "root.a",
    "TranType": 4,
    "Options": {
      "KeyInitIndex": 0,
      "AddElementsOption": "1",
      "TranOP": "1",
      "TranWay": "1"
    }
  },
  {
    "AimJsonPath": "root.b1[1]",
    "OrgJsonPath": "root.a",
    "TranType": 4,
    "Options": {
      "KeyInitIndex": 0,
      "AddElementsOption": "1",
      "TranOP": "1",
      "TranWay": "1"
    }
  },
  {
    "AimJsonPath": "root.b1[2]",
    "OrgJsonPath": "root.a",
    "TranType": 4,
    "Options": {
      "KeyInitIndex": 0,
      "AddElementsOption": "1",
      "TranOP": "1",
      "TranWay": "1"
    }
  }
];
/******************* 测试程序***************** */
let jsonTranferUtil = new JsonTranferUtil(jsonOrg, jsonAim, mappings);
let result = jsonTranferUtil.tranJson();
console.log("*************************最终转换结果*********************************")
console.log(JSON.stringify(result), 88888888888)
执行结果如下:

场景二:
- 将源结构的“a[0]”值替换到目标结构的“b1[0]”中
- 将源结构的“a[0]”值追加到目标结构的“b1[1]”中
- 将源结构的“a[0]”值替换到目标结构的“b1[2]”中
import JsonTranferUtil from './json_transfer_new'
const jsonOrg = {
  "a": [
    [
      {
        "c_child": "2"
      }
    ],
    [
      {
        "d_child": "3"
      }
    ],
    [
      {
        "e_child": "4"
      }
    ]
  ]
};
const jsonAim = {
  "b1": [
    [
      {
        "k1_child": "v1_child"
      }
    ],
    [
      {
        "k2_child": "v2_child"
      }
    ],
    [
      {
        "k3_child": "v3_child"
      }
    ]
  ]
};
/// 转换类型
/// 1:源Key->目标Key
/// 2:源Key->目标Value
/// 3:源Value->目标Key
/// 4:源Value->目标Value
const mappings = [
  {
    "AimJsonPath": "root.b1[0]",
    "OrgJsonPath": "root.a[0]",
    "TranType": 4,
    "Options": {
      "KeyInitIndex": 0,
      "AddElementsOption": "1",
      "TranOP": "1",
      "TranWay": "1"
    }
  },
  {
    "AimJsonPath": "root.b1[1]",
    "OrgJsonPath": "root.a[0]",
    "TranType": 4,
    "Options": {
      "KeyInitIndex": 0,
      "AddElementsOption": "1",
      "TranOP": "1",
      "TranWay": "1"
    }
  },
  {
    "AimJsonPath": "root.b1[2]",
    "OrgJsonPath": "root.a[0]",
    "TranType": 4,
    "Options": {
      "KeyInitIndex": 0,
      "AddElementsOption": "1",
      "TranOP": "1",
      "TranWay": "1"
    }
  }
];
/******************* 测试程序***************** */
let jsonTranferUtil = new JsonTranferUtil(jsonOrg, jsonAim, mappings);
let result = jsonTranferUtil.tranJson();
console.log("*************************最终转换结果*********************************")
console.log(JSON.stringify(result), 88888888888)
执行结果如下:

场景三:
- 将源结构的“a[0]”值追加到目标结构的“b1[0]”中
- 将源结构的“a[1]”值追加到目标结构的“b1[0]”中
- 将源结构的“a[2]”值追加到目标结构的“b1[0]”中
import JsonTranferUtil from './json_transfer_new'
const jsonOrg = {
  "a": [
    [
      {
        "c_child": "2"
      }
    ],
    [
      {
        "d_child": "3"
      }
    ],
    [
      {
        "e_child": "4"
      }
    ]
  ]
};
const jsonAim = {
  "b1": [
    [
      {
        "k1_child": "v1_child"
      }
    ],
    [
      {
        "k2_child": "v2_child"
      }
    ],
    [
      {
        "k3_child": "v3_child"
      }
    ]
  ]
};
/// 转换类型
/// 1:源Key->目标Key
/// 2:源Key->目标Value
/// 3:源Value->目标Key
/// 4:源Value->目标Value
const mappings = [
  {
    "AimJsonPath": "root.b1[0]",
    "OrgJsonPath": "root.a[0]",
    "TranType": 4,
    "Options": {
      "KeyInitIndex": 0,
      "AddElementsOption": "1",
      "TranOP": "1",
      "TranWay": "1"
    }
  },
  {
    "AimJsonPath": "root.b1[0]",
    "OrgJsonPath": "root.a[1]",
    "TranType": 4,
    "Options": {
      "KeyInitIndex": 0,
      "AddElementsOption": "1",
      "TranOP": "1",
      "TranWay": "1"
    }
  },
  {
    "AimJsonPath": "root.b1[0]",
    "OrgJsonPath": "root.a[2]",
    "TranType": 4,
    "Options": {
      "KeyInitIndex": 0,
      "AddElementsOption": "1",
      "TranOP": "1",
      "TranWay": "1"
    }
  }
];
/******************* 测试程序***************** */
let jsonTranferUtil = new JsonTranferUtil(jsonOrg, jsonAim, mappings);
let result = jsonTranferUtil.tranJson();
console.log("*************************最终转换结果*********************************")
console.log(JSON.stringify(result), 88888888888)
执行结果如下:

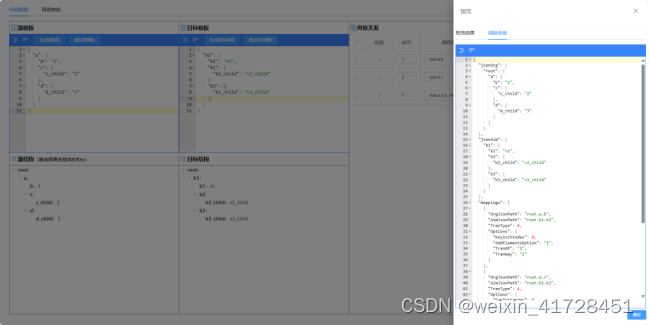
四、在线转换工具
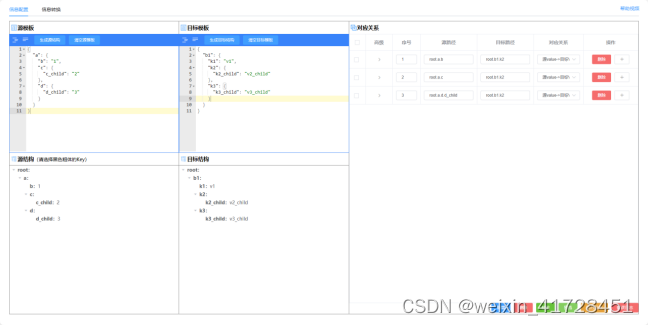
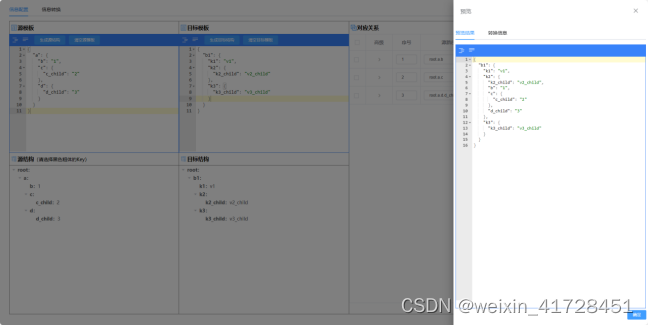
为了让使用者更加方便的配置出映射关系,为此开发了一套在线转换工具,可在工具中通过拖拽即可配置想要的结构转换关系,并可对转换关系所能实现的效果实时进行预览更改。
工具地址:数据转换工具
五、技术资料
- Github:edq-ebara/data-transformation-javascript: 数据转化(javascript) (github.com)
- 技术探讨QQ群:775932762
- 工具连接:数据转换工具