本文概述
-
本文章讲述基于Linux CentOS 7系统(虚拟机),部署Django+Vue开发的前后端分离项目。
-
项目源码不开放,但是操作步骤可以借鉴。
-
该文章将项目部署在Linux虚拟机上,暂不使用Docker
-
-
相关指令尽量展示执行路径,方便直观理解
最后有流程总结,捋不清的时候,可以到最后看看
后续部署系列:
- 基于Docker的Django+Vue项目部署:https://blog.csdn.net/qq_45445505/article/details/135563811
部署前准备
本机软件准备
| 软件 | 用途 |
|---|---|
| VMware Workstation | 部署Linux虚拟机(提前准备好软件,并部署好虚拟机) |
| MobaXterm | 远程连接软件,在本地(Windows系统)远程连接虚拟机的Linux系统 |
文章中常用的命令
防火墙有关命令
开启防火墙端口
firewall-cmd --zone=public --add-port=端口号/tcp --permanent
重载防火墙:该命令用在任何对防火墙更改的命令后,立刻使更改生效!!!!
firewall-cmd --reload
查看防火墙状态
systemctl status firewalld.service
查看以开放的端口
firewall-cmd --list-ports
安装Git
安装方式1:一键安装
yum install git -y
一键安装的版本可能过低,有时候clone仓库的时候有问题
安装方式2:安装指定版本git【建议】
移除已有的git
[root@localhost ~]# yum remove git
下载编译源代码的工具
[root@localhost ~]# yum -y groupinstall "Development tools"
下载相关依赖包
[root@localhost ~]# yum -y install zlib-devel perl-ExtUtils-MakeMaker asciidoc xmlto openssl-devel
下载git
- git官网:https://mirrors.edge.kernel.org/pub/software/scm/git/
- 注意事项:不要下载带有-rc的,因为它代表了一个候选发布版本
[root@localhost ~]# wget https://www.kernel.org/pub/software/scm/git/git-2.32.6.tar.gz
解压到指定文件夹下
- 指定文件夹必须存在!
- 将git解压缩的位置和git安装的位置放在一起,删除的时候好删除
[root@localhost ~]# tar -zxvf git-2.32.6.tar.gz -C /usr/local/git
进入解压缩后的目录
[root@localhost ~]# cd /usr/local/git/git-2.32.6
[root@localhost git-2.32.6]#
配置编译和安装的地址
[root@localhost git-2.32.6]# ./configure --prefix=/usr/local/git
编译和安装
[root@localhost git-2.32.6]# make && make install
配置环境变量
- 打开配置文件
[root@localhost git-2.32.6]# vim /etc/profile
- 文件末尾添加一行
export PATH=/usr/local/git/bin:$PATH
- 退出文件,执行以下命令使更改生效
[root@localhost git-2.32.6]# source /etc/profile
查看git版本
[root@localhost git-2.32.6]# git version
拉取项目文件
创建存放代码的目录
[root@localhost git-2.32.6]# mkdir /icwp/code
进入该目录
[root@localhost git-2.32.6]# cd /icwp/code
[root@localhost code]#
拉取仓库
- 拉取公开仓库
git clone 仓库地址
- 拉取私有仓库
git clone git clone https://user:需要自己生成仓库的Token@ghproxy.com/仓库地址
- 拉取自己的私有仓库:ssh,自行百度
安装MySQL
卸载已有的Mysql
若需要卸载已有的Mysql,可以按照如下步骤
1、查询是否安装了MySQL
[root@localhost ~]# rpm -qa | grep mysql
mysql-community-client-5.7.44-1.el7.x86_64
mysql57-community-release-el7-10.noarch
mysql-community-libs-5.7.44-1.el7.x86_64
mysql-community-server-5.7.44-1.el7.x86_64
mysql-community-common-5.7.44-1.el7.x86_64
查询到相关安装
2、查看MySQL服务是否已开启,若开启则需要关闭
[root@localhost ~]# systemctl status mysqld
[root@localhost ~]# systemctl stop mysqld
3、查询含有MySQL的目录并删除
查询目录。对于我这台电脑的结果:
/var/lib/docker目录下是docker配置的有关mysql的挂载信息,不用管/root目录下是自建的文件夹,也不用删
Linux默认安装MySQL,且要删除的文件夹一般都是在:
/var/lib/目录下/usr/目录下
[root@localhost ~]# find / -name mysql
find: ‘/run/user/1000/gvfs’: Permission denied
/etc/logrotate.d/mysql							# 删除
/etc/selinux/targeted/active/modules/100/mysql	# 删除
/etc/selinux/targeted/tmp/modules/100/mysql		# 删除
/root/.virtualenvs/icwp/lib/python3.8/site-packages/django/contrib/gis/db/backends/mysql
/root/.virtualenvs/icwp/lib/python3.8/site-packages/django/db/backends/mysql
/root/mysql
/root/mysql/data/mysql
/var/lib/docker/volumes/f0ece572bc8f6fb3b7448210bb4ead64e622062f7d41e225d17b99659e945b6a/_data/mysql
/var/lib/docker/volumes/58aaeb5cb98e01083d9624bd1981ed4cdf65436d7019b77b471e6bd0cefa9e3b/_data/mysql
/var/lib/docker/overlay2/4f71b050ff227dd296891c0ebd6210744dda330e0a03ec3ed2616c537809ea98/diff/etc/mysql
/var/lib/docker/overlay2/4f71b050ff227dd296891c0ebd6210744dda330e0a03ec3ed2616c537809ea98/diff/usr/bin/mysql
/var/lib/docker/overlay2/4f71b050ff227dd296891c0ebd6210744dda330e0a03ec3ed2616c537809ea98/diff/usr/lib/mysql
/var/lib/docker/overlay2/4f71b050ff227dd296891c0ebd6210744dda330e0a03ec3ed2616c537809ea98/diff/var/lib/mysql
/var/lib/docker/overlay2/71fdf5f5044d7f7a1a6a31b44c1c201abe5ac8d681ee09bf66120a77225d2f66/diff/etc/mysql
/var/lib/mysql				# 删除
/var/lib/mysql/mysql		# 删除
/usr/bin/mysql				# 删除
/usr/lib64/mysql			# 删除
/usr/share/mysql			# 删除
/usr/local/mysql			# 删除
/opt/gitlab/embedded/lib/ruby/gems/3.1.0/gems/activerecord-7.0.8/lib/active_record/connection_adapters/mysql
一个一个删除上述要删除的目录
rm -rf /var/lib/mysql /var/lib/mysql/mysql /usr/bin/mysql /usr/lib64/mysql /usr/share/mysql /usr/local/mysql
rm -rf /etc/logrotate.d/mysql /etc/selinux/targeted/active/modules/100/mysql /etc/selinux/targeted/tmp/modules/100/mysql
!!有个目录要注意额外删除
# mysql配置信息所在的目录
rm -rf /etc/my.cnf
4、查询MySQL安装的组件服务,并删除
[root@localhost ~]# rpm -qa|grep -i mysql
mysql-community-server-5.7.44-1.el7.x86_64
mysql-community-common-5.7.44-1.el7.x86_64
mysql-community-client-5.7.44-1.el7.x86_64
mysql57-community-release-el7-10.noarch
mysql-community-libs-5.7.44-1.el7.x86_64

[root@localhost ~]# rpm -ev mysql-community-server-5.7.44-1.el7.x86_64
[root@localhost ~]# rpm -ev mysql-community-common-5.7.44-1.el7.x86_64
[root@localhost ~]# rpm -ev mysql-community-client-5.7.44-1.el7.x86_64
[root@localhost ~]# rpm -ev mysql57-community-release-el7-10.noarch
[root@localhost ~]# rpm -ev mysql-community-libs-5.7.44-1.el7.x86_64
# 若删除不了,改用如下命令
[root@localhost ~]# rpm -ev --nodeps mysql-community-server-5.7.44-1.el7.x86_64
[root@localhost ~]# rpm -ev --nodeps mysql-community-common-5.7.44-1.el7.x86_64
[root@localhost ~]# rpm -ev --nodeps mysql-community-client-5.7.44-1.el7.x86_64
[root@localhost ~]# rpm -ev --nodeps mysql57-community-release-el7-10.noarch
[root@localhost ~]# rpm -ev --nodeps mysql-community-libs-5.7.44-1.el7.x86_64
5、检查是否卸载干净
[root@localhost ~]# rpm -qa | grep -i mysql		# 无相关安装
[root@localhost ~]# systemctl start mysql
Failed to start mysql.service: Unit not found.	# 证明已卸载干净
下载安装MySQL
安装开发工具
[root@localhost ~]# yum -y groupinstall "Development tools"
安装相关依赖
[root@localhost ~]# yum install openssl-devel bzip2-devel expat-devel gdbm-devel readline-devel sqlite-devel psmisc libffi-devel
下载MySQL
- 官网:https://dev.mysql.com/downloads/repo/yum/
- 默认安装位置:/Var/lib/mysql
[root@localhost ~]# wget http://dev.mysql.com/get/mysql57-community-release-el7-10.noarch.rpm
安装MySQL
[root@localhost ~]# yum -y install mysql57-community-release-el7-10.noarch.rpm
安装MySQL服务器
[root@localhost ~]# yum install mysql-community-server --nogpgcheck
启动MySQL
[root@localhost ~]# systemctl start mysqld.service
查看MySQL状态
[root@localhost ~]# systemctl status mysqld.service
● mysqld.service - MySQL Server
   Loaded: loaded (/usr/lib/systemd/system/mysqld.service; enabled; vendor preset: disabled)
   Active: active (running) since Fri 2024-01-12 14:54:31 CST; 46min ago
     Docs: man:mysqld(8)
           http://dev.mysql.com/doc/refman/en/using-systemd.html
 Main PID: 1772 (mysqld)
    Tasks: 28
   Memory: 1.0M
   CGroup: /system.slice/mysqld.service
           └─1772 /usr/sbin/mysqld --daemonize --pid-file=/var/run/mysqld/mysqld.pid

Jan 12 14:54:29 localhost.localdomain systemd[1]: Starting MySQL Server...
Jan 12 14:54:31 localhost.localdomain systemd[1]: Started MySQL Server.
[root@localhost ~]#
创建Django项目需要的数据库
查看默认密码
- 默认密码:Ga>tCgH,q2vm
[root@localhost ~]# grep "password" /var/log/mysqld.log
2024-01-12T01:14:06.410100Z 1 [Note] A temporary password is generated for root@localhost: Ga>tCgH,q2vm
登录并更改默认密码
一共输入两个命令:
mysql -u root -pmysql -u root -pALTER USER 'root'@'localhost' IDENTIFIED BY '修改为自己的密码';
[root@localhost ~]# mysql -u root -p
Enter password:
Welcome to the MySQL monitor.  Commands end with ; or \g.
Your MySQL connection id is 4
Server version: 5.7.44 MySQL Community Server (GPL)

Copyright (c) 2000, 2023, Oracle and/or its affiliates.

Oracle is a registered trademark of Oracle Corporation and/or its
affiliates. Other names may be trademarks of their respective
owners.

Type 'help;' or '\h' for help. Type '\c' to clear the current input statement.

mysql> ALTER USER 'root'@'localhost' IDENTIFIED BY '修改为自己的密码';
Query OK, 0 rows affected (0.02 sec)

mysql>
创建Django项目需要的数据库,并设置访问权限,退出
- django_icwp_v3:数据库名称,修改为自己项目对应的
- root:Django项目settings中,数据库连接配置中的username
- 修改后的密码:自己刚才更改后的密码
mysql> create database django_icwp_v3 default charset=utf8;
mysql> grant all privileges on django_icwp_v3.* to 'root'@'%' identified by '修改后的密码';
mysql> grant all privileges on django_icwp_v3.* to 'root'@'localhost' identified by '修改后的密码';
mysql> flush privileges;
mysql> quit;
Bye
[root@localhost ~]#
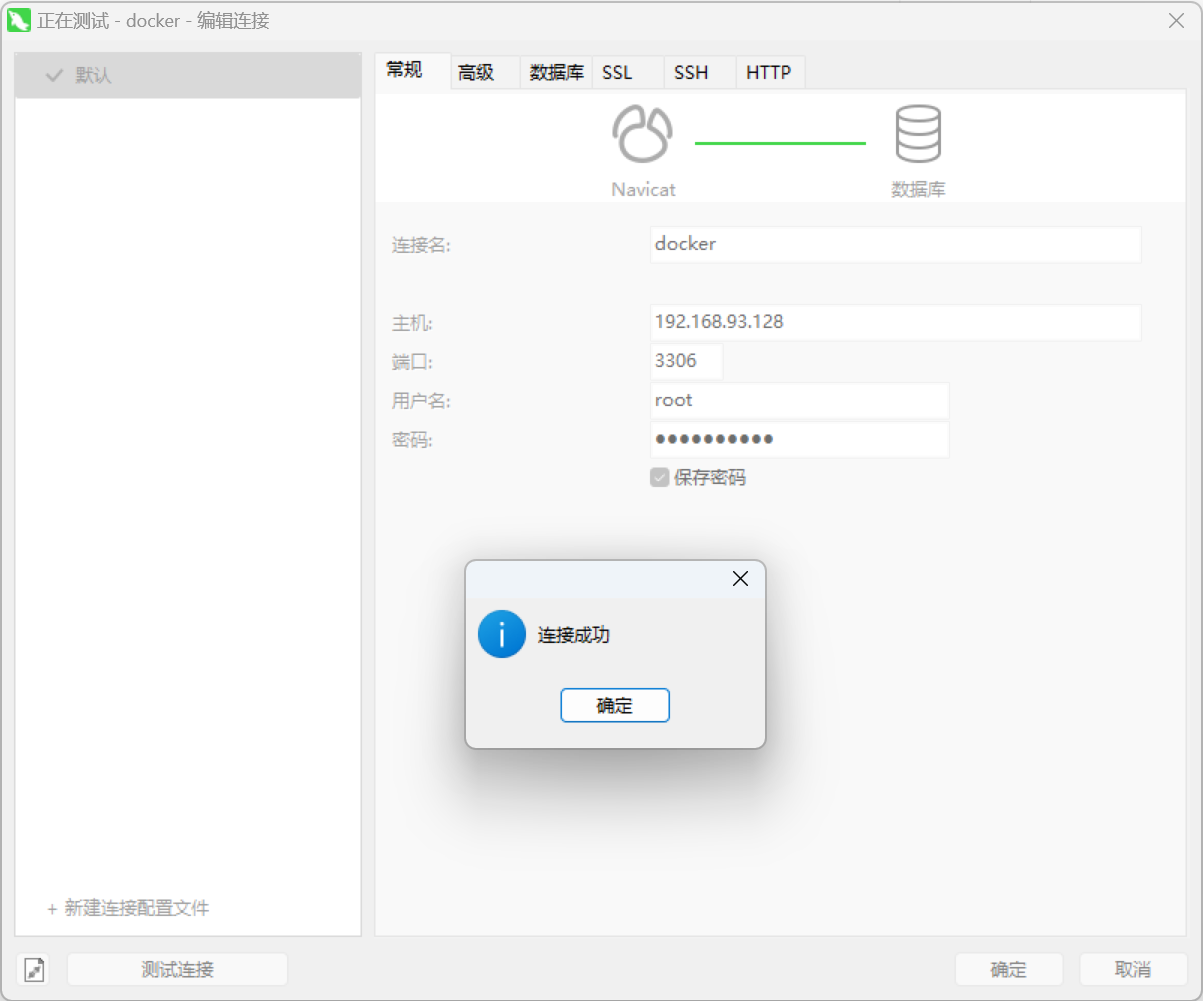
测试连接,成功
部署Django项目
环境准备
Python源码安装
安装版本:Python 3.8
安装相关依赖
[root@localhost ~]# yum install openssl-devel bzip2-devel expat-devel gdbm-devel readline-devel sqlite-devel psmisc libffi-devel zlib* libffi-devel -y
根目录下,下载安装包
[root@localhost ~]# cd ~
[root@localhost ~]# wget https://registry.npmmirror.com/-/binary/python/3.8.6/Python-3.8.6.tgz
解压缩,并进入解压后的目录
[root@localhost ~]# tar -xf Python-3.8.6.tgz
[root@localhost ~]# cd Python-3.8.6
配置编译和安装的路径,并进行编译和安装
[root@localhost ~]# ./configure --prefix=/usr/local/python38
[root@localhost ~]# make &&  make install
配置环境变量:建立软连接
[root@localhost ~]# ln -s /usr/local/python38/bin/python3 /usr/bin/python3.8
[root@localhost ~]# ln -s /usr/local/python38/bin/pip3 /usr/bin/pip3.8
云服务器各版本Python对应的命令
| python版本 | pip命令 | 解释 |
|---|---|---|
| python | pip | 2.7版本的命令 |
| python3 | pip3 | 3.6版本的命令 |
| python3.8 | pip3.8 | 3.8版本的命令 |
安装虚拟环境
virtualenv + virtualenvwrapper
更新pip
[root@localhost ~]# python3.8 -m pip install --upgrade pip
[root@localhost ~]# python3.8 -m pip install --upgrade setuptools
[root@localhost ~]# pip3.8 install pbr
安装虚拟环境
[root@localhost ~]# pip3.8 install virtualenv
[root@localhost ~]# pip3.8 install virtualenvwrapper
配置系统变量
[root@localhost ~]# ln -s /usr/local/python38/bin/virtualenv /usr/bin/virtualenv
配置虚拟环境
- 进入文件
[root@localhost ~]# vim ~/.bash_profile
- 文件末尾填入如下内容
VIRTUALENVWRAPPER_PYTHON=/usr/bin/python3.8
source /usr/local/python38/bin/virtualenvwrapper.sh
- 更新配置文件,使配置立刻生效
source ~/.bash_profile
为项目创建虚拟环境并安装相关库
创建虚拟环境:icwp
[root@localhost ~]# mkvirtualenv -p python3.8 icwp
......
(icwp) [root@localhost ~]#
切换目录到项目requirement.txt所在目录下
(icwp) [root@localhost ~]#  cd /icwp/code/Django-ICWP/Django_ICWP_v3
(icwp) [root@localhost Django_ICWP_v3]#
安装第三方库
(icwp) [root@localhost Django_ICWP_v3]# pip install -r ./requirements.txt
数据库迁移
执行步骤
保持上述目录、python环境不变
(icwp) [root@localhost Django_ICWP_v3]# python manage.py makemigrations
(icwp) [root@localhost Django_ICWP_v3]# python manage.py migrate
若有报错!!!
若提示报错:版本不匹配
......
  File "/root/.virtualenvs/icwp/lib/python3.8/site-packages/django/utils/asyncio.py", line 26, in inner
    return func(*args, **kwargs)
  File "/root/.virtualenvs/icwp/lib/python3.8/site-packages/django/db/backends/base/base.py", line 272, in connect
    self.init_connection_state()
  File "/root/.virtualenvs/icwp/lib/python3.8/site-packages/django/db/backends/mysql/base.py", line 257, in init_connection_state
    super().init_connection_state()
  File "/root/.virtualenvs/icwp/lib/python3.8/site-packages/django/db/backends/base/base.py", line 239, in init_connection_state
    self.check_database_version_supported()
  File "/root/.virtualenvs/icwp/lib/python3.8/site-packages/django/db/backends/base/base.py", line 214, in check_database_version_supported
    raise NotSupportedError(
django.db.utils.NotSupportedError: MySQL 8 or later is required (found 5.7.44).
解决方法1:重新安装mysql
解决方法2:Django源码中,禁止掉该检查代码
# 找到django的安装目录
[root@localhost Django_ICWP_v3]# workon icwp
(icwp) [root@localhost Django_ICWP_v3]# python
Python 3.8.6 (default, Jan 11 2024, 09:43:42)
[GCC 4.8.5 20150623 (Red Hat 4.8.5-44)] on linux
Type "help", "copyright", "credits" or "license" for more information.
>>> import django
>>> django
<module 'django' from '/root/.virtualenvs/icwp/lib/python3.8/site-packages/django/__init__.py'>
>>>

# 找寻文件:/root/.virtualenvs/icwp/lib/python3.8/site-packages/django/db/backends/base/base.py
# 注释掉:self.check_database_version_supported()这一行代码

运行项目并测试访问
执行步骤
执行项目
(icwp) [root@localhost Django_ICWP_v3]# python manage.py runserver 0.0.0.0:8000
复制当前远程连接窗口,然后在新的窗口进行访问测试
 [root@localhost ~]# curl 192.168.93.128:8000
{"states": 0, "message": "INFO", "warning": "", "data": "请先完成用户登录,再访问其他页面"}  # 证明虚拟机访问正常
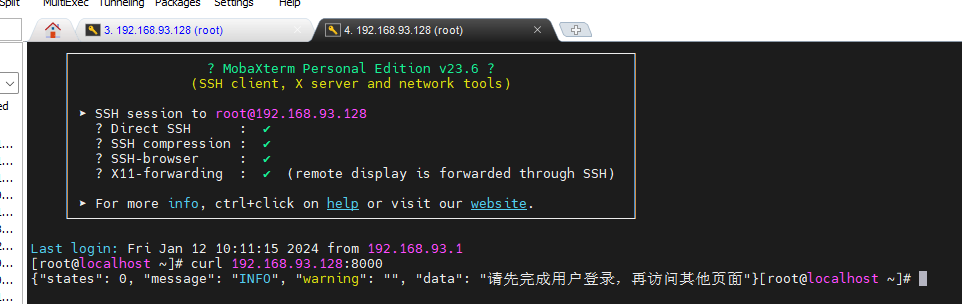
# 本机浏览器访问:192.168.93.128:8000

正常
上述方式是阻塞式运行,可以以后台运行的方式执行
(icwp) [root@localhost Django_ICWP_v3]# nohup python3 manage.py runserver 0.0.0.0:8000 &
[1] 31183
(icwp) [root@localhost Django_ICWP_v3]# nohup: ignoring input and appending output to ‘nohup.out’
关闭Django项目的运行
# 查找有关进程
ps -ef | grep manage.py

# 根据进程ID,删除:kill -9 进程ID
若有报错!!!
若无法访问,无外乎如下情况:
- 虚拟机端口没有开放
- Django项目settings.py仅允许本地访问了,没有放开权限
python虚拟环境退出、进入方式
(icwp) [root@localhost Django_ICWP_v3]# deactivate
[root@localhost Django_ICWP_v3]# workon icwp
(icwp) [root@localhost Django_ICWP_v3]#
uwsgi_694">通过uwsgi方式启动项目
uwsgi_696">安装uwsgi
项目虚拟环境中安装
[root@localhost ~]# workon icwp
(icwp) [root@localhost ~]# pip3 install uwsgi
默认环境安装与否暂时不管
# 在默认环境下安装uwsgi
pip3 install uwsgi

# 配置环境变量
ln -s /usr/local/python38/bin/uwsgi /usr/bin/uwsgi
uwsgiini_719">配置方式1:配置uwsgi.ini启动项目
进入项目目录:manage.py所在的位置
(icwp) [root@localhost ~]# cd /icwp/code/Django-ICWP/Django_ICWP_v3/
创建配置文件uwsgi.ini
(icwp) [root@localhost Django_ICWP_v3]# vim ./uwsgi.ini
写入如下内容
- 不要留注释,有可能会导致错误
[uwsgi]
socket=127.0.0.1:9999
chdir=/icwp/code/Django-ICWP/Django_ICWP_v3/
static-map=/static/=/icwp/code/Django-ICWP/Django_ICWP_v3/static
module=Django_ICWP_v3.wsgi
uid=root
gid=root
master=true
pidfile=uwsgi.pid
processes=8
threads=2
vacuum=true
daemonize=./icwp.log
thunder-lock=true
enable-threads=true
- 各配置解释
| key | 意义 |
|---|---|
| socket | 与nginx交互时,设置socket传输方式的地址+端口;自定义,后续要与nginx中的配置一致 |
| chdir | 项目目录:manage.py所在的目录 |
| static-map=/static/ | 静态资源所在位置:项目目录/static |
| module | 项目名.wsgi(即wsgi.py所在的文件夹的名字) |
| uid | root账户管理进程 |
| gid | |
| master | wsgi服务器的角色 |
| pidfile | 存放uwsgi进程pid的文件 |
| processes | 进程数 |
| threads | 每个进程对应的线程数 |
| vacuum | 当服务器退出的时候自动删除unix socket文件和pid文件 |
| daemonize | 进程后台运行时,日志所打印的位置 |
| thunder-lock | |
| enable-threads |
uwsgi启动项目
!!!!必须在虚拟环境下启动项目,或者说必须在拥有项目所需第三方库的环境+uwsgi环境下启动项目
!!!!若有任何的启动问题,查看日志即可,上述忠告,就是运行启动命令后无法访问,通过查阅日志解决的!!!
- 启动命令
--ini用于指定启动文件--http用于指定项目运行后,访问的地址,该参数可以放在.ini文件中配置
(icwp) [root@localhost Django_ICWP_v3]# uwsgi --http :8000 --ini uwsgi.ini
[uWSGI] getting INI configuration from uwsgi.ini
[uwsgi-static] added mapping for /static/ => /icwp/code/Django-ICWP/Django_ICWP_v3/static
- 查看uwsgi状态
(icwp) [root@localhost Django_ICWP_v3]# ps aux |grep uwsgi
root       7495  1.7  1.0 435512 41576 ?        Sl   16:53   0:00 uwsgi --http :8000 --ini uwsgi.ini
root       7499  0.0  0.9 435512 36852 ?        Sl   16:53   0:00 uwsgi --http :8000 --ini uwsgi.ini
root       7500  0.0  0.9 435512 36856 ?        Sl   16:53   0:00 uwsgi --http :8000 --ini uwsgi.ini
root       7503  0.0  0.9 435512 36856 ?        Sl   16:53   0:00 uwsgi --http :8000 --ini uwsgi.ini
root       7505  0.0  0.9 435512 36856 ?        Sl   16:53   0:00 uwsgi --http :8000 --ini uwsgi.ini
root       7506  0.0  0.9 435512 36856 ?        Sl   16:53   0:00 uwsgi --http :8000 --ini uwsgi.ini
root       7508  0.0  0.9 435512 36856 ?        Sl   16:53   0:00 uwsgi --http :8000 --ini uwsgi.ini
root       7511  0.0  0.9 435512 36856 ?        Sl   16:53   0:00 uwsgi --http :8000 --ini uwsgi.ini
root       7513  0.0  0.9 435512 36856 ?        Sl   16:53   0:00 uwsgi --http :8000 --ini uwsgi.ini
root       7515  0.0  0.9 435512 36216 ?        S    16:53   0:00 uwsgi --http :8000 --ini uwsgi.ini
root       7522  0.0  0.0 112812   972 pts/0    S+   16:54   0:00 grep --color=auto uwsgi
- 测试连接是否成功:虚拟机
(icwp) [root@localhost Django_ICWP_v3]# curl 192.168.93.128:8000
{"states": 0, "message": "INFO", "warning": "", "data": "请先完成用户登录,再访问其他页面"}
- 测试连接是否成功:本机
浏览器输入:192.168.93.128:8000

有响应:{"states": 0, "message": "INFO", "warning": "", "data": "请先完成用户登录,再访问其他页面"}

响应是项目给出的,不同的项目响应不同
关闭uwsgi
看下一节
uwsgixml_836">配置方式2:配置uwsgi.xml启动项目
后边再说
uwsgi_844">关闭uwsgi
查看uwsgi状态
(icwp) [root@localhost Django_ICWP_v3]# ps aux |grep uwsgi
关闭uwsgi:根据pid关闭
- 命令1:关闭
- 命令2:查看状态,没了
- 命令3:访问项目,失败
(icwp) [root@localhost Django_ICWP_v3]# uwsgi --stop uwsgi.pid
(icwp) [root@localhost Django_ICWP_v3]# ps aux |grep uwsgi
root       7677  0.0  0.0 112812   972 pts/0    S+   16:59   0:00 grep --color=auto uwsgi
(icwp) [root@localhost Django_ICWP_v3]# curl 192.168.93.128:9000
curl: (7) Failed connect to 192.168.93.128:9000; Connection refused
关闭uwsgi:强制关闭
(icwp) [root@localhost Django_ICWP_v3]# killall -s INT uwsgi
- 简单的
kill -9 进程号,不会停止uwsgi,只会导致重启
部署Vue项目
nginx_882">安装nginx(源码安装)
安装
进入自建目录
[root@localhost ~]# mkdir /usr/local/nginx/
[root@localhost nginx]# cd /usr/local/nginx/
下载压缩包
[root@localhost nginx]# wget http://nginx.org/download/nginx-1.13.7.tar.gz
解压缩并进入解压缩后的目录
[root@localhost nginx]# tar -xf nginx-1.13.7.tar.gz
[root@localhost nginx]# cd nginx-1.13.7
指定安装路径,编译并安装
[root@localhost nginx-1.13.7]# ./configure --prefix=/usr/local/nginx
[root@localhost nginx-1.13.7]# make && make install
运行测试
启动
[root@localhost nginx-1.13.7]# nginx
查看状态
[root@localhost nginx-1.13.7]# netstat -nlp | grep nginx
测试连接
- 虚拟机内部
[root@localhost nginx-1.13.7]# curl 192.168.93.128:80
<!DOCTYPE html>
<html>
<head>
<title>Welcome to nginx!</title>
<style>
    body {
        width: 35em;
        margin: 0 auto;
        font-family: Tahoma, Verdana, Arial, sans-serif;
    }
</style>
</head>
<body>
<h1>Welcome to nginx!</h1>
<p>If you see this page, the nginx web server is successfully installed and
working. Further configuration is required.</p>

<p>For online documentation and support please refer to
<a href="http://nginx.org/">nginx.org</a>.<br/>
Commercial support is available at
<a href="http://nginx.com/">nginx.com</a>.</p>

<p><em>Thank you for using nginx.</em></p>
</body>
</html>
- 本机浏览器
浏览器输入内容,成功访问默认内容
关闭nginx
nginx -s stop
uwsginginxconf_976">结合uwsgi编写nginx.conf配置文件
进入nginx.conf所在目录
[root@localhost ~]# cd /usr/local/nginx/conf
备份原配置文件
cp nginx.conf nginx.conf.bak
在原配置文件中,新增如下内容
[root@localhost nginx-1.13.7]# vim nginx.conf
server{
	listen 9000;
	server_name 192.168.93.128
	access_log /var/log/nginx/access.log main;
	charset utf-8;
	gzip on;
	gzip_types text/plain application/x-javascript text/css text/javascript application/x-httpd-php application/json text/json text/json image/jpeg image/gif image/png application/octet-stream;
	error_page 500 502 503 504  /50x.html;
	location /{
		include uwsgi_params;
		uwsgi_connect_timeout 30;
		uwsgi_pass 0.0.0.0:9999;
	}
}
即:访问虚拟机的9000端口,会将请求转发给uwsgi,由uwsgi提交给后端Django项目
部署Vue
编译Vue项目
1、修改前端向后端发送ajax请求的地址:从向本地发送,改为向服务器发送
baseURL = 192.168.93.128:9000
!!注意
前端工程中端口设置为9000,即前端向9000端口发送ajax请求,希望获取服务器响应,则9000端口需要与后端匹配。
即,在结合uwsgi配置nginx.conf文件的时候,listen设置为9000。即发到9000端口的请求,由uwsgi发送给后端
2、编译Vue项目
npm run build
3、上传文件到服务器并进行有关处理
- 自建目录,存放vue的静态资源
[root@localhost ~]# mkdir /icwp/code/Vue-ICWP
[root@localhost ~]# cd /icwp/code/Vue-ICWP
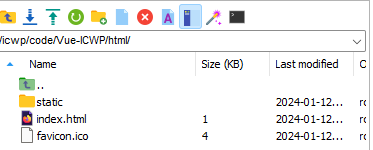
- 将dist文件夹放入上述目录,并将dist改名为html
[root@localhost ~]# mv dist html
nginxVue_1060">配置nginx对Vue工程的代理
进入nginx.conf所在目录
[root@localhost ~]# cd /usr/local/nginx/conf
在原配置文件中,新增如下内容
[root@localhost nginx-1.13.7]# vim nginx.conf
server {
    listen 8081;
    server_name  192.168.93.128;
    charset utf-8;
    location / {
        root /icwp/code/Vue-ICWP/html/;
        index index.html;
        try_files $uri $uri/ /index.html;
    }
}
即:访问虚拟机的8081端口,会默认访问/icwp/code/Vue-ICWP/html/index.html,通过后缀的变化,访问该目录下的其他资源
最后:后端静态资源处理
静态文件收集
编辑Django工程的settings.py文件,对如下变量进行设置
STATIC_URL = '/static/'
STATIC_ROOT = os.path.join(BASE_DIR, 'static')
静态文件收集
- 建立静态文件放置的目录
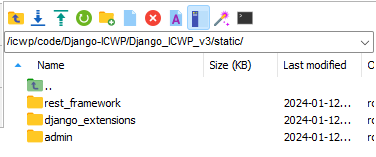
[root@localhost ~]# mkdir /icwp/code/Django-ICWP/Django_ICWP_v3/static
- 静态文件收集
[root@localhost ~]# cd /icwp/code/Django-ICWP/Django_ICWP_v3/
[root@localhost Django_ICWP_v3]# python manage.py collectstatic
nginx_1125">修改nginx:增加静态资源映射
打开nginx配置文件
[root@localhost ~]# vim /usr/local/nginx/conf/nginx.conf
新增如下内容
location /static {
    alias /icwp/code/Django-ICWP/Django_ICWP_v3/static;
}
放置的位置:uwsgi有关配置的server里面
最终,uwsgi有关的完整配置如下:
server{
    	listen 9000;
    	server_name 192.168.93.128
    	access_log /var/log/nginx/access.log main;
    	charset utf-8;
    	gzip on;
    	gzip_types text/plain application/x-javascript text/css text/javascript application/x-httpd-php application/json text/json text/json image/jpeg image/gif image/png application/octet-stream;
    	error_page 500 502 503 504  /50x.html;
    	location /{
    		include uwsgi_params;
    		uwsgi_connect_timeout 30;
    		uwsgi_pass 0.0.0.0:9999;
    	}
    	location /static/{
    		alias /icwp/code/Django-ICWP/Django_ICWP_v3/static;
    	}
}
重启nginx
nginx -s reload
nginxVue_1173">访问nginx代理Vue工程的地址,成功!
访问8081端口
192.168.93.128:8081
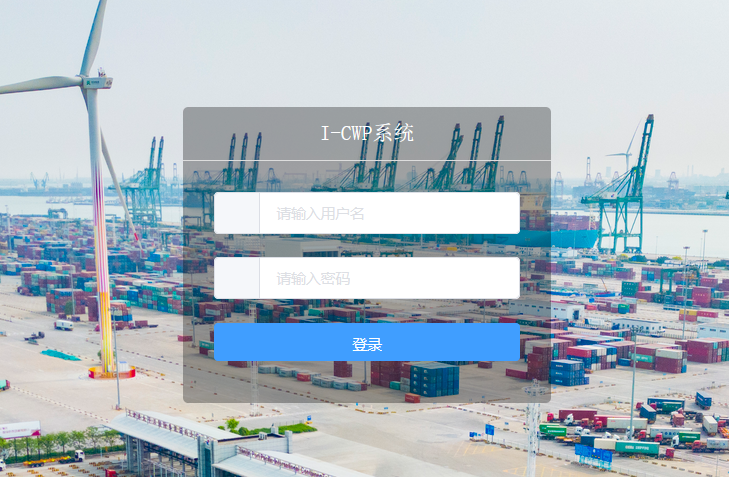
输入注册好的账号密码,点击登录
成功登录,说明交互顺利,配置成功!
总结梳理
几个配置文件的最终内容
nginxconf_1193">nginx.conf
#user  nobody;
worker_processes  1;

#error_log  logs/error.log;
#error_log  logs/error.log  notice;
#error_log  logs/error.log  info;

#pid        logs/nginx.pid;


events {
    worker_connections  1024;
}


http {
    include       mime.types;
    default_type  application/octet-stream;

    #log_format  main  '$remote_addr - $remote_user [$time_local] "$request" '
    #                  '$status $body_bytes_sent "$http_referer" '
    #                  '"$http_user_agent" "$http_x_forwarded_for"';

    #access_log  logs/access.log  main;

    sendfile        on;
    #tcp_nopush     on;

    #keepalive_timeout  0;
    keepalive_timeout  65;

    #gzip  on;

    server {
        listen       80;
        server_name  localhost;

        #charset koi8-r;

        #access_log  logs/host.access.log  main;

        location / {
            root   html;
            index  index.html index.htm;
        }

        #error_page  404              /404.html;

        # redirect server error pages to the static page /50x.html
        #
        error_page   500 502 503 504  /50x.html;
        location = /50x.html {
            root   html;
        }

        # proxy the PHP scripts to Apache listening on 127.0.0.1:80
        #
        #location ~ \.php$ {
        #    proxy_pass   http://127.0.0.1;
        #}

        # pass the PHP scripts to FastCGI server listening on 127.0.0.1:9000
        #
        #location ~ \.php$ {
        #    root           html;
        #    fastcgi_pass   127.0.0.1:9000;
        #    fastcgi_index  index.php;
        #    fastcgi_param  SCRIPT_FILENAME  /scripts$fastcgi_script_name;
        #    include        fastcgi_params;
        #}

        # deny access to .htaccess files, if Apache's document root
        # concurs with nginx's one
        #
        #location ~ /\.ht {
        #    deny  all;
        #}
    }


    # another virtual host using mix of IP-, name-, and port-based configuration
    #
    #server {
    #    listen       8000;
    #    listen       somename:8080;
    #    server_name  somename  alias  another.alias;

    #    location / {
    #        root   html;
    #        index  index.html index.htm;
    #    }
    #}


    # HTTPS server
    #
    #server {
    #    listen       443 ssl;
    #    server_name  localhost;

    #    ssl_certificate      cert.pem;
    #    ssl_certificate_key  cert.key;

    #    ssl_session_cache    shared:SSL:1m;
    #    ssl_session_timeout  5m;

    #    ssl_ciphers  HIGH:!aNULL:!MD5;
    #    ssl_prefer_server_ciphers  on;

    #    location / {
    #        root   html;
    #        index  index.html index.htm;
    #    }
    #}
    server {
        listen 8081;
        server_name  192.168.93.128;
        charset utf-8;
        location / {
            root /icwp/code/Vue-ICWP/html/;
            index index.html;
            try_files $uri $uri/ /index.html;
        }
    }
    server{
    	listen 9000;
    	server_name 192.168.93.128
    	access_log /var/log/nginx/access.log main;
    	charset utf-8;
    	gzip on;
    	gzip_types text/plain application/x-javascript text/css text/javascript application/x-httpd-php application/json text/json text/json image/jpeg image/gif image/png application/octet-stream;
    	error_page 500 502 503 504  /50x.html;
    	location /{
    		include uwsgi_params;
    		uwsgi_connect_timeout 30;
    		uwsgi_pass 0.0.0.0:9999;
    	}
    	location /static/{
    		alias /icwp/code/Django-ICWP/Django_ICWP_v3/static;
    	}
    }
}
uwsgiini_1344">uwsgi.ini
位置:
[uwsgi]
socket=127.0.0.1:9999
chdir=/icwp/code/Django-ICWP/Django_ICWP_v3/
static-map=/static/=/icwp/code/Django-ICWP/Django_ICWP_v3/static
module=Django_ICWP_v3.wsgi
uid=root
gid=root
master=true
pidfile=uwsgi.pid
processes=8
threads=2
vacuum=true
daemonize=./icwp.log
thunder-lock=true
enable-threads=true
Vue静态资源
位置:/icwp/code/Vue-ICWP/html/
Django静态资源
位置:/icwp/code/Django-ICWP/Django_ICWP_v3/static
通信流程梳理
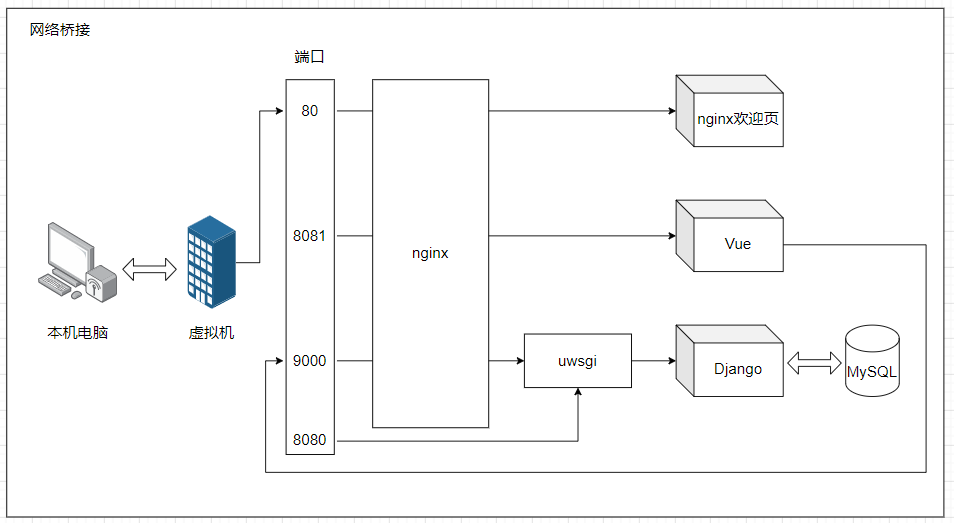
本机电脑和虚拟机之间,通过网络桥接,可以实现通信。这里虚拟机的地址为:192.168.93.128
当在本机电脑上,访问192.168.93.128:80端口,确认是访问静态资源,通过nginx的代理,指向nginx的静态欢迎页面
当在本机电脑上,访问192.168.93.128:8081端口,确认是访问静态资源,通过nginx的代理,指向Vue项目的静态页面
在Vue的静态资源里面,发送Ajax请求:
当在本机电脑上,访问192.168.93.128:8080端口