spring入门3.0
- 三 小黑子的springAOP开发
- 1. AOP简介
- 1.1 AOP的概念
- 1.2 AOP思想的实现方案
- 1.3 模拟AOP思想实现的基础代码
- 1.4 AOP的相关概念
- 2. 基于xml配置的AOP
- 2.1 XML方式AOP快速入门
- 2.2 XML方式AOP配置详解
- 2.3 xml方式AOP的原理解析
- 2.3.1 AOP底层两种生成Proxy的方式
- 3. 基于注解配置的AOP
- 3.1、注解方式AOP基本使用
- 3.2 注解方式AOP配置详解
- 3.3 注解方式AOP原理解析
springAOP_1">三 小黑子的springAOP开发
1. AOP简介
1.1 AOP的概念
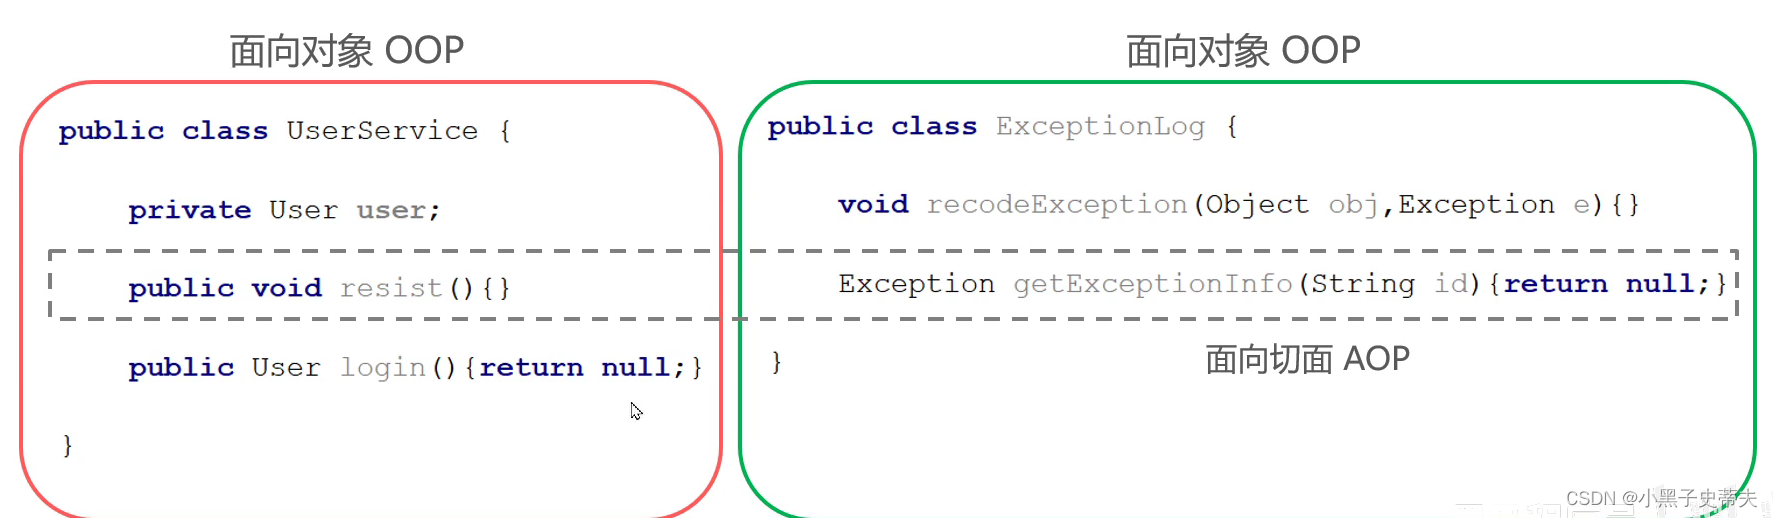
AOP,Aspect Oriented Programming,面向切面编程,是对面向对象编程OOP的升华。OOP是纵向对一个事物的抽象,一个对象包括静态的属性信息,包括动态的方法信息等。而AOP是横向的对不同事物的抽象,属性与属性、方法与方法、对象与对象都可以组成一个切面,而用这种思维去设计编程的方式叫做面向切面编程
再打比方地说面向切面就是:
有一台手机,用面向对象的思想去设计这个手机。手机内部有一些对应的属性,屏幕、硬件什么的都是静态属性,但是也有动态行为:打电话和照相等,把其封装成相应的方法。要打电话的方法,就能执行其功能。这个就是对各个事务进行一个纵向的抽象:这个事务包含哪些动态的行为、哪些静态的属性,都可以用方法和属性去表达。可是,在众多对象当中,可能要抽取每个对象当中的一部分功能,再临时组装成一个对象进行执行。
1.2 AOP思想的实现方案
代理技术
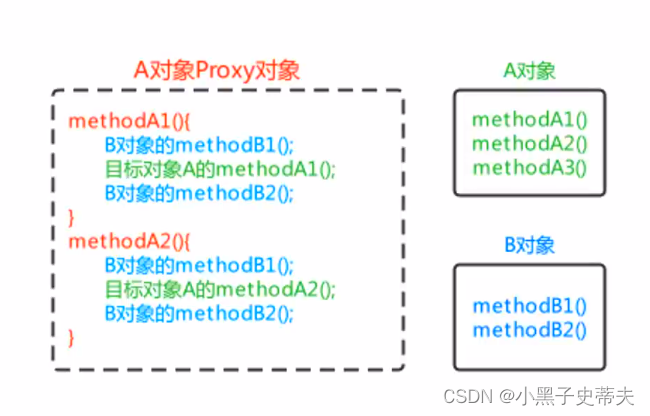
动态代理技术,在运行期间,对目标对象的方法进行增强,代理对象同名方法内可以执行原有逻辑的同时嵌入执行其他增强逻辑或其他对象的方法
1.3 模拟AOP思想实现的基础代码
其实在之前学习BeanPostProcessor时,在BeanPostProcessor的after方法中使用动态代理对Bean进行了增强,实际存储到单例池singleObjects中的不是当前目标对象本身,而是当前目标对象的代理对象Proxy,这样在调用目标对象方法时,实际调用的是代理对象Proxy的同名方法,起到了目标方法前后都进行增强的功能,对该方式进行一下优化,将增强的方法提取出去到一个增强类中,且只对com.itheima.service.impl包下的任何类的任何方法进行增强
java">public interface UserService {

    void show1();
    void show2();
}
java">public class UserServiceImpl implements UserService {
    @Override
    public void show1() {
        System.out.println("show1......");
    }

    @Override
    public void show2() {
        System.out.println("show2.......");
    }
}
java">//增强类,内部提供增强方法
public class MyAdvice {
    public void beforeAdvice(){
        System.out.println("前置的增强。。。");
    }

    public void afterAdvice(){
        System.out.println("后置的增强。。。");
    }
java">ublic class MockAopBeanPostProcessor implements BeanPostProcessor, ApplicationContextAware {

    private ApplicationContext applicationContext;

    @Override
    public Object postProcessBeforeInitialization(Object bean, String beanName) throws BeansException {

        //目的:岁UserServiceImpl中show1和show2方法进行增强,怎去方法存在于MyAdvice中
        //问题1:筛选service.impl包下的所有类的所有方法都可以进行增强,解决方案:if-else
        //问题2:MyAdvice怎么获取到?解决方案:从spring容器中获取MyAdvice
        if(bean.getClass().getPackage().getName().equals("com.itheima.service.impl")){
            //生成当前Bean的Proxy对象
            Object beanProxy = Proxy.newProxyInstance(
                    bean.getClass().getClassLoader(),
                    bean.getClass().getInterfaces(),
                    (Object proxy, Method method, Object[] args) -> {
                        //执行增强对象的before方法
                        MyAdvice myAdvice = applicationContext.getBean(MyAdvice.class);
                        myAdvice.beforeAdvice();
                        //执行目标对象的目标方法
                        Object result = method.invoke(bean, args);
                        //执行增强对象的after方法
                        myAdvice.afterAdvice();
                        return result;
                    }
            );
            return beanProxy;

        }

        return bean;
    }

    @Override
    public void setApplicationContext(ApplicationContext applicationContext) throws BeansException {
        this.applicationContext = applicationContext;
    }
}
    <bean id="userService" class="com.itheima.service.impl.UserServiceImpl"></bean>
    <bean id="myadvice" class="com.itheima.advice.MyAdvice"></bean>

    <bean class="com.itheima.MockAopBeanPostProcessor"></bean>
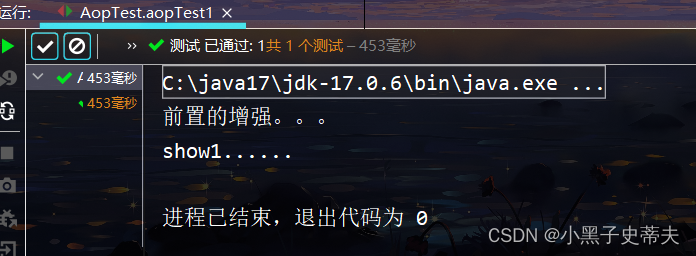
- 测试
java">    @Test
    public void aopTest1(){
        ApplicationContext app = new ClassPathXmlApplicationContext("applicationContext.xml");
        UserService userService = app.getBean(UserService.class);
        userService.show1();
    }

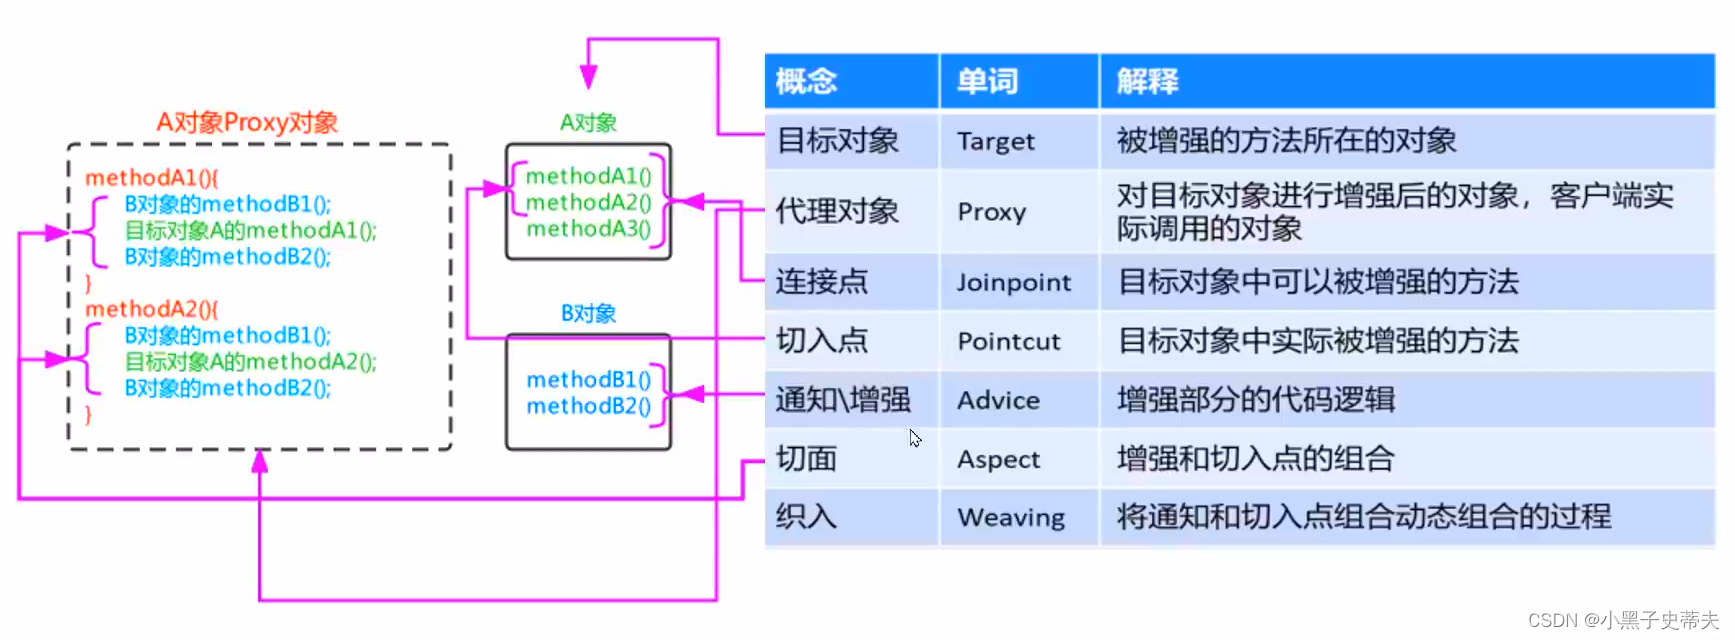
1.4 AOP的相关概念
| 概念 | 单词 | 解释 |
|---|---|---|
| 目标对象 | Target | 被增强的方法所在的对象 |
| 代理对象 | Proxy | 对目标对象进行增强后的对象,客户端实际调用的对象 |
| 连接点 | Joinpoint | 目标对象中可以被增强的方法 |
| 切入点 | Pointcut | 目标对象中实际被增强的方法 |
| 通知 \ 增强 | Advice | 增强部分的代码逻辑 |
| 切面 | Aspect | 增强和切入点的组合 |
| 织入 | Weaving | 将通知和切入点组合动态组合的过程 |
2. 基于xml配置的AOP
2.1 XML方式AOP快速入门
前面编写的AOP基础代码还是存在一些问题的,主要如下
java">        if(bean.getClass().getPackage().getName().equals("com.itheima.service.impl")){
            //生成当前Bean的Proxy对象
            Object beanProxy = Proxy.newProxyInstance(
                    bean.getClass().getClassLoader(),
                    bean.getClass().getInterfaces(),
                    (Object proxy, Method method, Object[] args) -> {
                        //执行增强对象的before方法
                        MyAdvice myAdvice = applicationContext.getBean(MyAdvice.class);
                        myAdvice.beforeAdvice();
                        //执行目标对象的目标方法
                        Object result = method.invoke(bean, args);
                        //执行增强对象的after方法
                        myAdvice.afterAdvice();
                        return result;
                    }
            );
                        return beanProxy;
缺点:
- 被增强的包名在代码写死了
- 通知对象的方法在代码中写死了
通过配置文件的方式去解决上述问题
- 配置哪些包、哪些类、哪些方法需要被增强
- 配置目标方法要被哪些通知方法所增强,在目标方法执行之前还是之后执行增强
配置方式的设计、配置文件(注解)的解析工作,Spring已经帮我们封装好了
xml方式配置AOP的步骤:
- 导入AOP相关坐标;
<dependency>
    <groupId>org.aspectj</groupId>
    <artifactId>aspectjweaver</artifactId>
    <version>1.9.6</version>
</dependency>
- 准备目标类、准备通知类,并配置给Spring管理;
<!--    配置的目标类-->
    <bean id="userService" class="com.itheima.service.impl.UserServiceImpl"></bean>
<!--    配置的通知类-->
    <bean id="myadvice" class="com.itheima.advice.MyAdvice"></bean>
-
配置切点表达式(哪些方法被增强);
配置切点表达式的时候,就要用到spring对应的一个命名空间,用到aop的标签 -
配置织入(切点被哪些通知方法增强,是前置增强还是后置增强)。
<?xml version="1.0" encoding="UTF-8"?>
<beans xmlns="http://www.springframework.org/schema/beans"
       xmlns:xsi="http://www.w3.org/2001/XMLSchema-instance"
       xmlns:aop="http://www.springframework.org/schema/aop"
       xsi:schemaLocation="
       http://www.springframework.org/schema/beans
       http://www.springframework.org/schema/beans/spring-beans.xsd
       http://www.springframework.org/schema/aop
       http://www.springframework.org/schema/aop/spring-aop.xsd
">

<!--    配置的目标类-->
    <bean id="userService" class="com.itheima.service.impl.UserServiceImpl"></bean>
<!--    配置的通知类-->
    <bean id="myadvice" class="com.itheima.advice.MyAdvice"></bean>

<!--    <bean class="com.itheima.MockAopBeanPostProcessor"></bean>-->

<!--    aop配置-->
    <aop:config>
<!--        配置切点表达式,目的是要指定哪些方法被增强-->
        <aop:pointcut id="myPointcut" expression="execution(void com.itheima.service.impl.UserServiceImpl.show1())"/>
        <!--配置织入 目的:指定哪些切点与哪些通知结合-->
        <aop:aspect ref="myadvice">
            <aop:before method="beforeAdvice" pointcut-ref="myPointcut"></aop:before>

        </aop:aspect>
    </aop:config>

</beans>
- 测试
java">@Test
    public void aopTest1(){
        ApplicationContext app = new ClassPathXmlApplicationContext("applicationContext.xml");
        UserService userService = app.getBean(UserService.class);
        userService.show1();
    }
2.2 XML方式AOP配置详解
xml配置AOP的方式还是比较简单的,下面看一下AOP详细配置的细节:
-
切点表达式的配置方式
-
可以配置多个切点
<!--配置aop--> <aop:config> <!--配置切点表达式 目的:指定哪些方法被增强--> <aop:pointcut id="mtPointcut" expression="execution(void com.itheima.service.Impl.UserServiceImpl.show1())"/> <aop:pointcut id="mtPointcut2" expression="execution(void com.itheima.service.Impl.UserServiceImpl.show2())"/> </aop:config> -
pointcut属性可以再后面直接写上要结合的切点<!--配置aop--> <aop:config> <!--配置切点表达式 目的:指定哪些方法被增强--> <aop:pointcut id="mtPointcut" expression="execution(void com.itheima.service.Impl.UserServiceImpl.show1())"/> <!--配置织入 目的:指定哪些切点与哪些通知结合--> <aop:aspect ref="myadvice"> <aop:before method="beforeAdvice" pointcut-ref="mtPointcut"></aop:before> <aop:after method="afterAdvice" pointcut="execution(void com.itheima.service.Impl.UserServiceImpl.show1())"> </aop:after> </aop:aspect> </aop:config>
-
-
切点表达式的配置语法
java">execution([访问修饰符]返回值类型 包名.类名.方法名(参数))
其中,
- 访问修饰符可以省略不写;
- 返回值类型、某一级包名、类名、方法名可以使用
*表示任意; - 包名与类名之间使用单点
.表示该包下的类,使用双点..表示该包及其子包下的类; - 参数列表可以使用两个点
..表示任意参数。
java">//表示访问修饰符为public、无返回值、在com.itheima . aop包下的TargetImpl类的无参方法show
execution(public void com.itheima.aop.TargetImpl.show())
//表述com.itheima.aop包下的TargetImpl类的任意方法
execution(* com.itheima.aop.TargetImpl.*(..))
//表示com.itheima.aop包下的任意类的任意方法
execution(* com.itheima.aop.*.*(..))
//表示com.itheima. aop包及其子包下的任意类的任意方法
execution(* com.itheima.aop..*.*(..))
//表示任意包中的任意类的任意方法
execution(* *..*.*(..) )
- 通知的类型
| 通知名称 | 配置方式 | 执行时机 |
|---|---|---|
| 前置通知 | <aop:before > | 目标方法执行之前执行 |
| 后置通知 | <aop:after-returning > | 目标方法执行之后执行,目标方法异常时,不在执行 |
| 环绕通知 | <aop:around > | 目标方法执行前后执行,目标方法异常时,环绕后方法不在执行 |
| 异常通知 | <aop:after-throwing > | 目标方法抛出异常时执行 |
| 最终通知 | <aop:after > | 不管目标方法是否有异常,最终都会执行 |
<?xml version="1.0" encoding="UTF-8"?>
<beans xmlns="http://www.springframework.org/schema/beans"
xmlns:xsi="http://www.w3.org/2001/XMLSchema-instance"
xmlns:aop="http://www.springframework.org/schema/aop"
xsi:schemaLocation="
http://www.springframework.org/schema/beans
http://www.springframework.org/schema/beans/spring-beans.xsd
http://www.springframework.org/schema/aop
http://www.springframework.org/schema/aop/spring-aop.xsd
">
<!-- 配置的目标类-->
<bean id="userService" class="com.itheima.service.impl.UserServiceImpl"></bean>
<!-- 配置的通知类-->
<bean id="myadvice" class="com.itheima.advice.MyAdvice"></bean>
<!-- <bean class="com.itheima.MockAopBeanPostProcessor"></bean>-->
<!-- aop配置-->
<aop:config>
<!-- 配置切点表达式,目的是要指定哪些方法被增强-->
<!-- <aop:pointcut id="myPointcut" expression="execution(void com.itheima.service.impl.UserServiceImpl.show1())"/>-->
<aop:pointcut id="myPointcut2" expression="execution(* com.itheima.service.impl.*.*(..))"/>
<!--配置织入 目的:指定哪些切点与哪些通知结合-->
<aop:aspect ref="myadvice">
<!-- 前置通知-->
<!-- <aop:before method="beforeAdvice" pointcut-ref="myPointcut2"></aop:before>-->
<!--<!– 后置通知–>-->
<!-- <aop:after-returning method="afterReturningAdvice" pointcut-ref="myPointcut2"></aop:after-returning>-->
<!-- 环绕通知-->
<aop:around method="around" pointcut-ref="myPointcut2"></aop:around>
<!-- 异常抛出通知-->
<aop:after-throwing method="afterThrowingAdvice" pointcut-ref="myPointcut2"></aop:after-throwing>
<!-- 最终通知-->
<aop:after method="afterAdvice" pointcut-ref="myPointcut2"></aop:after>
</aop:aspect>
</aop:config>
</beans>
通知方法再被调用时,Spring可以为其传递一些必要的参数
| 参数类型 | 作用 |
|---|---|
| JoinPoint | 连接点对象,任何通知都可使用,可以获得当前目标对象、目标方法参数等信息 |
| ProceedingJoinPoint | JoinPoint子类对象,主要是在环绕通知中执行proceed(),进而执行目标方法 |
| Throwable | 异常对象,使用在异常通知中,需要在配置文件中指出异常对象名称 |
java">public void 通知方法名称(JoinPoint joinPoint){
	//获得目标方法的参数
	system.out.println(joinPoint.getArgs()) ;
	//获得目标对象
	system.out.println(joinPoint.getTarget());
	//获得精确的切点表达式信息
	System.out.println(joinPoint.getstaticPart());
}
- Throwable对象
java">public void afterThrowing (JoinPoint joinPoint, Throwable th) {
//获得异常信息
	System.out.println("异常对象是:"+th+"异常信息是:"+th.getMessage());
}
<aop:after-throwing method="afterThrowing" pointcut-ref="myPointcut" throwing="th"/>
-
AOP配置的两种方式
- 使用
<advisor>配置切面 - 使用
<aspect>配置切面
- 使用
spring定义了一个Advice接口,实现了该接口的类都可以作为通知类出现
java">public interface Advice{
}
AOP配置的两种语法形式不同点:
语法形式不同:
- advisor是通过实现接口来确认通知的类型
- aspect是通过配置确认同的类型,更加灵活
科配置的切面数量不同:
- 一个advisor只能配置一个固定通知和一个切点表达式
- 一个aspect可以配置多个通知和多个切点表达式任意组合
使用场景不同
- 允许随意搭配情况下可以使用aspect进行配置
- 如果通知类型单一、切面单一的情况下可以使用advisor进行配置
- 在通知类型已经固定,不用人为指定通知类型时,可以使用advisor进行配置,例如后面要学习的spring事务控制的配置
2.3 xml方式AOP的原理解析
xml方式AOP的原理解析
通过xml方式配置AOP时,引入AOP的命名空间,根据讲解,要去spring-aop包下的META-INF,再去找spring.handlers文件
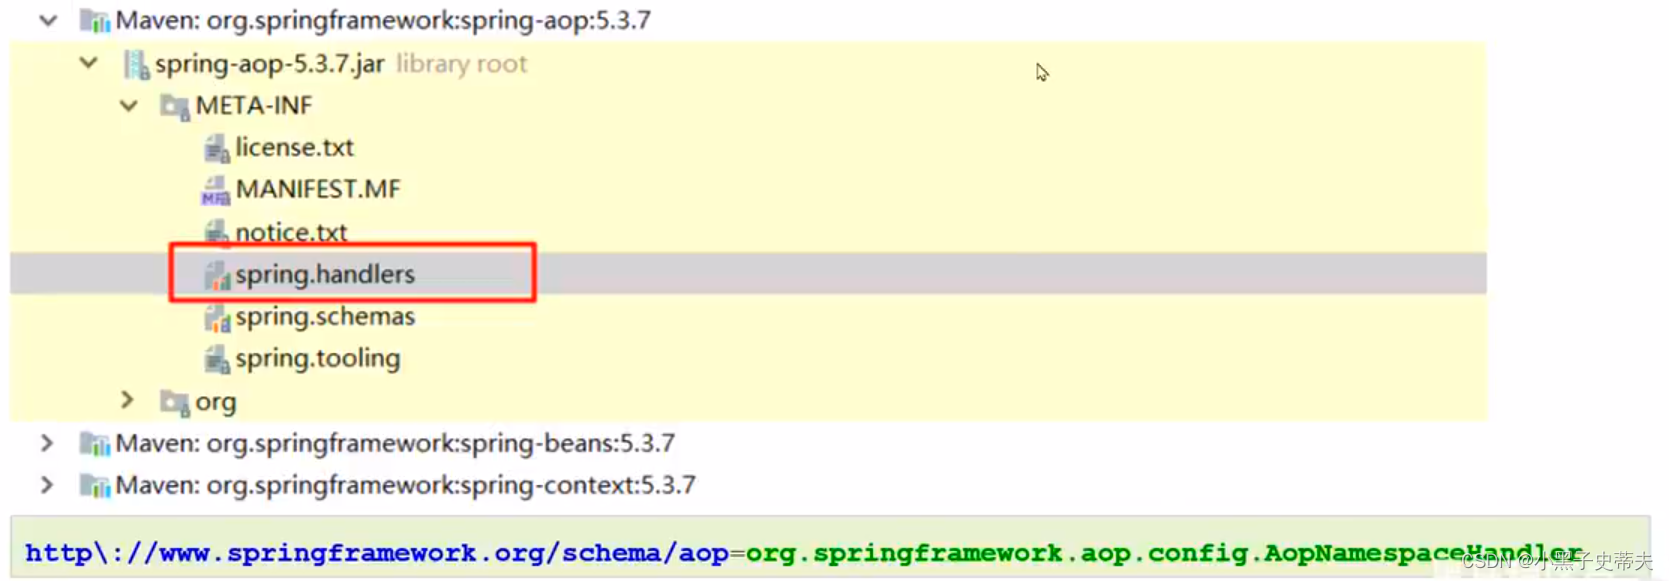
最终加载的是AopNamespaceHandler,该Handler的init方法中注册了config标签对应的解析器
java">this.registerBeanDefinitionParser("config",new ConfigBeanDefinitionParser());
以ConfigBeanDefinitionParser作为入口进行源码剖析,最终会注册一个AspectJAwareAdvisorAutoProxyCreator进入到Spring容器中,那该类作用是什么呢?看一下集成体系图
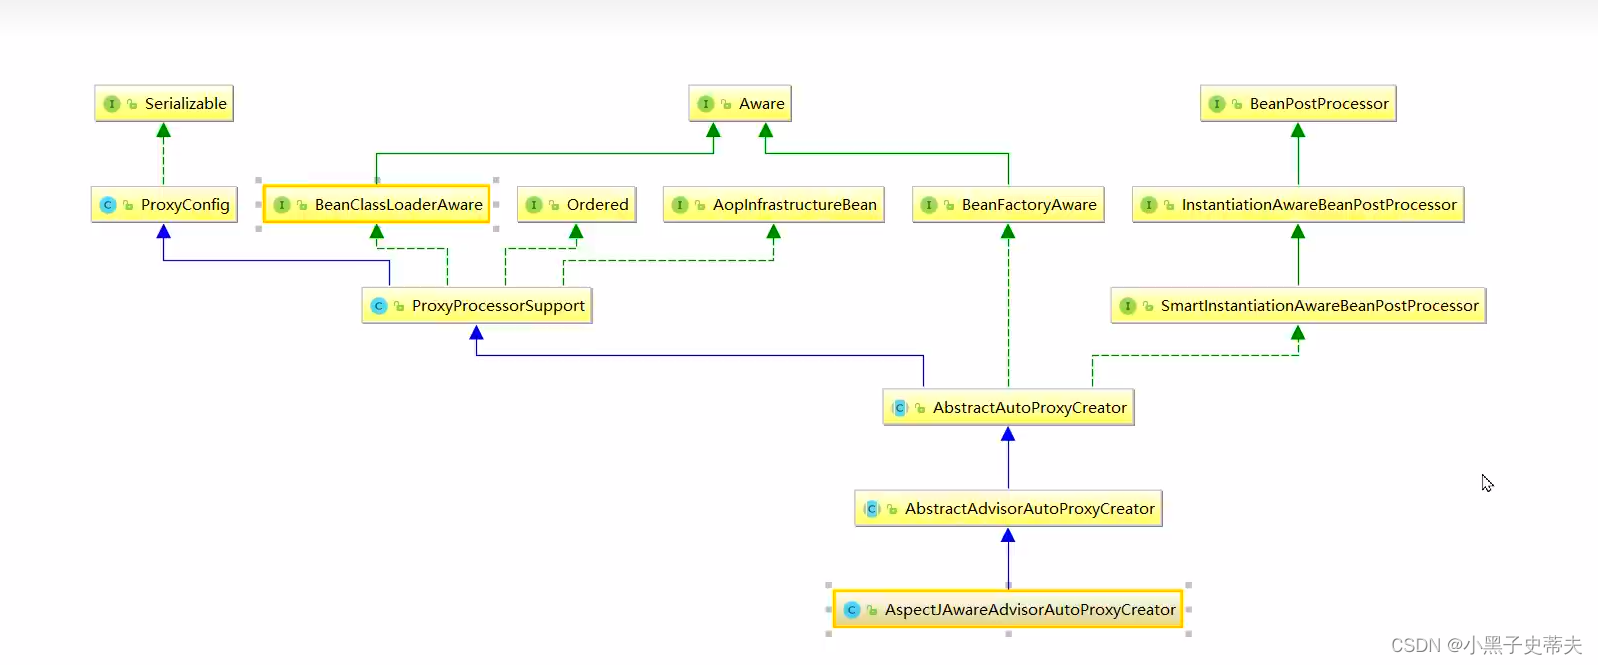
AspectJAwareAdvisorAutoProxyCreator的上上级父类AbstractAutoProxyCreator中的postProcessAfterlnitialization方法
java">//参数bean:为目标对象
public Object postProcessAfterInitialization (@Nullable Object bean,String beanName) {
if (bean != nul1){
	Object cacheKey = this.getCacheKey (bean.getClass (), beanName);
	if(this.earlyProxyReferences.remove (cacheKey)!= bean){
	//如果需要被增强,则wrapIfNecessary方法最终返回的就是一个Proxy对象
		return this.wrapIfNecessary (bean,beanName,cacheKey);
	}
}
return bean;
}
通过断点方式观察,当bean是匹配切点表达式时,this.wraplfNecessary(bean, beanName, cacheKey)返回的是一个JDKDynamicAopProxy
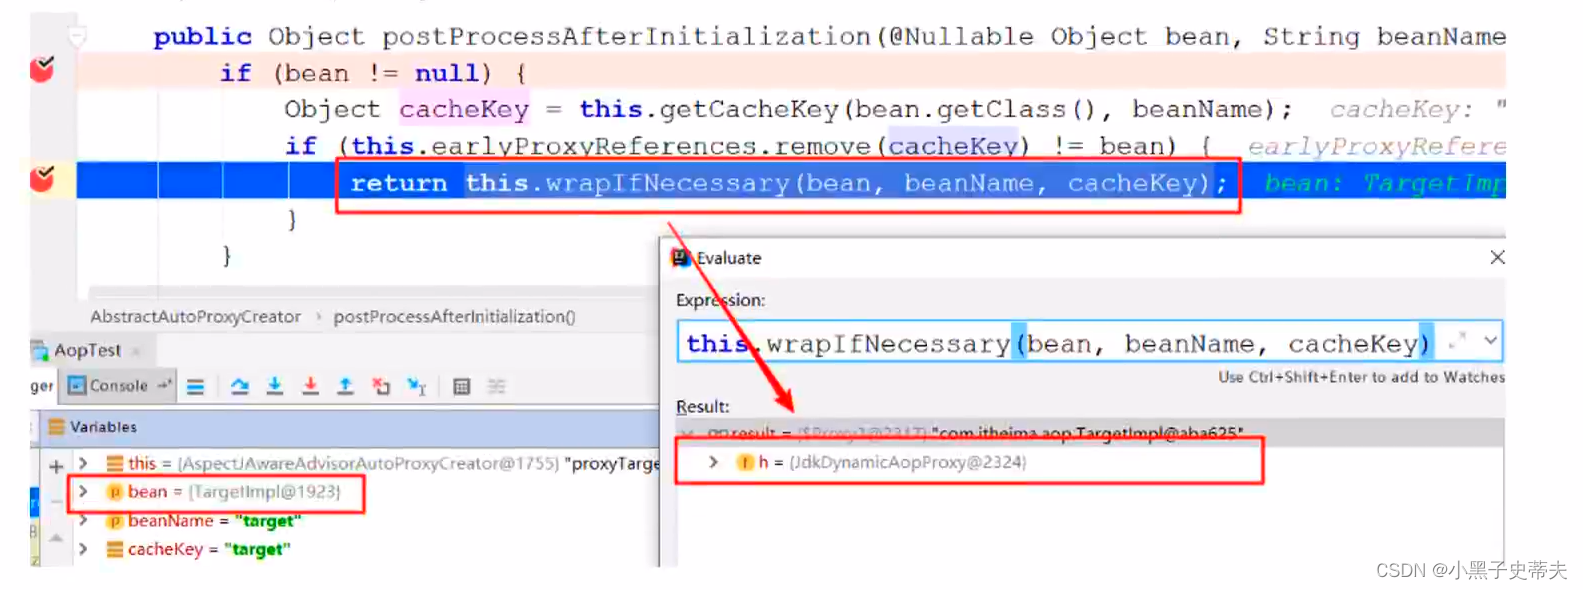
可以在深入一点,对wraplfNecessary在剖析一下,看看是不是我们熟知的通过JDK的
Proxy.newProxyInstance(ClassLoader loader, Class<?>[] interfaces,InvocationHandler h)的方式创建的代理对象呢? 经过如下一系列源码跟踪
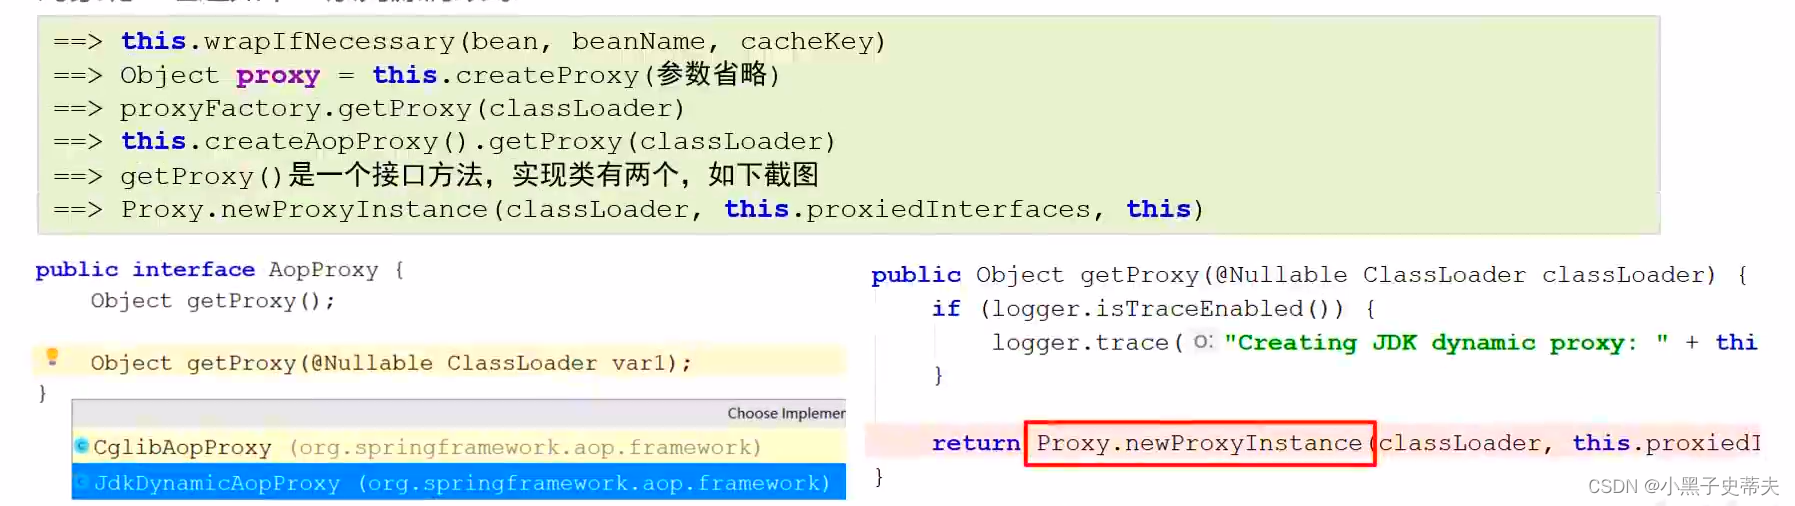
2.3.1 AOP底层两种生成Proxy的方式
动态代理的实现的选择,在调用getProxy()方法时,我们可选用的AopProxy接口有两个实现类,如上图,这两种都是动态生成代理对象的方式,一种就是基于JDK的,一种是基于Cglib的
| 代理技术 | 使用条件 | 配置方式 |
|---|---|---|
| JDK动态代理技术 | 目标类有接口,是基于接口动态生成实现类的代理对象 | 目标类有接口的情况下,默认方式 |
| Cglib | 动态代理技术 | 目标类无接口且不能使用final修饰,是基于被代理对象动态生成子对象为代理对象 目标类无接口时,默认使用该方式;目标类有接口时,手动配置<aop:config proxy-target-class="true”>强制使用Cglib方式 |
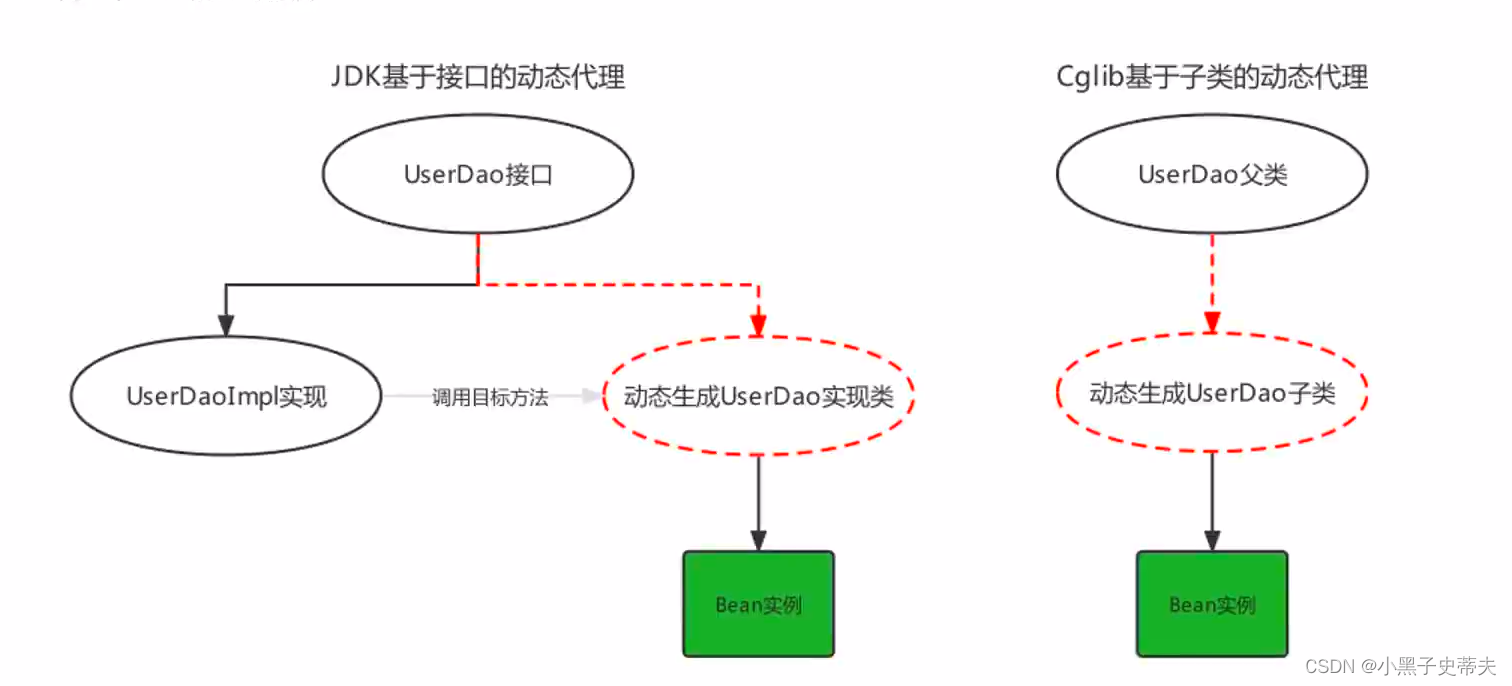
下面看Cglib基于超类的动态代理:
java">Target target = new Target() ;//目标对象
Advices advices = new Advices();//通知对象
Enhancer enhancer = new Enhancer();//增强器对象
enhancer.setSuperclass(Target.class);//增强器设置父类
//增强器设置回调
enhancer.setCallback((MethodInterceptor) (o,method,objects,methodProxy)->{
	advices.before ( ) ;
	object result = method.invoke(target,objects);
	advices.afterReturning();
	return result;
});
//创建代理对象
Target tagetProxy = (Target) enhancer.create();
//测试
String result = targetProxy.show("haohao");
3. 基于注解配置的AOP
3.1、注解方式AOP基本使用
Spring的AOP也提供了注解方式配置,使用相应的注解替代之前的xml配置,xml配置AOP时,我们主要配置了三部分:目标类被Sprina容器管理、通知类被Spring管理、通知与切点的织入(切面),如下:
<!--配置目标-->
<bean id="target" class="com.itheima.aop.TargetImpl"></bean>
<!--配置通知-->
<bean id="advices" class="com.itheima.aop.Advices"></bean>
<!--配置aop-->
<aop:config proxy-target-class="true">
	<aop:aspect ref="advices">
		<aop:around method="around" pointeut="execution(* com.itheima.aop.*.*(..))"/>
	</aop:aspect>
</aop:config>
配置aop,其实配置aop主要就是配置通知类中的哪个方法(通知类型)对应的切点表达式是什么
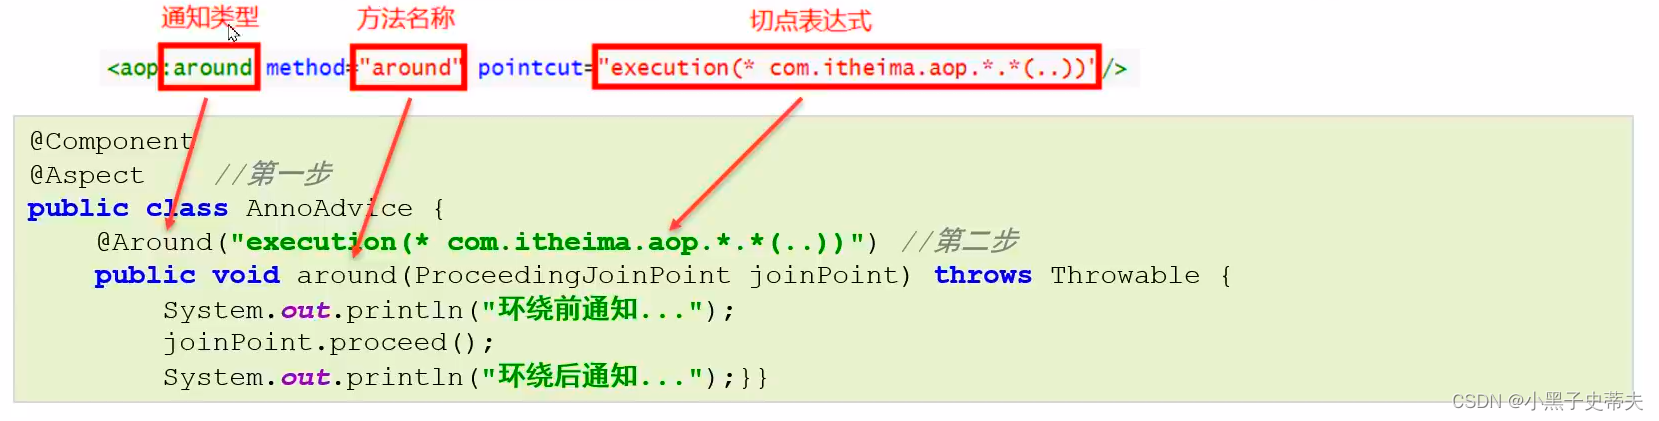
注解@Aspect、@Around需要被Spring解析,所以在Spring核心配置文件中需要配置aspectj的自动代理
<!--使用注解配置AOP,需要开启AOP的自动代理-->
<aop:aspectj-autoproxy>
3.2 注解方式AOP配置详解
各种注解方式通知类型
java">//前置通知
@Before("execution( *com. itheima.aop.*.*(..))")
public void before(JoinPoint joinPoint){}
//后置通知
@AfterReturning("execution(* com.itheima.aop.*.*(..))")
public void afterReturning(JoinPoint joinPoint){}
//环绕通知
@Around("execution (* com.itheima.aop.*.*(..))")
public void around(ProceedingJoinPoint joinPoint) throws Throwable{}
//异常通知
@AfterThrowing("execution(* com.itheima.aop.*.*(..))")
public void afterThrowing(JoinPoint joinPoint){}
//最终通知
@After("execution(* com.itheima.aop.*.*(..))")
public void after(JoinPoint joinPoint){}
java">//增强类,内部提供增强方法
@Component
@Aspect
public class MyAdvice {
//切点表达式的抽取
@Pointcut("execution(* com.itheima.service.impl.*.*(..))")
public void pointcut(){};
// @Before("execution(* com.itheima.service.impl.*.*(..))")
@Before("MyAdvice.pointcut()")
public void before(){
System.out.println("前置增强");
}
@AfterReturning("execution(* com.itheima.service.impl.*.*(..))")
// @AfterReturning("MyAdvice.pointcut()")
public void afterreturning(){
System.out.println("后置增强");
}
// @Around("execution(* com.itheima.service.impl.*.*(..))")
@Around("MyAdvice.pointcut()")
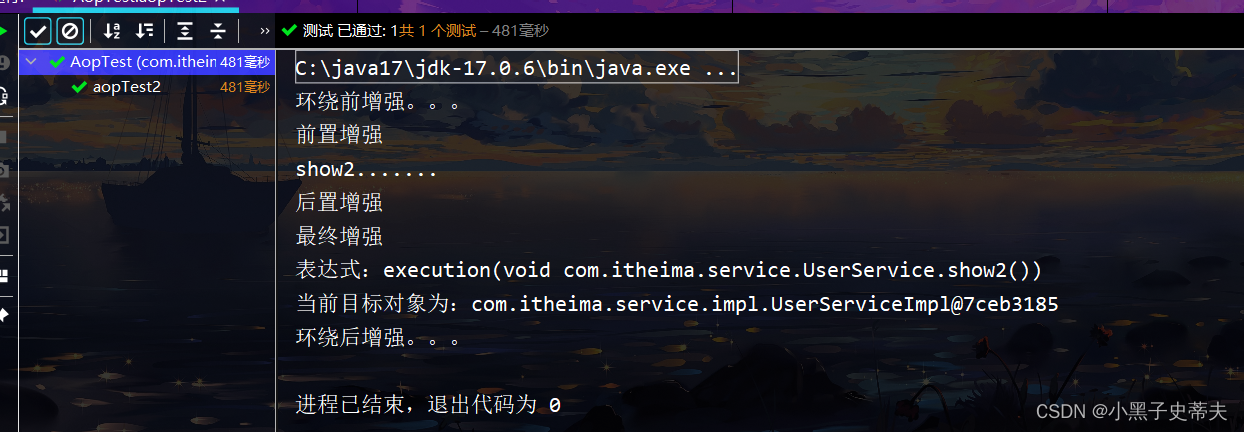
public Object around(ProceedingJoinPoint proceedingJoinPoint) throws Throwable {
System.out.println("环绕前增强。。。");
Object proceed = proceedingJoinPoint.proceed();//执行目标方法
JoinPoint.StaticPart staticPart = proceedingJoinPoint.getStaticPart();
Object target = proceedingJoinPoint.getTarget();
System.out.println("表达式:"+staticPart);
System.out.println("当前目标对象为:"+target);
System.out.println("环绕后增强。。。");
return proceed;
}
//@AfterThrowing("execution(* com.itheima.service.impl.*.*(..))")
@AfterThrowing("MyAdvice.pointcut()")
public void afterThrowAdvice(){
System.out.println("异常抛出通知。。。报异常时执行");
}
//@After("execution(* com.itheima.service.impl.*.*(..))")
@After("MyAdvice.pointcut()")
public void after(){
System.out.println("最终增强");
}
}
- 使用配置类替代进行spring的配置
java">@Configuration
@ComponentScan("com.itheima")//<context:component-scan base-package="com.itheima"/>
@EnableAspectJAutoProxy//<aop:aspectj-autoproxy/>
public class SpringConfig {
}
- 测试
java">    @Test
    public void aopTest2(){
        ApplicationContext app2 = new AnnotationConfigApplicationContext(SpringConfig.class);
        UserService userService = app2.getBean(UserService.class);
        userService.show2();
    }
java">@Service("service")
public class UserServiceImpl implements UserService {
    @Override
    public void show1() {
        System.out.println("show1......");
    }

    @Override
    public void show2() {
        System.out.println("show2.......");
//        int i = 1/0;
    }
}
3.3 注解方式AOP原理解析
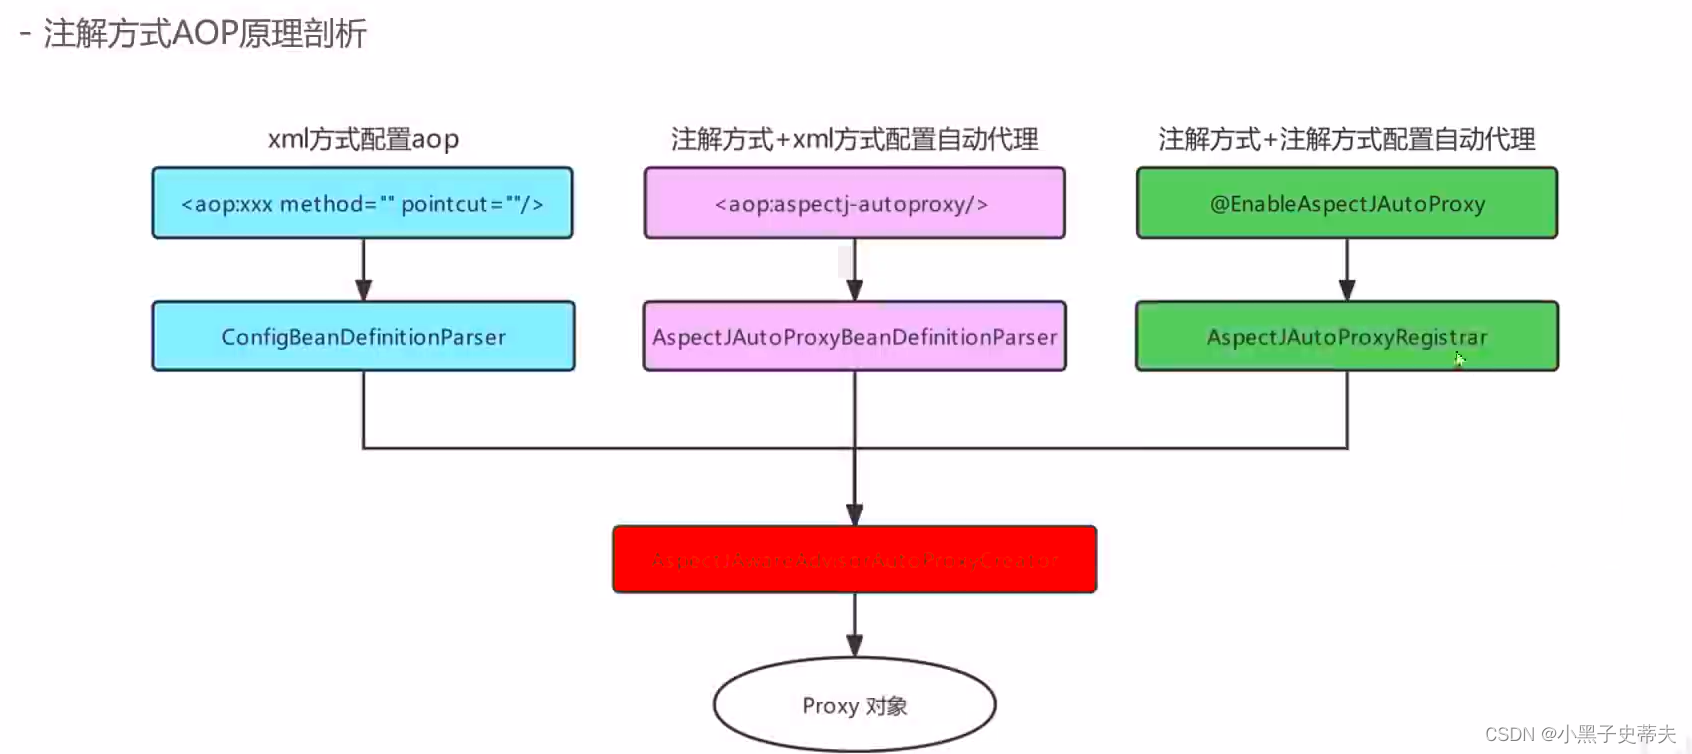
注解方式AOP原理解析
之前在使用xml配置AOP时,是借助的Spring的外部命名空间的加载方式完成的,使用注解配置后,就抛弃了<aop.config>标签,而该标签最终加载了名为AspectJAwareAdvisorAutoProxyCreator的BeanPostProcessor ,最终,在该BeanPostProcessor中完成了代理对象的生成。
同样,从aspectj-autoproxy标签的解析器入手
java">this.registerBeanDefinitionParser("aspectj-autoproxy",new AspectJAutoProxyBeanDefinitionParser());
之前在使用xml配置AOP时,是借助的Spring的外部命名空间的加载方式完成的,使用注解配置后,就抛弃了<aop:config>标签,而该标签最终加载了名为AspectJAwareAdvisorAutoProxyCreator的BeanPostProcessor,最终,在该BeanPostProcessor中完成了代理对象的生成。
<!--开启aop aspectj的自动代理-->
<aop:aspectj-autoproxy/>
同样,从aspectj-autoproxy标签解析器入手
java">this.registerBeanDefinitionParser("aspectj-autoproxy",new AspectJAutoProxyBeanDefinitionParser());
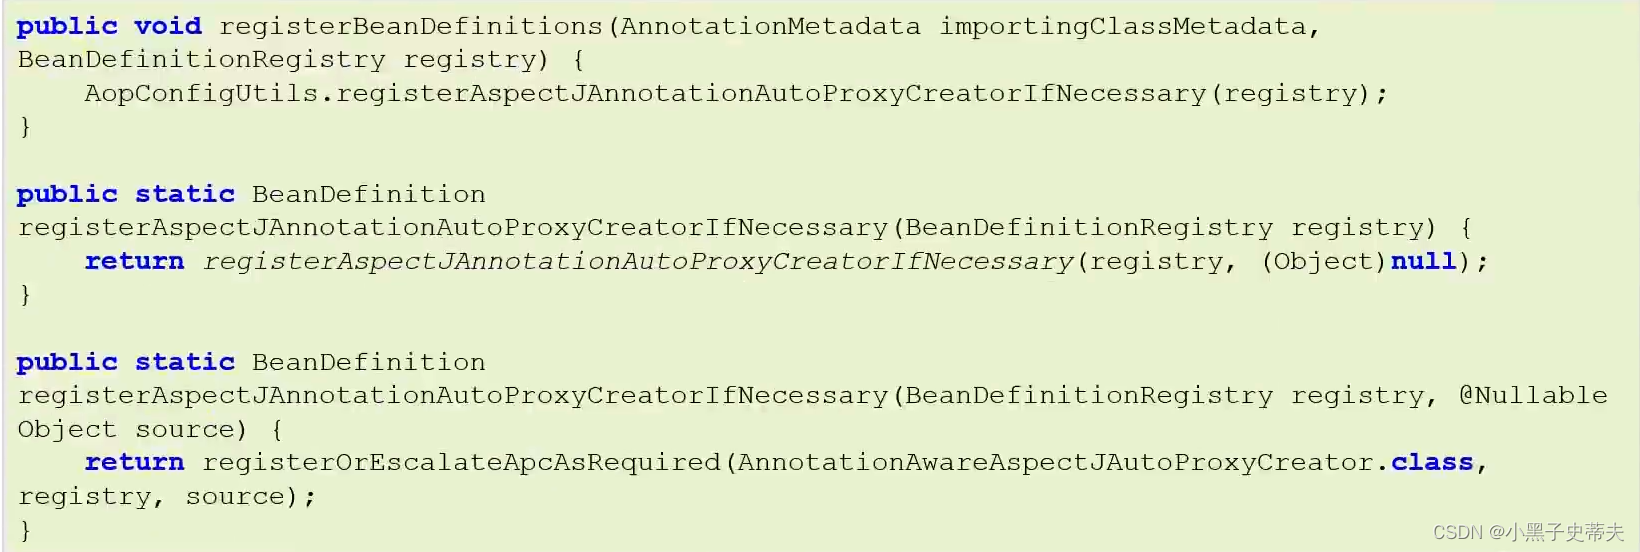
而AspectJAutoProxyBeanDefinitionParser代码内部,最终也是执行了和xml方式AOP一样的代码
java">registerOrEscalateApcAsRequired(AnnotationAwareAspectJAutoProxyCreator.class,register,source);
-
如果使用的是核心配置类的话
java"> @Configuration @ComponentScan("com.itheima.aop") @EnableAspectJAutoProxy public class ApplicationContextConfig(){ } -
查看@EnableAspectAutoProxy源码,使用的也是@Import导入相关解析类
java"> @Target({ElementType.TYPE}) @Retention(RetentionPolicy.RUNTIME) @Documented @Import({AspectJAutoProxyRegistrar.class}) public @interface EnableAspectJAutoProxy { boolean proxyTargetClass() default false; boolean exposeProxy() default false; } -
使用@Import导入的AspectJAutoProxyRegistrar源码,一路追踪下去,最终还是注册了AnnotationAwareAspectJAutoProxyCreator这个类