分片集群的搭建过程

配置 并启动confifig 节点集群
1.1节点1 confifig-17017.conf
# 数据库文件位置
dbpath=config/config1
#日志文件位置
logpath=config/logs/config1.log
# 以追加方式写入日志
logappend=true
# 是否以守护进程方式运行
fork = true
bind_ip=0.0.0.0
port = 17017
# 表示是一个配置服务器
configsvr=true
#配置服务器副本集名称
replSet=configsvr
1.2 节点2 confifig-17018.conf
dbpath=config/config2
#日志文件位置
logpath=config/logs/config.log
# 以追加方式写入日志
logappend=true
# 是否以守护进程方式运行
fork = true
bind_ip=0.0.0.0
port = 17018
# 表示是一个配置服务器
configsvr=true
#配置服务器副本集名称
replSet=configsvr
1.3 节点3 confifig-17019.conf
# 数据库文件位置
dbpath=config/config3
#日志文件位置
logpath=config/logs/config3.log
# 以追加方式写入日志
logappend=true
# 是否以守护进程方式运行
fork = true
bind_ip=0.0.0.0
port = 17019
# 表示是一个配置服务器
configsvr=true
#配置服务器副本集名称
replSet=configsvr
1.4 启动配置节点
./bin/mongod -f config/config-17017.conf
./bin/mongod -f config/config-17018.conf
./bin/mongod -f config/config-17019.conf
1.5 进入任意节点的mongo shell 并添加 配置节点集群 注意use admin
./bin/mongo --port 17017
use admin
var cfg ={"_id":"configsvr",
"members":[
{"_id":1,"host":"127.0.0.1:17017"},
{"_id":2,"host":"127.0.0.1:17018"},
{"_id":3,"host":"127.0.0.1:17019"}]
};
rs.initiate(cfg)
配置shard集群
2.1 shard1集群搭建37017到37019
dbpath=shard/shard1/shard1-37017
bind_ip=0.0.0.0
port=37017
fork=true
logpath=shard/shard1/shard1-37017.log
replSet=shard1
shardsvr=true

dbpath=shard/shard1/shard1-37018
bind_ip=0.0.0.0
port=37018
fork=true
logpath=shard/shard1/shard1-37018.log
replSet=shard1
shardsvr=true

dbpath=shard/shard1/shard1-37019
bind_ip=0.0.0.0
port=37019
fork=true
logpath=shard/shard1/shard1-37019.log
replSet=shard1
shardsvr=true

启动每个mongod 然后进入其中一个进行集群配置
var cfg ={"_id":"shard1",
"protocolVersion" : 1,
"members":[
{"_id":1,"host":"127.0.0.1:37017"},
{"_id":2,"host":"127.0.0.1:37018"},
{"_id":3,"host":"127.0.0.1:37019"}
]
};
rs.initiate(cfg)
rs.status()
2.2 shard2集群搭建47017到47019
dbpath=shard/shard2/shard2-47017
bind_ip=0.0.0.0
port=47017
fork=true
logpath=shard/shard2/logs/shard2-47017.log
replSet=shard2
shardsvr=true

dbpath=shard/shard2/shard2-47018
bind_ip=0.0.0.0
port=47018
fork=true
logpath=shard/shard2/logs/shard2-47018.log
replSet=shard2
shardsvr=true

dbpath=shard/shard2/shard2-47019
bind_ip=0.0.0.0
port=47019
fork=true
logpath=shard/shard2/logs/shard2-47019.log
replSet=shard2
shardsvr=true

启动每个mongod 然后进入其中一个进行集群配置
var cfg ={"_id":"shard2",
"protocolVersion" : 1,
"members":[
{"_id":1,"host":"127.0.0.1:47017"},
{"_id":2,"host":"127.0.0.1:47018"},
{"_id":3,"host":"127.0.0.1:47019"}
]
};
rs.initiate(cfg)
rs.status()
配置和启动 路由节点
vi route-27017.conf

添加以下内容:
port=27018
bind_ip=0.0.0.0
fork=true
logpath=route/logs/route.log
configdb=configsvr/127.0.0.1:17017,127.0.0.1:17018,127.0.0.1:17019
启动路由节点使用 mongos (注意不是mongod)
./bin/mongos -f route/route-27017.conf4. mongos(路由)中添加分片节点
进入路由mongos
mongo --port 27017
sh.status()
sh.addShard("shard1/127.0.0.1:37017,127.0.0.1:37018,127.0.0.1:37019");
sh.addShard("shard2/127.0.0.1:47017,127.0.0.1:47018,127.0.0.1:47019");
sh.shardCollection("lagou_resume.lagou_resume_datas",{"name":"hashed"})
sh.status()
5. 开启数据库和集合分片(指定片键)
继续使用mongos完成分片开启和分片大小设置
为数据库开启分片功能
sh.enableSharding("lagou_resume")
为指定集合开启分片功能
sh.shardCollection("lagou_resume.lagou_resume_datas",{"name":"hashed"})
6. 向集合中插入数据测试
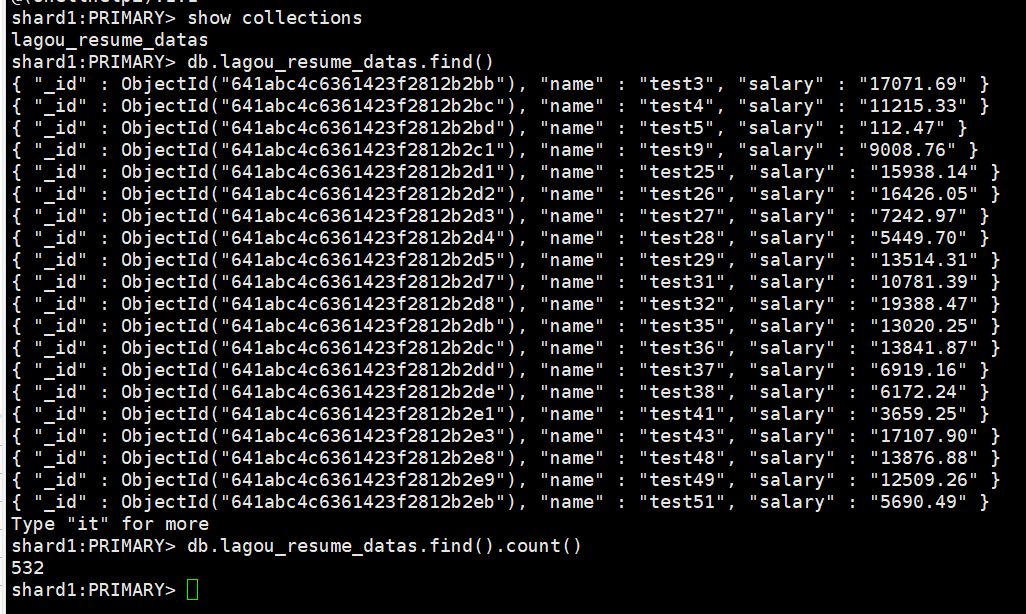
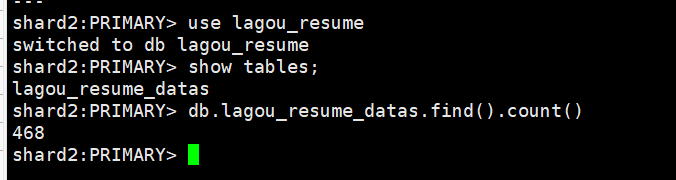
通过路由循环向集合中添加数
use lagou_resume;
for(var i=1;i<= 1000;i++){
db.lagou_resume_datas.insert({"name":"test"+i,
salary:(Math.random()*20000).toFixed(2)});
}
验证分片效果