传统目标检测实战:Sift/ORB+Match
文章目录
- 传统目标检测实战:Sift/ORB+Match
- 1. 前言
- 2. 先验知识
- 3. 项目框架
- 4. 工具函数(utils.py)
- 5. 检测待测图像(test_xxxx.py)
- 5.1 使用图像缩放金字塔(test_PG.py)
- 5.2 没有使用图像缩放金字塔(test_noPG.py)
- 5.3 效果(可能不是很好,得再调调)
- 6. 总结
1. 前言
本文的目标检测对象是裂缝,主要通过对图像提取特征点特征,然后进行特征点匹配操作,进而实现目标检测。
- 1)对模板图像提取特征点特征信息
- 2)对待测图像进行(金字塔缩放+滑动窗口),对窗口内图像提取特征点特征信息,判断是否与模板图像的特征信息匹配,进而判断该窗口内是否存在裂缝。
- 3)非极大值抑制、合并含有裂缝的窗口。
2. 先验知识
- 机器视觉特征简单介绍:HOG、SIFT、SURF、ORB、LBP、HAAR
- cv2-特征点匹配(bf、FLANN)
- cv2–特征点特征提取(Sift,Orb,Surf)
3. 项目框架
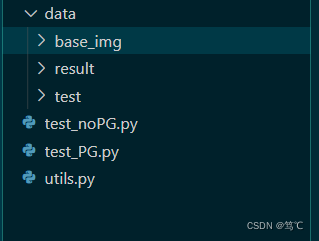
- data代表数据文件夹,下有base_img(是模板图像)、result(预测的结果)和test_img(预测时所用到的图像)。
- 其余的py文件,下面详细介绍。
4. 工具函数(utils.py)
import numpy as np
import cv2

def get_sift_op():
    return cv2.SIFT_create()

def get_orb_op():
    return cv2.ORB_create()

def sliding_window(image, window_size, step_size):
    for row in range(0, image.shape[0], step_size[0]):
        for col in range(0, image.shape[1], step_size[1]):
            yield (row, col, image[row:row + window_size[0], col:col + window_size[1]])

def overlapping_area(detection_1, detection_2, show = False):
    '''
    计算两个检测区域覆盖大小,detection:(x, y, pred_prob, width, height, area)
    '''
    # Calculate the x-y co-ordinates of the
    # rectangles
    # detection_1的 top left 和 bottom right
    x1_tl = detection_1[0]
    y1_tl = detection_1[1]
    x1_br = detection_1[0] + detection_1[3]
    y1_br = detection_1[1] + detection_1[4]

    # detection_2的 top left 和 bottom right
    x2_tl = detection_2[0]
    y2_tl = detection_2[1]
    x2_br = detection_2[0] + detection_2[3]
    y2_br = detection_2[1] + detection_2[4]
    # Calculate the overlapping Area
    # 计算重叠区域

    x_overlap = max(0, min(x1_br, x2_br) - max(x1_tl, x2_tl))
    y_overlap = max(0, min(y1_br, y2_br) - max(y1_tl, y2_tl))
    overlap_area = x_overlap * y_overlap
    area_1 = detection_1[3] * detection_1[4]
    area_2 = detection_2[3] * detection_2[4]

    # 计算重叠比例方法1
    # total_area = area_1 + area_2 - overlap_area
    # return overlap_area / float(total_area)

    # 计算重叠比例方法2
    area = area_1
    if area_1 > area_2:
        area = area_2
    return float(overlap_area / area)


def nms(detections, threshold=0.5):
    '''
    抑制策略:
    1. 最大的置信值先行
    2. 最大的面积先行
    非极大值抑制减少重叠区域,detection:(x,y,pred_prob,width,height, area)
    '''
    if len(detections) == 0:
        return []
    # Sort the detections based on confidence score
    # 根据预测值大小排序预测结果
    detections = sorted(detections, key=lambda detections: detections[2], reverse=True)
    # print((detections[0][5], detections[-1][5]))
    # Unique detections will be appended to this list
    # 非极大值抑制后的检测区域
    new_detections=[]
    # Append the first detection
    # 默认第一个区域置信度最高是正确检测区域
    new_detections.append(detections[0])
    # Remove the detection from the original list
    # 去除以检测为正确的区域
    del detections[0]
    # For each detection, calculate the overlapping area
    # and if area of overlap is less than the threshold set
    # for the detections in `new_detections`, append the
    # detection to `new_detections`.
    # In either case, remove the detection from `detections` list.
    print(len(detections))
    for index, detection in enumerate(detections):
        if len(new_detections) >= 50:
            break
        overlapping_small = True
        # 重叠区域过大,则删除该区域,同时结束检测,过小则继续检测
        for new_detection in new_detections:
            if overlapping_area(detection, new_detection) > threshold:
                overlapping_small = False
                break
        # 整个循环中重叠区域都小那么增加
        if overlapping_small:
            new_detections.append(detection)
    return new_detections
5. 检测待测图像(test_xxxx.py)
5.1 使用图像缩放金字塔(test_PG.py)
import numpy as np
import os
import glob
from skimage.transform import pyramid_gaussian
import cv2
from utils import *

# ----------------------准备工作-----------------------start
window_size = (256, 256)
step_size = (128, 128)
op = get_sift_op()

base_dataset_path = os.path.expanduser('./data/base_img')
base_dataset_pos_lists = glob.glob(os.path.join(base_dataset_path, '*.jpg'))
kps = []
des = []
for base_path in base_dataset_pos_lists:
    img = cv2.imread(base_path, cv2.IMREAD_GRAYSCALE)
    img = cv2.resize(img, window_size)
    kp, de = op.detectAndCompute(img, None)
    kps.append(kp)
    des.append(de)
# ----------------------准备工作-----------------------end


img_name = 'a.jpg'
test_image = cv2.imread("./data/test/" + img_name, cv2.IMREAD_GRAYSCALE)
scale = 0
detections = []
downscale = 1.25
bf = cv2.BFMatcher(normType=cv2.NORM_HAMMING, crossCheck=True)

# test_PG 与 test_noPG 的不同之处在于下面这行代码,即是否使用图像金字塔。
for test_image_pyramid in pyramid_gaussian(test_image, downscale=downscale):
    if test_image_pyramid.shape[0] < window_size[0] or test_image_pyramid.shape[1] < window_size[1]:
        break
    for (row, col, sliding_image) in sliding_window(test_image_pyramid, window_size, step_size):
        if sliding_image.shape != window_size:
            continue
        sliding_image = np.uint8(sliding_image*255)
        kp1, de1 = op.detectAndCompute(sliding_image, None)
        max_num = 0
        for de2 in des:
            matches = bf.match(de1, de2)
            num = len(matches)
            if num >= 20:
                if max_num < num:
                    max_num = num
        if max_num != 0:
            (window_height, window_width) = window_size
            real_height = int(window_height*downscale**scale)
            real_width = int(window_width*downscale**scale)
            detections.append((int(col*downscale**scale), int(row*downscale**scale), max_num, real_width, real_height, real_height*real_width))
    scale+=1

test_image1 = cv2.imread("./data/test/" + img_name, 1)
test_image_detect = test_image1.copy()
for detection in detections:
    col = detection[0]
    row = detection[1]
    width = detection[3]
    height = detection[4]
    cv2.rectangle(test_image_detect, pt1=(col, row), pt2=(col+width, row+height), color=(255, 0, 0), thickness=4)

print('before NMS')
cv2.imwrite("./data/result/_"+ img_name, test_image_detect)

threshold = 0.2
detections_nms = nms(detections, threshold)

test_image_detect = test_image1.copy()
for detection in detections_nms:
    col = detection[0]
    row = detection[1]
    width = detection[3]
    height = detection[4]
    cv2.rectangle(test_image_detect, pt1=(col, row), pt2=(col+width, row+height), color=(0, 255, 0), thickness=4)

print('after NMS')
cv2.imwrite("./data/result/"+ img_name, test_image_detect)
5.2 没有使用图像缩放金字塔(test_noPG.py)
import os
import glob
import cv2
from utils import *

# ----------------------准备工作-----------------------start
window_size = (256, 256)
step_size = (128, 128)
op = get_sift_op()

base_dataset_path = os.path.expanduser('./data/base_img')
base_dataset_pos_lists = glob.glob(os.path.join(base_dataset_path, '*.jpg'))
kps = []
des = []
for base_path in base_dataset_pos_lists:
    img = cv2.imread(base_path, cv2.IMREAD_GRAYSCALE)
    img = cv2.resize(img, window_size)
    kp, de = op.detectAndCompute(img, None)
    kps.append(kp)
    des.append(de)
# ----------------------准备工作-----------------------end

img_name = 'a.jpg'
test_image = cv2.imread("./data/test/" + img_name, cv2.IMREAD_GRAYSCALE)
detections = []
bf = cv2.BFMatcher(normType=cv2.NORM_HAMMING, crossCheck=True)

# test_PG 与 test_noPG 的不同之处在于下面这行代码,即是否使用图像金字塔。
for (row, col, sliding_image) in sliding_window(test_image, window_size, step_size):
    if sliding_image.shape != window_size:
        continue
    kp1, de1 = op.detectAndCompute(sliding_image, None)
    max_num = 0
    for de2 in des:
        matches = bf.match(de1, de2)
        num = len(matches)
        if num >= 20:
            if max_num < num:
                max_num = num
    if max_num != 0:
        detections.append((int(col), int(row), max_num, window_size[1], window_size[0], window_size[1]*window_size[0]))

test_image1 = cv2.imread("./data/test/" + img_name, 1)
test_image_detect = test_image1.copy()
for detection in detections:
    col = detection[0]
    row = detection[1]
    width = detection[3]
    height = detection[4]
    cv2.rectangle(test_image_detect, pt1=(col, row), pt2=(col+width, row+height), color=(255, 0, 0), thickness=4)

print('before NMS')
cv2.imwrite("./data/result/_"+ img_name, test_image_detect)

threshold = 0.2
detections_nms = nms(detections, threshold)

test_image_detect = test_image1.copy()
for detection in detections_nms:
    col = detection[0]
    row = detection[1]
    width = detection[3]
    height = detection[4]
    cv2.rectangle(test_image_detect, pt1=(col, row), pt2=(col+width, row+height), color=(0, 255, 0), thickness=4)

print('after NMS')
cv2.imwrite("./data/result/"+ img_name, test_image_detect)
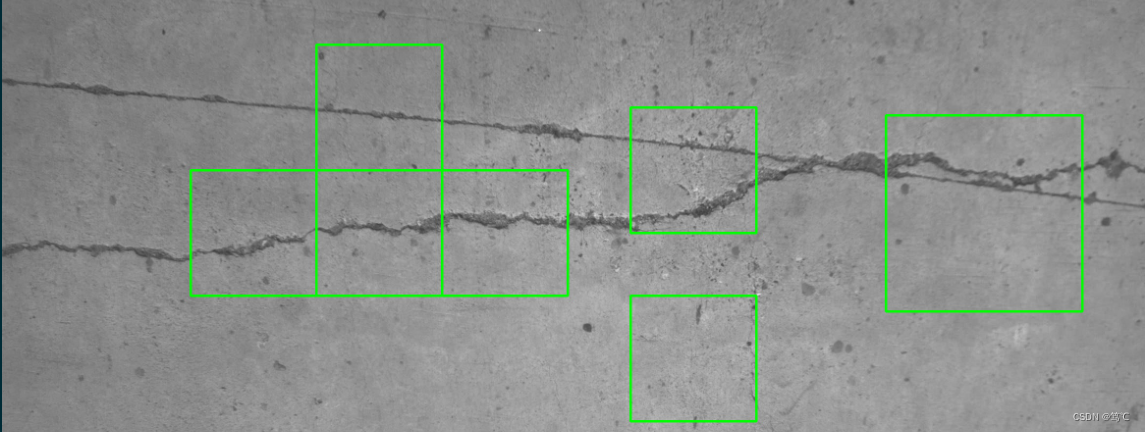
5.3 效果(可能不是很好,得再调调)
6. 总结
本文的目标检测对象是裂缝,主要通过对图像提取特征点特征,然后进行特征点匹配操作,进而实现目标检测。也可以扩展到其他对象的目标检测。