Ultralytics YOLOv8 是一款前沿、最先进(SOTA)的模型,基于先前 YOLO 版本的成功,引入了新功能和改进,进一步提升性能和灵活性。YOLOv8 设计快速、准确且易于使用,使其成为各种物体检测与跟踪、实例分割、图像分类和姿态估计任务的绝佳选择。
随着其官方团队对ultralytics项目的不断完善,其所支持的功能在不断扩展,为此重新对ultralytics项目进行深入分析。
1、基本情况
1.1 ultralytics项目能力
ultralytics项目支持图像分类、目标检测、实列分割、目标跟踪、姿态检测。
 YOLO supported tasks" />
在COCO数据集上预训练的YOLOv8 检测,分割和姿态模型可以在这里找到,以及在ImageNet数据集上预训练的YOLOv8 分类模型。所有的检测,分割和姿态模型都支持追踪模式。
所有模型在首次使用时会自动从最新的Ultralytics 发布版本下载。
1.2 与v5模型性能对比
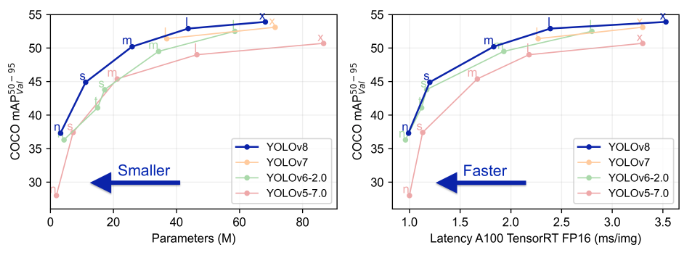
yolov5与yolov8是最为广泛使用的目标检测项目,通过下图可以看出相同规模下的v5模型通常在速度比v8模型略快,但v8模型比v5要搞5个百分点;同时,v8模型比v5的更高档次模型精度更高。
1.3 性能信息
查看检测文档以获取这些在COCO上训练的模型的使用示例,其中包括80个预训练类别。从公开信息上看,yolov8的最搞coco map为53.9,似乎比yolov5p6(1280输入下 2 6 2^6 26倍下采样)要低,实则有待琢磨
| 模型 | 尺寸 (像素) | mAPval 50-95 | 速度 CPU ONNX (ms) | 速度 A100 TensorRT (ms) | 参数 (M) | FLOPs (B) |
|---|---|---|---|---|---|---|
| YOLOv8n | 640 | 37.3 | 80.4 | 0.99 | 3.2 | 8.7 |
| YOLOv8s | 640 | 44.9 | 128.4 | 1.20 | 11.2 | 28.6 |
| YOLOv8m | 640 | 50.2 | 234.7 | 1.83 | 25.9 | 78.9 |
| YOLOv8l | 640 | 52.9 | 375.2 | 2.39 | 43.7 | 165.2 |
| YOLOv8x | 640 | 53.9 | 479.1 | 3.53 | 68.2 | 257.8 |
- mAPval 值是基于单模型单尺度在 COCO val2017 数据集上的结果。
通过yolo val detect data=coco.yaml device=0复现 - 速度 是使用 Amazon EC2 P4d 实例对 COCO val 图像进行平均计算的。
通过yolo val detect data=coco.yaml batch=1 device=0|cpu复现
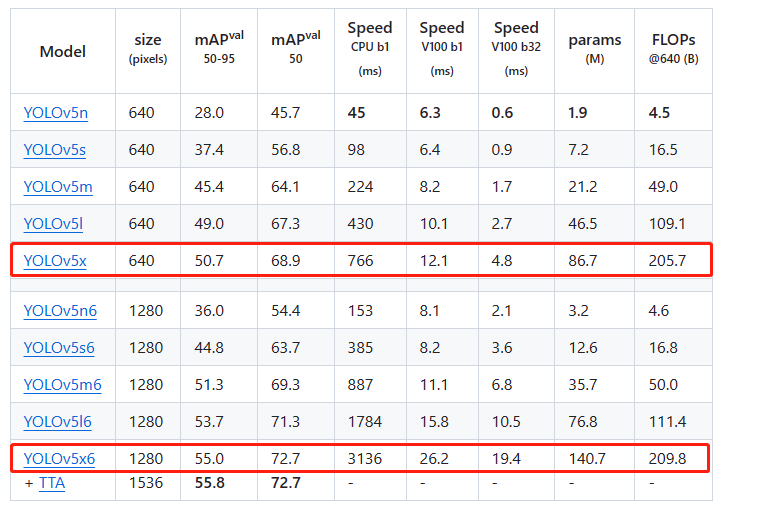
yolov5的角度信息如下所示,可见其p6版本与正常版本相比将输入更改为1280,在v100 b1的推理下耗时约增加了30%~ 50% ,其精度提升了5~8个百分点。其中模型越小,推理时间增加越少,精度提升越快。yolov5np6提升了8个点,推理时间仅增加2ms(单图推理,增加30%的推理时间),性能基本上追平v8n模型。将图像size翻倍,计算量翻了4倍,cpu推理时间翻4倍,而gpu推理时间仅增加50%,可以看出单图推理时gpu是存在性能冗余;而在多图推理是,gpu时间差不多翻了4倍
目前v8也可以实现p6结构,参考v5p6结构的精度提升,可以预见v8模型的map提升4~7%,预计能将coco map突破60
2、基本使用
这里主要总结基于YOLOv8模型的常规使用
2.1 常规使用
通常使用yolov8都是进行目标检测与实例分割
from ultralytics import YOLO

# 加载模型
model = YOLO("yolov8n.yaml")  # 从头开始构建新模型
model = YOLO("yolov8n.pt")  # 加载预训练模型(建议用于训练)

# 使用模型
model.train(data="you-data.yaml", epochs=3)  # 训练模型
metrics = model.val()  # 在验证集上评估模型性能
results = model("https://ultralytics.com/images/bus.jpg")  # 对图像进行预测
success = model.export(format="onnx")  # 将模型导出为 ONNX 格式
其中yaml的格式如下所示
path: ./yolo-data  # dataset root dir
train: train/images  # train images (relative to 'path') 118287 images
val: val/images  # val images (relative to 'path') 5000 images
test: test/images  # 20288 of 40670 images, submit to https://competitions.codalab.org/competitions/20794

# Classes
names:
  0: cls1
  1: cls2
  2: cls3
  3: cls4
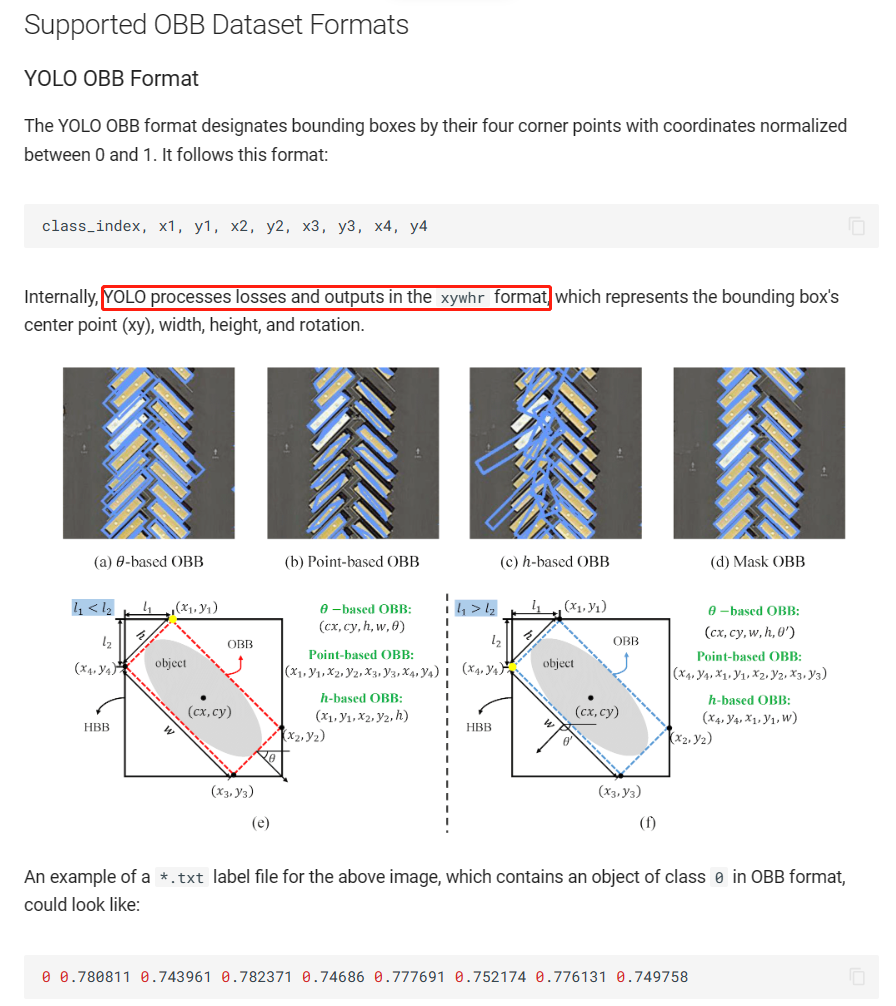
2.2 obb检测
obb是指旋转框检测,其对应的head代码如下,仅是在原来的detect上新增了一个角度预测分支。与之相应,在ultralytics\utils\loss.py中有v8OBBLoss,其主要包含RotatedTaskAlignedAssigner与RotatedBboxLoss,从中可以看出v8官方实现的obb在网络结构上是通用的,但在loss设计上与yolov5_obb的cls是完全不同的。
class OBB(Detect):
    """YOLOv8 OBB detection head for detection with rotation models."""

    def __init__(self, nc=80, ne=1, ch=()):
        super().__init__(nc, ch)
        self.ne = ne  # number of extra parameters
        self.detect = Detect.forward

        c4 = max(ch[0] // 4, self.ne)
        self.cv4 = nn.ModuleList(nn.Sequential(Conv(x, c4, 3), Conv(c4, c4, 3), nn.Conv2d(c4, self.ne, 1)) for x in ch)

    def forward(self, x):
        bs = x[0].shape[0]  # batch size
        angle = torch.cat([self.cv4[i](x[i]).view(bs, self.ne, -1) for i in range(self.nl)], 2)  # OBB theta logits
        # NOTE: set `angle` as an attribute so that `decode_bboxes` could use it.
        angle = (angle.sigmoid() - 0.25) * math.pi  # [-pi/4, 3pi/4]
        # angle = angle.sigmoid() * math.pi / 2  # [0, pi/2]
        if not self.training:
            self.angle = angle
        x = self.detect(self, x)
        if self.training:
            return x, angle
        return torch.cat([x, angle], 1) if self.export else (torch.cat([x[0], angle], 1), (x[1], angle))

    def decode_bboxes(self, bboxes):
        """Decode rotated bounding boxes."""
        return dist2rbox(self.dfl(bboxes), self.angle, self.anchors.unsqueeze(0), dim=1) * self.strides
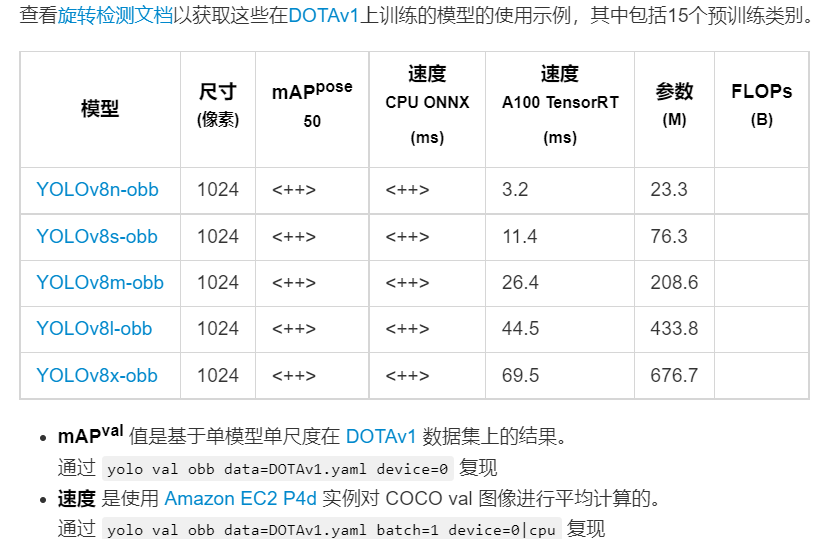
目标v8官方团队并未公布v8-obb在dotav1上的精度,但根据博主自行实现的效果来看,map50与v5大致相同,map5095要比v5——obb搞5个百分点左右。
 基本使用
基本使用
其使用代码与正常模型相同
from ultralytics import YOLO

# Load a model
model = YOLO('yolov8n-obb.yaml')  # build a new model from YAML
model = YOLO('yolov8n-obb.pt')  # load a pretrained model (recommended for training)
model = YOLO('yolov8n-obb.yaml').load('yolov8n.pt')  # build from YAML and transfer weights

# Train the model
results = model.train(data='dota128-obb.yaml', epochs=100, imgsz=640)
其所需的数据格式与yolov8-seg类似,跟原始dota也相同(但没有difficult标注),不过其xy都是相对值
yolov8-obb的yaml文件如下所示
# Ultralytics YOLO 🚀, AGPL-3.0 license
# YOLOv8 Oriented Bounding Boxes (OBB) model with P3-P5 outputs. For Usage examples see https://docs.ultralytics.com/tasks/detect

# Parameters
nc: 80  # number of classes
scales: # model compound scaling constants, i.e. 'model=yolov8n.yaml' will call yolov8.yaml with scale 'n'
  # [depth, width, max_channels]
  n: [0.33, 0.25, 1024]  # YOLOv8n summary: 225 layers,  3157200 parameters,  3157184 gradients,   8.9 GFLOPs
  s: [0.33, 0.50, 1024]  # YOLOv8s summary: 225 layers, 11166560 parameters, 11166544 gradients,  28.8 GFLOPs
  m: [0.67, 0.75, 768]   # YOLOv8m summary: 295 layers, 25902640 parameters, 25902624 gradients,  79.3 GFLOPs
  l: [1.00, 1.00, 512]   # YOLOv8l summary: 365 layers, 43691520 parameters, 43691504 gradients, 165.7 GFLOPs
  x: [1.00, 1.25, 512]   # YOLOv8x summary: 365 layers, 68229648 parameters, 68229632 gradients, 258.5 GFLOPs

# YOLOv8.0n backbone
backbone:
  # [from, repeats, module, args]
  - [-1, 1, Conv, [64, 3, 2]]  # 0-P1/2
  - [-1, 1, Conv, [128, 3, 2]]  # 1-P2/4
  - [-1, 3, C2f, [128, True]]
  - [-1, 1, Conv, [256, 3, 2]]  # 3-P3/8
  - [-1, 6, C2f, [256, True]]
  - [-1, 1, Conv, [512, 3, 2]]  # 5-P4/16
  - [-1, 6, C2f, [512, True]]
  - [-1, 1, Conv, [1024, 3, 2]]  # 7-P5/32
  - [-1, 3, C2f, [1024, True]]
  - [-1, 1, SPPF, [1024, 5]]  # 9

# YOLOv8.0n head
head:
  - [-1, 1, nn.Upsample, [None, 2, 'nearest']]
  - [[-1, 6], 1, Concat, [1]]  # cat backbone P4
  - [-1, 3, C2f, [512]]  # 12

  - [-1, 1, nn.Upsample, [None, 2, 'nearest']]
  - [[-1, 4], 1, Concat, [1]]  # cat backbone P3
  - [-1, 3, C2f, [256]]  # 15 (P3/8-small)

  - [-1, 1, Conv, [256, 3, 2]]
  - [[-1, 12], 1, Concat, [1]]  # cat head P4
  - [-1, 3, C2f, [512]]  # 18 (P4/16-medium)

  - [-1, 1, Conv, [512, 3, 2]]
  - [[-1, 9], 1, Concat, [1]]  # cat head P5
  - [-1, 3, C2f, [1024]]  # 21 (P5/32-large)

  - [[15, 18, 21], 1, OBB, [nc, 1]]  # OBB(P3, P4, P5)
2.3 p6架构
yolov8p6架构是指将P6层的输出与原来的P3, P4, P5层输出连接在一起。P6层是指
2
6
2^6
26即64倍下采样,P5层是指
2
5
2^5
25即32倍下采样,P4层是指
2
4
2^4
24即16倍下采样,P3层是指
2
3
2^3
23即8倍下采样。与常规目标检测模型相比,p6架构是多出来的参数,用于实现64倍下采样,可以实现对大目标的检测。也可以将图像输入扩大一倍,再使用p6架构,然后实现类似v5p6架构的效果
与常规配置文件相比,使用p6架构仅需略微修改yaml文件,其关键为- [[20, 23, 26, 29], 1, Detect, [nc]] # Detect(P3, P4, P5, P6)
# Parameters
nc: 80  # number of classes
scales: # model compound scaling constants, i.e. 'model=yolov8n-p6.yaml' will call yolov8-p6.yaml with scale 'n'
  # [depth, width, max_channels]
  n: [0.33, 0.25, 1024]
  s: [0.33, 0.50, 1024]
  m: [0.67, 0.75, 768]
  l: [1.00, 1.00, 512]
  x: [1.00, 1.25, 512]

# YOLOv8.0x6 backbone
backbone:
  # [from, repeats, module, args]
  - [-1, 1, Conv, [64, 3, 2]]  # 0-P1/2
  - [-1, 1, Conv, [128, 3, 2]]  # 1-P2/4
  - [-1, 3, C2f, [128, True]]
  - [-1, 1, Conv, [256, 3, 2]]  # 3-P3/8
  - [-1, 6, C2f, [256, True]]
  - [-1, 1, Conv, [512, 3, 2]]  # 5-P4/16
  - [-1, 6, C2f, [512, True]]
  - [-1, 1, Conv, [768, 3, 2]]  # 7-P5/32
  - [-1, 3, C2f, [768, True]]
  - [-1, 1, Conv, [1024, 3, 2]]  # 9-P6/64
  - [-1, 3, C2f, [1024, True]]
  - [-1, 1, SPPF, [1024, 5]]  # 11

# YOLOv8.0x6 head
head:
  - [-1, 1, nn.Upsample, [None, 2, 'nearest']]
  - [[-1, 8], 1, Concat, [1]]  # cat backbone P5
  - [-1, 3, C2, [768, False]]  # 14

  - [-1, 1, nn.Upsample, [None, 2, 'nearest']]
  - [[-1, 6], 1, Concat, [1]]  # cat backbone P4
  - [-1, 3, C2, [512, False]]  # 17

  - [-1, 1, nn.Upsample, [None, 2, 'nearest']]
  - [[-1, 4], 1, Concat, [1]]  # cat backbone P3
  - [-1, 3, C2, [256, False]]  # 20 (P3/8-small)

  - [-1, 1, Conv, [256, 3, 2]]
  - [[-1, 17], 1, Concat, [1]]  # cat head P4
  - [-1, 3, C2, [512, False]]  # 23 (P4/16-medium)

  - [-1, 1, Conv, [512, 3, 2]]
  - [[-1, 14], 1, Concat, [1]]  # cat head P5
  - [-1, 3, C2, [768, False]]  # 26 (P5/32-large)

  - [-1, 1, Conv, [768, 3, 2]]
  - [[-1, 11], 1, Concat, [1]]  # cat head P6
  - [-1, 3, C2, [1024, False]]  # 29 (P6/64-xlarge)

  - [[20, 23, 26, 29], 1, Detect, [nc]]  # Detect(P3, P4, P5, P6)
其使用代码如下:
from ultralytics import YOLO
if __name__ =="__main__":
    # Load a model
    model = YOLO("yolov8m-p6.yaml")  # build a new model from scratch
    #model = YOLO("yolov8m.pt")  # load a pretrained model (recommended for training)
    model.load("el-m-640.pt")
    # Use the model
    model.train(data="coco128.yaml", epochs=300,imgsz=640)  # train the model
    metrics = model.val()  # evaluate model performance on the validation set
    #results = model("https://ultralytics.com/images/bus.jpg")  # predict on an image
    #path = model.export(format="onnx")  # export the model to ONNX format
2.4 p2架构
p2架构与p6架构类似,是指输出层融合了(P2, P3, P4, P5层的信息),与常规模型相比,其多了一个P2层的输入(4倍下采样)。基于此,使得yolov8模型能检测各种弱小目标,例如各种不需要纹理特征就可以进行识别的目标(sar影像中的船只)。我们还可以参考P6架构,构造(P2, P3, P4, P5,P6)的输出融合,实现丰富的多尺度检测。
其使用代码如下所示:
from ultralytics import YOLO
if __name__ =="__main__":
    # Load a model
    model = YOLO("yolov8m-p2.yaml")  # build a new model from scratch
    model.load("yolov8m.pt")
    # Use the model
    model.train(data="coco.yaml", epochs=300,cfg="./default.yaml",imgsz=800)  # train the model
    metrics = model.val()  # evaluate model performance on the validation set
    #results = model("https://ultralytics.com/images/bus.jpg")  # predict on an image
    #path = model.export(format="onnx")  # export the model to ONNX format
yolov8-p2.yaml的配置文件如下所示
nc: 80  # number of classes
scales: # model compound scaling constants, i.e. 'model=yolov8n.yaml' will call yolov8.yaml with scale 'n'
  # [depth, width, max_channels]
  n: [0.33, 0.25, 1024]
  s: [0.33, 0.50, 1024]
  m: [0.67, 0.75, 768]
  l: [1.00, 1.00, 512]
  x: [1.00, 1.25, 512]

# YOLOv8.0 backbone
backbone:
  # [from, repeats, module, args]
  - [-1, 1, Conv, [64, 3, 2]]  # 0-P1/2
  - [-1, 1, Conv, [128, 3, 2]]  # 1-P2/4
  - [-1, 3, C2f, [128, True]]
  - [-1, 1, Conv, [256, 3, 2]]  # 3-P3/8
  - [-1, 6, C2f, [256, True]]
  - [-1, 1, Conv, [512, 3, 2]]  # 5-P4/16
  - [-1, 6, C2f, [512, True]]
  - [-1, 1, Conv, [1024, 3, 2]]  # 7-P5/32
  - [-1, 3, C2f, [1024, True]]
  - [-1, 1, SPPF, [1024, 5]]  # 9

# YOLOv8.0-p2 head
head:
  - [-1, 1, nn.Upsample, [None, 2, 'nearest']]
  - [[-1, 6], 1, Concat, [1]]  # cat backbone P4
  - [-1, 3, C2f, [512]]  # 12

  - [-1, 1, nn.Upsample, [None, 2, 'nearest']]
  - [[-1, 4], 1, Concat, [1]]  # cat backbone P3
  - [-1, 3, C2f, [256]]  # 15 (P3/8-small)

  - [-1, 1, nn.Upsample, [None, 2, 'nearest']]
  - [[-1, 2], 1, Concat, [1]]  # cat backbone P2
  - [-1, 3, C2f, [128]]  # 18 (P2/4-xsmall)

  - [-1, 1, Conv, [128, 3, 2]]
  - [[-1, 15], 1, Concat, [1]]  # cat head P3
  - [-1, 3, C2f, [256]]  # 21 (P3/8-small)

  - [-1, 1, Conv, [256, 3, 2]]
  - [[-1, 12], 1, Concat, [1]]  # cat head P4
  - [-1, 3, C2f, [512]]  # 24 (P4/16-medium)

  - [-1, 1, Conv, [512, 3, 2]]
  - [[-1, 9], 1, Concat, [1]]  # cat head P5
  - [-1, 3, C2f, [1024]]  # 27 (P5/32-large)

  - [[18, 21, 24, 27], 1, Detect, [nc]]  # Detect(P2, P3, P4, P5)
2.5 yolov8-ghost
GhostNet是2020CVPR录用的一篇对卷积操作进行改进的论文。文章的核心内容是Ghost模块(Ghost Module),可以用来替换任何经典CNN网络中的卷积操作,突出优势是轻量高效,实验证明使用了Ghost Module的MobileNetV3的效果,要比原始的MobileNetV3要好。在yolov8-ghost中推出了用GhostConv替代原来的conv结构,其配置文件如下所示,可用的配置文件有:yolov8-ghost.yaml、yolov8-ghost-p2.yaml、yolov8-ghost-p6.yaml
# Parameters
nc: 80  # number of classes
scales: # model compound scaling constants, i.e. 'model=yolov8n.yaml' will call yolov8.yaml with scale 'n'
  # [depth, width, max_channels]
  n: [0.33, 0.25, 1024]  # YOLOv8n-ghost summary: 403 layers,  1865316 parameters,  1865300 gradients,   5.8 GFLOPs
  s: [0.33, 0.50, 1024]  # YOLOv8s-ghost summary: 403 layers,  5960072 parameters,  5960056 gradients,  16.4 GFLOPs
  m: [0.67, 0.75, 768]   # YOLOv8m-ghost summary: 603 layers, 10336312 parameters, 10336296 gradients,  32.7 GFLOPs
  l: [1.00, 1.00, 512]   # YOLOv8l-ghost summary: 803 layers, 14277872 parameters, 14277856 gradients,  53.7 GFLOPs
  x: [1.00, 1.25, 512]   # YOLOv8x-ghost summary: 803 layers, 22229308 parameters, 22229292 gradients,  83.3 GFLOPs

# YOLOv8.0n-ghost backbone
backbone:
  # [from, repeats, module, args]
  - [-1, 1, Conv, [64, 3, 2]]  # 0-P1/2
  - [-1, 1, GhostConv, [128, 3, 2]]  # 1-P2/4
  - [-1, 3, C3Ghost, [128, True]]
  - [-1, 1, GhostConv, [256, 3, 2]]  # 3-P3/8
  - [-1, 6, C3Ghost, [256, True]]
  - [-1, 1, GhostConv, [512, 3, 2]]  # 5-P4/16
  - [-1, 6, C3Ghost, [512, True]]
  - [-1, 1, GhostConv, [1024, 3, 2]]  # 7-P5/32
  - [-1, 3, C3Ghost, [1024, True]]
  - [-1, 1, SPPF, [1024, 5]]  # 9

# YOLOv8.0n head
head:
  - [-1, 1, nn.Upsample, [None, 2, 'nearest']]
  - [[-1, 6], 1, Concat, [1]]  # cat backbone P4
  - [-1, 3, C3Ghost, [512]]  # 12

  - [-1, 1, nn.Upsample, [None, 2, 'nearest']]
  - [[-1, 4], 1, Concat, [1]]  # cat backbone P3
  - [-1, 3, C3Ghost, [256]]  # 15 (P3/8-small)

  - [-1, 1, GhostConv, [256, 3, 2]]
  - [[-1, 12], 1, Concat, [1]]  # cat head P4
  - [-1, 3, C3Ghost, [512]]  # 18 (P4/16-medium)

  - [-1, 1, GhostConv, [512, 3, 2]]
  - [[-1, 9], 1, Concat, [1]]  # cat head P5
  - [-1, 3, C3Ghost, [1024]]  # 21 (P5/32-large)

  - [[15, 18, 21], 1, Detect, [nc]]  # Detect(P3, P4, P5)
与正常的yolov8模型项目,yolov8-ghost的参数量如下所示,相比与原来的结构参数量只有原来的30%,flop只有原来的60%,针对于大模型参数量更低。


3、扩展模型
在ultralytics项目中除了yolov8模型外,其还支持v3、v5、v6、rt-dert等模型,不过通过博主对源码的分析,发现其不支持这些(v3、v5、v6)模型的原生neck、head与锚框分配策略,仅是使用各个版本的yolo模型作为backbone。
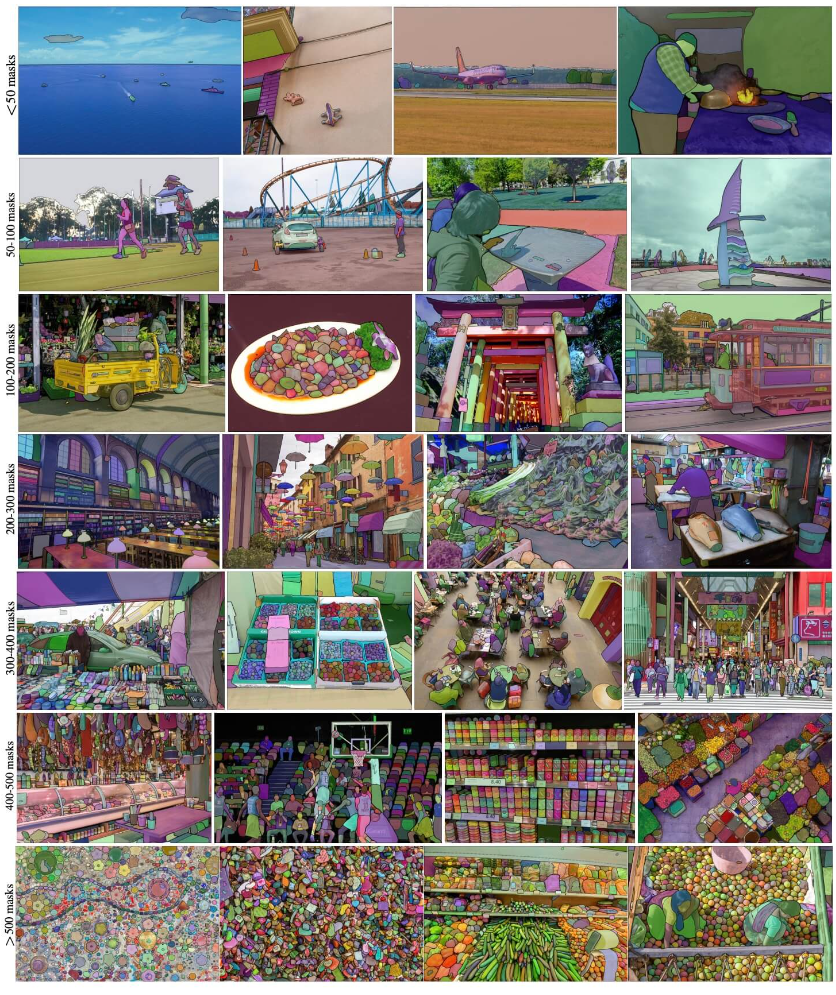
3.1 Segment Anything Model(自动标注)
Segment Anything Model (SAM) 是一种先进的图像分割模型,可以进行可提示的分割,为图像分析任务提供了前所未有的灵活性。SAM 是Segment Anything 项目的核心,该项目引入了一种新颖的模型、任务和图像分割数据集。
在yolov8项目中支持使用sam模型进行推理、导出onn模型。其使用代码如下所示,以下代码是基于ultralytics 封装进行使用
from ultralytics import SAM

# 加载模型
model = SAM('sam_b.pt')

# 显示模型信息(可选)
model.info()

# 使用边界框提示进行推断
model('ultralytics/assets/zidane.jpg', bboxes=[439, 437, 524, 709])

# 使用点提示进行推断
model('ultralytics/assets/zidane.jpg', points=[900, 370], labels=[1])
也可以使用sam官方的封装使用
from ultralytics.models.sam import Predictor as SAMPredictor

# 创建 SAMPredictor
overrides = dict(conf=0.25, task='segment', mode='predict', imgsz=1024, model="mobile_sam.pt")
predictor = SAMPredictor(overrides=overrides)

# 设置图像
predictor.set_image("ultralytics/assets/zidane.jpg")  # 使用图像文件设置
predictor.set_image(cv2.imread("ultralytics/assets/zidane.jpg"))  # 使用 np.ndarray 设置
results = predictor(bboxes=[439, 437, 524, 709])
results = predictor(points=[900, 370], labels=[1])

# 重置图像
predictor.reset_image()
自动标注
自动注释是 SAM 的一个关键功能,它允许用户使用预训练的检测模型生成一个分割数据集。这个功能可以通过自动生成大量图像的准确注释,绕过耗时的手动标注过程,从而快速获得高质量的分割数据集。
要使用Ultralytics框架对数据集进行自动注释,可以使用如下所示的 auto_annotate 函数,我们可以将yolov8x.pt替换为自定义模型实现自动标注.
from ultralytics.data.annotator import auto_annotate

auto_annotate(data="path/to/images", det_model="yolov8x.pt", sam_model='sam_b.pt')#'mobile_sam.pt'
注:yolov8项目中使用相同的 API 实现了 MobileSAM 和 SAM,故而在自动标注中可以使用mobile_sam模型
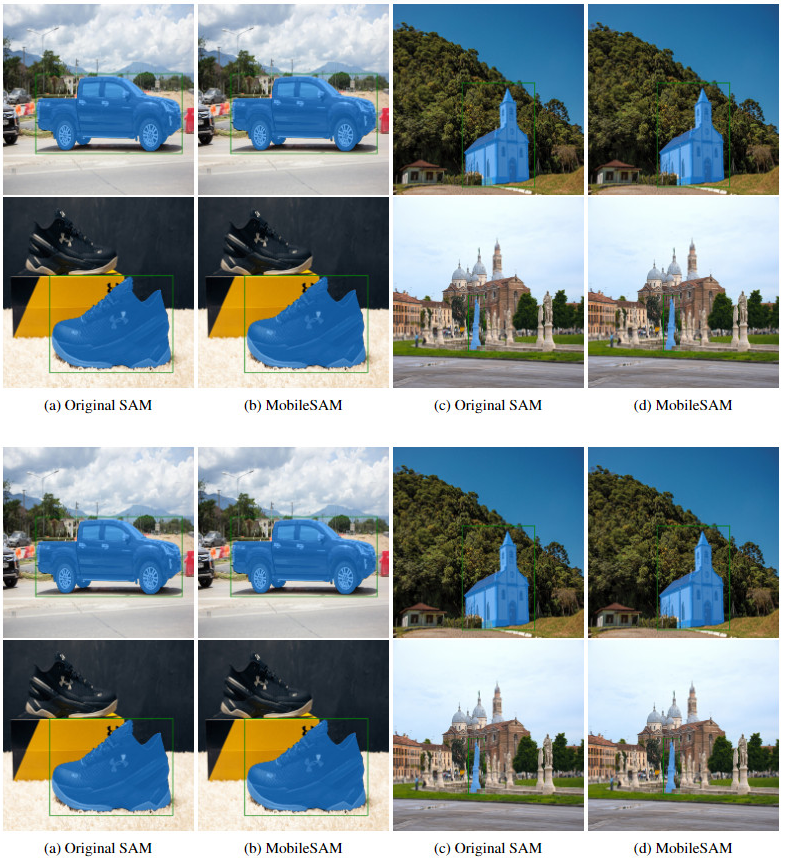
3.2 MobileSAM
MobileSAM 使用单个 GPU 在不到一天的时间内对 10 万个数据集(原始图像的 1%)进行训练。已在 Grounding-SAM、AnyLabeling 和 Segment Anything in 3D 等多个项目中实施。与原始的SAM相比,MobileSAM 更加轻量化和快速。MobileSAM 的本质是对SAM中图像编码器的一种知识蒸馏,我们可以使用MobileSAM 达到SAM的效果。
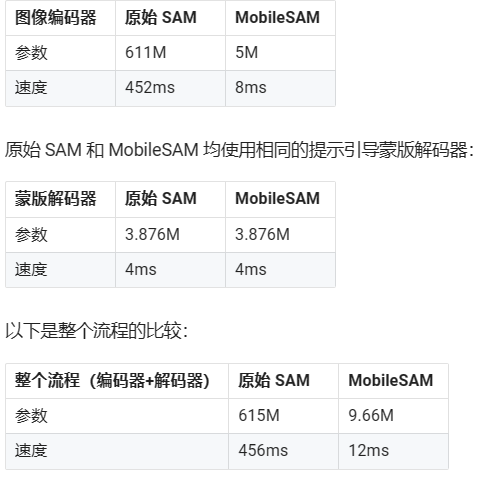
根据MobileSAM的描述,其达到了与SAM相同的性能。
注:MobileSAM 的性能优于当前的 FastSAM,尺寸大约减小了 5 倍,速度快了约 7 倍。
模型下载地址:https://github.com/ChaoningZhang/MobileSAM/blob/master/weights/mobile_sam.pt
其使用代码与SAM一致,具体如下所示:
from ultralytics import SAM

# 载入模型
model = SAM('mobile_sam.pt')

# 基于点提示预测一个分段
model.predict('ultralytics/assets/zidane.jpg', points=[900, 370], labels=[1])
3.3 FastSAM
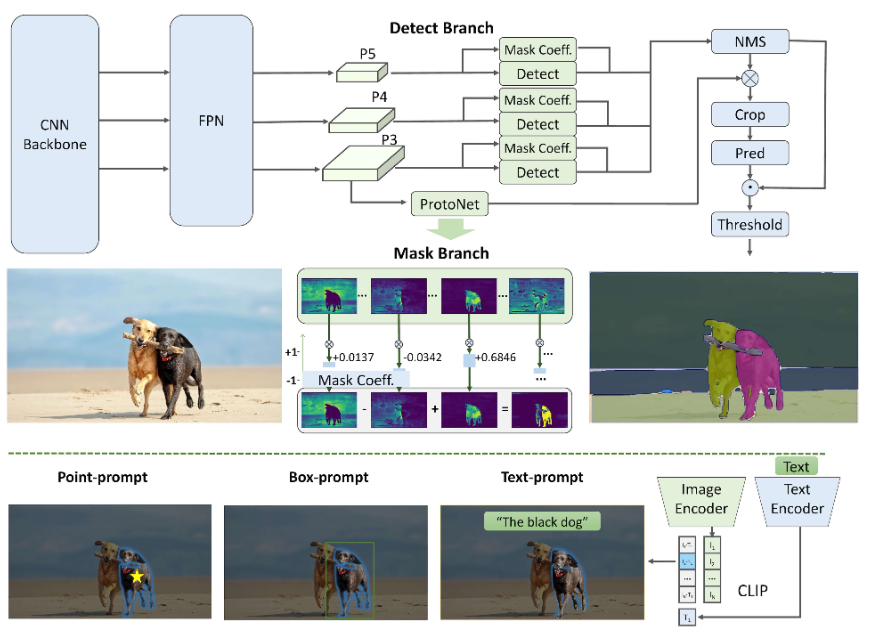
Fast Segment Anything Model(FastSAM)是一种创新的实时卷积神经网络(CNN)模型,用于图像中的任意对象分割任务。该任务旨在根据各种可能的用户交互提示,对图像中的任意对象进行分割。FastSAM在保持具备竞争性能的同时,显著降低了计算需求,使其成为各种视觉任务的实用选择。
注:MobileSAM 的性能优于当前的 FastSAM,尺寸大约减小了 5 倍,速度快了约 7 倍。FastSAM的特点是可以作为预训练权重嵌入到yolov8的目标检测模型中
主要特点
-
实时解决方案: FastSAM利用CNN的计算效率提供了图像中任意对象分割任务的实时解决方案,适用于需要快速结果的工业应用。
-
高效和高性能: FastSAM在显著降低计算和资源需求的同时,不会降低性能质量。它与SAM具有相当的性能,但计算资源大幅减少,能够实现实时应用。
-
提示引导分割: FastSAM可以通过各种可能的用户交互提示来分割图像中的任意对象,提供了不同场景下的灵活性和适应性。
-
基于YOLOv8-seg: FastSAM基于YOLOv8-seg,是一种配备实例分割分支的目标检测器。这使得它能够有效地生成图像中所有实例的分割掩码 -
基准测试中具有竞争力的结果: 在MS COCO的对象提议任务中,FastSAM在单个NVIDIA RTX 3090上以显著更快的速度获得高分,与SAM相比,显示出其效率和能力。
-
实际应用: 提出的方法以非常高的速度为大量视觉任务提供了一种新的实用解决方案,比当前方法快十几倍乃至数百倍。
-
模型压缩的可行性: FastSAM通过引入人工先验到结构中,展示了通过路径显著减少计算工作量的可行性,为通用视觉任务的大型模型架构开辟了新的可能性。
其使用代码如下所示,可见其是独立于sam接口的
from ultralytics import FastSAM
from ultralytics.models.fastsam import FastSAMPrompt

# 定义推断源
source = 'path/to/bus.jpg'

# 创建FastSAM模型
model = FastSAM('FastSAM-s.pt')  # 或 FastSAM-x.pt

# 在图像上运行推断
everything_results = model(source, device='cpu', retina_masks=True, imgsz=1024, conf=0.4, iou=0.9)

# 准备Prompt Process对象
prompt_process = FastSAMPrompt(source, everything_results, device='cpu')

# Everything提示
ann = prompt_process.everything_prompt()

# Bbox默认形状[0,0,0,0] -> [x1,y1,x2,y2]
ann = prompt_process.box_prompt(bbox=[200, 200, 300, 300])

# 文本提示
ann = prompt_process.text_prompt(text='a photo of a dog')

# 点提示
# 默认点[[0,0]] [[x1,y1],[x2,y2]]
# 默认point_label [0] [1,0] 0:背景,1:前景
ann = prompt_process.point_prompt(points=[[200, 200]], pointlabel=[1])
prompt_process.plot(annotations=ann, output='./')
除了sam外,yolov8官方还推出了验证功能。FastSAM仅支持检测和分割单个类别的对象。这意味着它将识别和分割所有对象为相同的类别。因此,在准备数据集时,需要将所有对象的类别ID转换为0。当使用FastSAM验证性能达标后,可以不用训练模型了,获取再次迁移训练可以获得显著的性能提升
from ultralytics import FastSAM

# 创建FastSAM模型
model = FastSAM('FastSAM-s.pt')  # 或 FastSAM-x.pt

# 验证模型
results = model.val(data='coco8-seg.yaml')
YOLONAS_496">3.4 YOLO-NAS
YOLO-NAS是一种开创性的物体检测基础模型。它是先进的神经架构搜索技术的产物,经过精心设计以解决之前YOLO模型的局限性。YOLO-NAS在量化支持和准确性-延迟权衡方面取得了重大改进,代表了物体检测领域的重大飞跃。
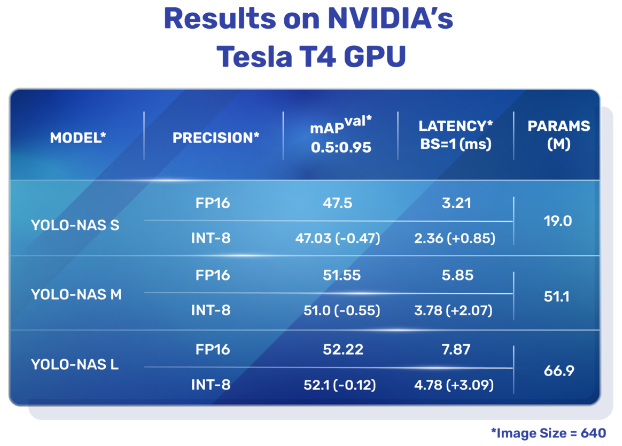
yolov8提供了三种类型的YOLO-NAS模型:Small (s)、Medium (m)和Large (l)。每种类型都旨在满足不同的计算和性能需求:
- YOLO-NAS-s: 针对计算资源有限但效率至关重要的环境进行了优化。
- YOLO-NAS-m: 提供平衡的方法,适用于具有更高准确性的通用物体检测。
- YOLO-NAS-l: 面向需要最高准确性的场景,计算资源不是限制因素。
在https://docs.ultralytics.com/zh/models/yolo-nas/#_5提供了预训练模型的下载地址,具体如下所示,其不支持·YOLO-NAS模型的训练,估计是没有实现对应的loss结构。
3.5 RT-DETR
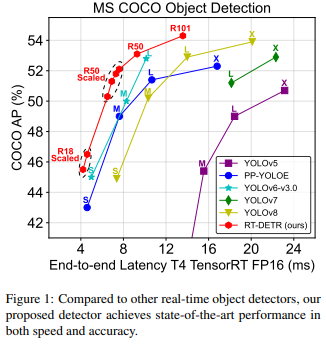
百度开发的实时检测变换器(RT-DETR)是一种尖端的端到端目标检测器,具有实时性能和高准确性。它利用Vision Transformers (ViT) 的强大功能,通过解耦内部尺度交互和跨尺度融合,高效处理多尺度特征。RT-DETR非常灵活适应各种推断速度的调整,支持使用不同的解码器层而无需重新训练。该模型在CUDA和TensorRT等加速后端上表现出色,超越了许多其他实时目标检测器。
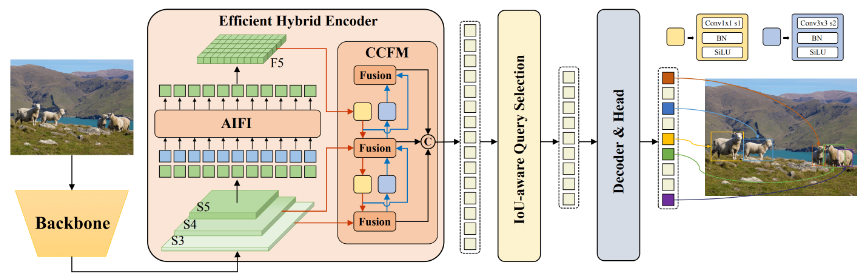
百度的RT-DETR模型架构图显示了骨干网的最后三个阶段{S3, S4, S5}作为编码器输入。高效的混合编码器通过内部尺度特征交互(AIFI)和跨尺度特征融合模块(CCFM)将多尺度特征转换为图像特征序列。采用IoU感知的查询选择来选择一定数量的图像特征作为解码器的初始对象查询。最后,解码器通过辅助预测头迭代优化对象查询,生成框和置信度得分。通过下图可以看到,RE-DETR在保持精度的同时比yolov8快30%。
在yolov8项目中支持对RTDETR模型的训练、推理、验证与导出。
from ultralytics import RTDETR

# 加载预训练的COCO RT-DETR-l模型
model = RTDETR('rtdetr-l.pt')

# 显示模型信息(可选)
model.info()

# 使用COCO8示例数据集对模型进行100个epoch的训练
results = model.train(data='coco8.yaml', epochs=100, imgsz=640)

# 使用RT-DETR-l模型在'bus.jpg'图像上运行推断
results = model('path/to/bus.jpg')
但是所提供的与训练模型有限,具体可以到https://docs.ultralytics.com/zh/models/rtdetr/#_4

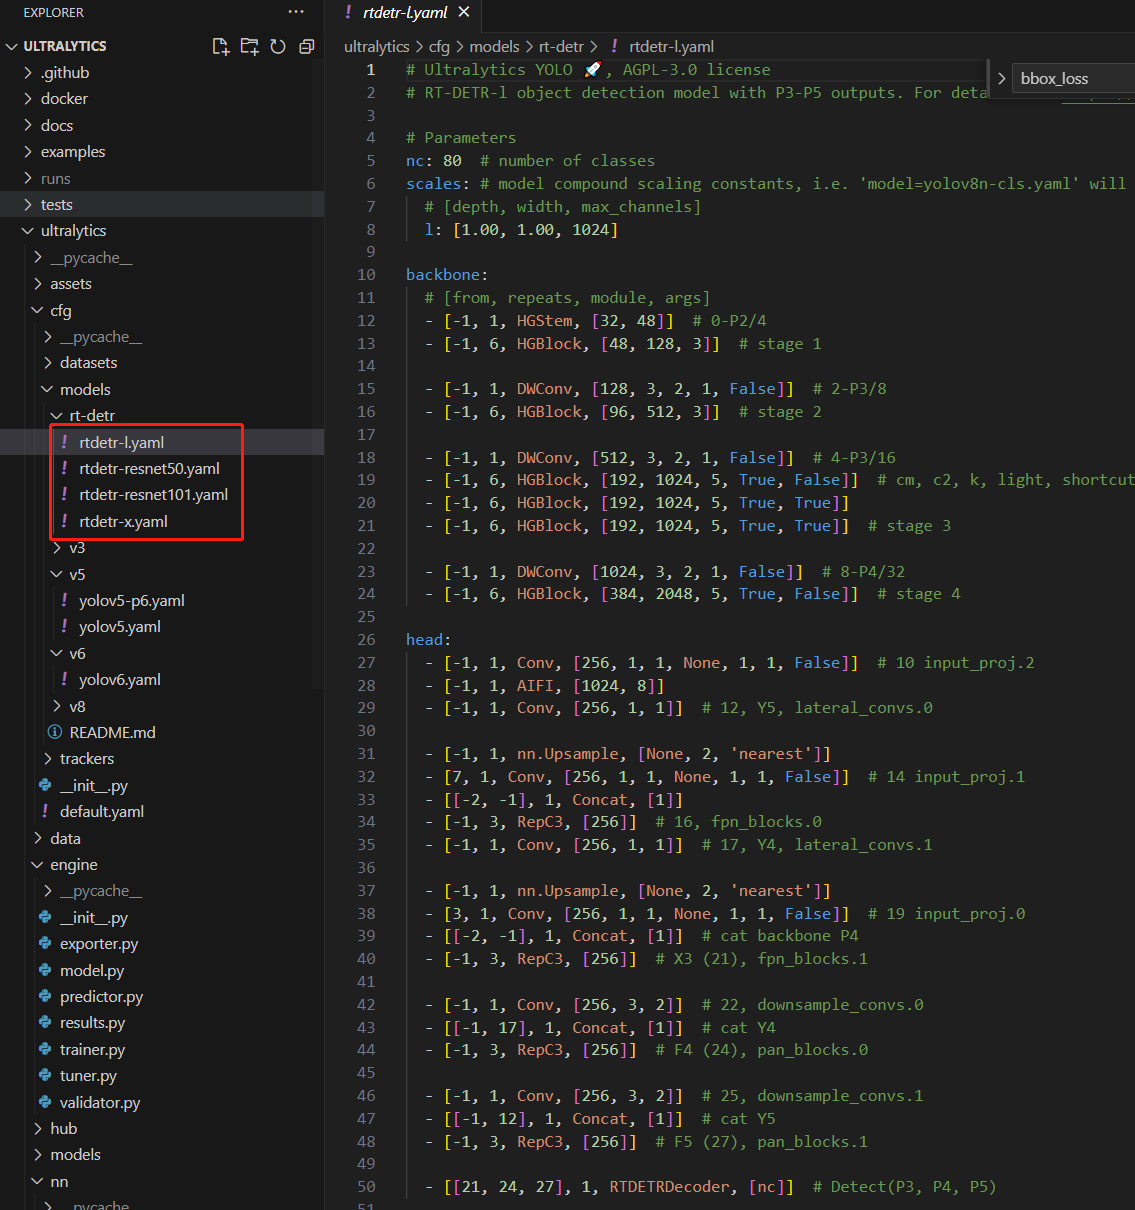
尽管预训练模型有限,ultralytics团队还是提供了原文中的各种模型结构实现。
![[足式机器人]Part2 Dr. CAN学习笔记-动态系统建模与分析 Ch02-1+2课程介绍+电路系统建模、基尔霍夫定律](https://img-blog.csdnimg.cn/direct/8cefa772c05f4582b4f2aad33bb4d679.png#pic_center)