1. 介绍
这是有关 YOLOv8 系列文章的第二篇。在上一篇文章中我们介绍了YOLOv8以及如何使用它,然后展示了如何使用 Python 和基于 PyTorch 的官方 YOLOv8 库创建一个 Web 服务来检测图像上的对象。
在本文中,将展示如何在不需要PyTorch和官方API的情况下使用 YOLOv8 模型,将模型部署在不同的端上,使得模型使用的资源减少十倍,并且不仅可以在 Python 上创建服务,还可以在 Node.js、Go 上创建同样的服务。
本文内容将在上一篇文章中开发的Web服务基础上做扩展,前端不做修改,仅使用不同的语言重写后端。
2. YOLOv8 部署
YOLOv8 使用 PyTorch 框架并输出为“.pt”文件。我们使用 Ultralytics API 来训练这些模型或基于它们进行预测。要运行它们,需要有一个包含 Python 和 PyTorch 的环境。
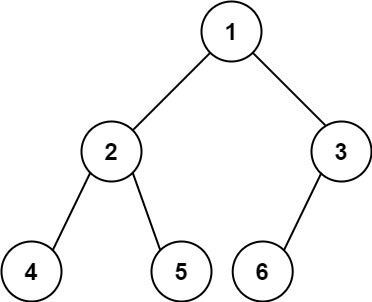
PyTorch 是一个用于设计、训练和评估神经网络模型的框架。然而,我们在应用环境中并不需要PyTorch。我们使用 YOLOv8,在应用中所做的就是把输入图像给模型,通过模型的输出计算目标的边界框、种类、置信度等。这个过程并不一定非得依靠Python,我们可以把YOLOv8训练的模型导出成其他任何类型,从而使用其他编程语言完成这个过程。
目前,我们可以把模型导出为以下格式:TorchScript, ONNX, OpenVINO, TensorRT, CoreML, TF_SavedModel, TF_GraphDef, TF_Lite, TF_Edge_TPU, TF.js, PaddlePaddle。
例如,CoreML 是可在iOS上程序使用的神经网络格式。
本文主要使用ONNX,它由 Microsoft 提出的,可在不同平台和编程语言上运行神经网络模型。它不是一个框架,而只是一个用 C 语言编写的库。对于 Linux 来说,它的大小只有 16 MB,但它提供了主要编程语言的API,包括 Python、PHP、JavaScript、 Node.js、C++、Go 和 Rust。
3. 将 YOLOv8 导出到 ONNX
首先,我们加载 YOLOv8 模型并导出为 ONNX 格式。
python">from ultralytics import YOLO
model = YOLO("yolov8m.pt")
model.export(format="onnx")
运行上述的代码后,会产生一个和pt模型名称一样,扩展名是.onnx 的文件。比如,上述例子产生yolov8m.onnx 文件。
4. 使用 ONNX 做对象检测
现在,使用 ONNX 来做对象检测。为简单起见,我们将从 Python 开始,因为我们已经有一个使用 PyTorch 和 Ultralytics API 的 Python Web 应用程序。因此,将其转移到 ONNX 会更容易。
通过在 Jupyter 中运行以下命令来安装适用于 Python 的 ONNX 库:
python">!pip install onnxruntime
导入ONNX
python">import onnxruntime as ort
我们把库重命名为ort 。
用下面的方式就能加载onnx的模型:
python">model = ort.InferenceSession("yolov8m.onnx", providers=['CPUExecutionProvider'])
在上一篇的Python版中,只需运行:outputs = model.predict("image_file") 就能获得结果。该方法会执行以下操作:
- 从文件中读取图像
- 将其转换为YOLOv8神经网络输入层的格式
- 通过模型传递它
- 接收原始模型输出
- 解析原始模型输出
- 返回有关检测到的对象及其边界框的结构化信息
ONNX 有类似的方法run,但它只实现了步骤 3 和 4。其他一切都需要开发,因为 ONNX 不知道这是 YOLOv8 模型。就 ONNX 而言,模型是一个黑匣子,它接收多维浮点数数组作为输入,并将其转换为其他多维数字数组。它不知道输入和输出的含义。那么,我们我们要怎么做呢?

模型的输入层和输出层的是固定的,它们是在模型创建时定义的,并保存于模型中。
ONNX 有一个有用的方法get_inputs() 来获取有关此模型期望接收的输入的信息,以及 get_outputs() 来获取有关的信息模型在返回的输出。
让我们首先获取输入:
python">inputs = model.get_inputs();
len(inputs)
输出为:
python">1
这里我们得到了输入数组并显示了该数组的长度。结果很明显:网络期望获得单个输入。让我们访问到这个输入:
python">input = inputs[0]
输入对象具有三个字段:name、type 和 shape。让我们获取 YOLOv8 模型的这些值:
python">print("Name:",input.name)
print("Type:",input.type)
print("Shape:",input.shape)
输出如下:
python">Name: images
Type: tensor(float)
Shape: [1, 3, 640, 640]
从中我们可以看出:
- 预期输入的名称是images。
- 输入类型为tensor(float)。 我们需要将图像转换为浮点数的多维数组。
- 形状显示了该Tensor的维度。能看到该数组是四维的,表示输入是1个图像 ,包含 3 个 640x640 浮点数矩阵。每个矩阵表示红、绿、蓝的分量。每个颜色分量的值可以是 0 到 255。
5. 准备输入
我们需要把输入图像小调整为 640x640,提取有关每个像素的红色、绿色和蓝色分量的信息,并构建 3 个适当颜色分量的矩阵。
假设图像是上一篇我们用到的cat_dog.jpg

使用Pillow完成上述处理。
python">from PIL import Image
img = Image.open("cat_dog.jpg")
img_width, img_height = img.size
img = img.resize((640,640))
上述代码先把输入图片调整到640x640,接着需要提取每个像素的每个颜色分量并从中构造 3 个矩阵。
首先取消输入图片的Alpha通道:
python">img = img.convert("RGB");
构建分量数组:
python">import numpy as np
input = np.array(img)
我们导入了 NumPy 并将图像加载到 input 这个NumPy 数组中。现在让我们看看这个数组的形状:
python">input.shape
输出为:
python">(640, 640, 3)
根据输出发现尺寸顺序错误,我们需要将 3 放在开头。 transpose函数可以切换NumPy数组的维度:
python">input = input.transpose(2,0,1)
input.shape
输出为:
python">(3,640,640)
我们需要在开始处再添加一个维度来使其成为 (1,3,640,640):
python">input = input.reshape(1,3,640,640)
现在我们有了正确的输入内容,如果查看该数组的内容,例如第一个像素的红色分量:
python">input[0,0,0,0]
输出为:
python">71
这里是整数,正确的输出应该是Float,我们需要对此数据做归一化处理,将其缩放到0到1的范围:
python">input = input/255.0
input[0,0,0,0]
输出为:
python">0.2784313725490196
这里显示的就是输入数据的样子。
6. 运行模型
现在,在运行推理过程之前,让我们看看 YOLOv8 模型应返回哪些输出。如上所述,这可以使用 ONNX 的 get_outputs() 方法来完成。
python">outputs = model.get_outputs()
output = outputs[0]
print("Name:",output.name)
print("Type:",output.type)
print("Shape:",output.shape)
输出为:
python">Name: output0
Type: tensor(float)
Shape: [1, 84, 8400]
从输出中可以看出,ONNX的YOLOv8 有一个输出,它是 outputs 对象的第一项,类型是tensor(float)的格式,形状为 [1,84,8400],这意味着这是一个嵌套到单个数组的 84x8400 矩阵。实际上, YOLOv8 返回 8400 个边界框,每个边界框有 84 个参数。这里每个边界框都是列,而不是行。这是神经网络算法的要求。我认为最好将其转置为 8400x84,因此,有 8400 行与检测到的对象匹配,并且每行都是具有 84 个参数的边界框。
稍后我们将讨论为什么单个边界框有这么多参数。现在,ONNX可以用run函数来运行模型并获取输出:
python">model.run(output_names,inputs)
- output_names:接收的输出的数组。
- inputs :输入字典,以 {name:tensor} 格式传递到网络,其中 name 是输入名称,tensor 是我们之前准备好的图像数据数组。
具体而言,代码如下:
python">outputs = model.run(["output0"], {"images":input})
len(outputs)
输出为:
python">1
输出表示outputs数组的长度为1,如果提示错误输入,必须采用 float 格式,可以用以下代码转换输入:
python">input = input.astype(np.float32)
然后再次运行run函数。
7. 处理输出
从输出中提取内容:
python">output = outputs[0]
output.shape
输出为:
python">(1, 84, 8400)
返回了正确的输出格式。由于第一个维度只有1个内容,我们可以直接获取它:
python">output = output[0]
output.shape
输出为:
python">(84, 8400)
显示是一个84 行、8400 列的矩阵。如前文讨论,我们需要把它转置一下,以方便后续计算:
python">output = output.transpose()
输出为:
python">(8400, 84)
现在更清楚了:8400 行,84列个数据。 8400 是 YOLOv8 可以检测的最大边界框数量,并且无论实际检测到多少个对象,它都会为任何图像返回 8400 行,这是因为YOLOv8的网络设计决定。因此,每次都会返回 8400 行,但其中大部分行只包含垃圾。如何检测这些行中哪些有有意义的数据,哪些是垃圾数据?可以看出每一行都有84个数据,其中前 4 个是边界框的坐标,剩余其他的80个数据是该模型可以检测到的所有对象类的置信度。如果使用的是我们自训练的模型,假设能检测到3个对象类,那么输出有 7 个数据(4+3)。
现在来看看第一行的内容:
python">row = output[0]
print(row)
显示为:
python">[     5.1182      8.9662      13.247      19.459  2.5034e-06  2.0862e-07  5.6624e-07  1.1921e-07  2.0862e-07  1.1921e-07  1.7881e-07  1.4901e-07  1.1921e-07  2.6822e-07  1.7881e-07  1.1921e-07  1.7881e-07  4.1723e-07  5.6624e-07  2.0862e-07  1.7881e-07  2.3842e-07  3.8743e-07  3.2783e-07  1.4901e-07  8.9407e-08
  3.8743e-07  2.9802e-07  2.6822e-07  2.6822e-07  2.3842e-07  2.0862e-07  5.9605e-08  2.0862e-07  1.4901e-07  1.1921e-07  4.7684e-07  2.6822e-07  1.7881e-07  1.1921e-07  8.9407e-08  1.4901e-07  1.7881e-07  2.6822e-07  8.9407e-08  2.6822e-07  3.8743e-07  1.4901e-07  2.0862e-07  4.1723e-07  1.9372e-06  6.5565e-07
  2.6822e-07  5.3644e-07  1.2815e-06  3.5763e-07  2.0862e-07  2.3842e-07  4.1723e-07  2.6822e-07  8.3447e-07  8.9407e-08  4.1723e-07  1.4901e-07  3.5763e-07  2.0862e-07  1.1921e-07  5.9605e-08  5.9605e-08  1.1921e-07  1.4901e-07  1.4901e-07  1.7881e-07  5.9605e-08  8.9407e-08  2.3842e-07  1.4901e-07  2.0862e-07
  2.9802e-07  1.7881e-07  1.1921e-07  2.3842e-07  1.1921e-07  1.1921e-07]
可以看到这一行代表一个坐标为 [5.1182, 8.9662, 13.247, 19.459] 的边界框。边框表示信息如下:
python">x_center = 5.1182
y_center = 8.9662
width = 13.247
height = 19.459
提取这个边框:
python">xc,yc,w,h = row[:4]
剩余其他数值表示检测到的对象属于 80 个类的置信度。比如:数组索引 4 的数据表示类别 0 的置信度 (2.5034e-06),数组索引 5 的数据表示类别 1 的置信度 (2.0862e-07) ),以此类推。
现在,我们把数据解析为我们在上一篇文章中的格式:[x1, y1, x2 y2,类标签,置信度]。
- 计算边界框的四个角的坐标:
python">x1 = xc-w/2
y1 = yc-h/2
x2 = xc+w/2
y2 = yc+h/2
注意:由于输入图像尺寸是640x640,模型返回的坐标也是以640x640来输出的。为了获得原始图像的边界框的坐标,我们需要根据原始图像的尺寸按比例缩放它们。我们将原始宽度和高度保存到了img_width和img_height变量中,为了缩放边界框的角点,我们需要如下计算:
python">x1 = (xc - w/2) / 640 * img_width
y1 = (yc - h/2) / 640 * img_height
x2 = (xc + w/2) / 640 * img_width
y2 = (yc + h/2) / 640 * img_height
- 找到最大的对象置信度
我们需要在剩余的80个数据中找到数值最大的那个,在NumPy中可以通过以下方法做到:
python">prob = row[4:].max()
class_id = row[4:].argmax()
print(prob, class_id)
输出为:
python">2.503395e-06 0
第一个数据是识别对象的最大置信度。第二个数据是该对象的索引。
接着把对象类索引替换为类标签,由于此模型用的是COCO数据,它的80个数据类如下:
python">yolo_classes = [
    "person", "bicycle", "car", "motorcycle", "airplane", "bus", "train",
    "truck", "boat","traffic light", "fire hydrant", "stop sign", "parking meter",
    "bench", "bird", "cat", "dog", "horse","sheep", "cow", "elephant", "bear",
    "zebra", "giraffe", "backpack", "umbrella", "handbag", "tie","suitcase",
    "frisbee", "skis", "snowboard", "sports ball", "kite", "baseball bat",
    "baseball glove","skateboard", "surfboard", "tennis racket", "bottle",
    "wine glass", "cup", "fork", "knife", "spoon","bowl", "banana", "apple",
    "sandwich", "orange", "broccoli", "carrot", "hot dog", "pizza", "donut","cake",
    "chair", "couch", "potted plant", "bed", "dining table", "toilet", "tv", "laptop",
    "mouse","remote", "keyboard", "cell phone", "microwave", "oven", "toaster",
    "sink", "refrigerator", "book","clock", "vase", "scissors", "teddy bear",
    "hair drier", "toothbrush"
]
接着类标签是:
python">label = yolo_classes[class_id]
以上就是解析 YOLOv8 输出的每一行的方式。
然而,这个置信度太低了,因为 2.503395e-06 = 2.503395 / 1000000 = 0.000002503。所以,这个边界框,也许只是应该过滤掉的垃圾。在实际中我们会滤掉所有置信度小于 0.5 的边界框。
把上述内容写成函数就是:
python">def parse_row(row):
    xc,yc,w,h = row[:4]
    x1 = (xc-w/2)/640*img_width
    y1 = (yc-h/2)/640*img_height
    x2 = (xc+w/2)/640*img_width
    y2 = (yc+h/2)/640*img_height

    prob = row[4:].max()
    class_id = row[4:].argmax()
    label = yolo_classes[class_id]

    return [x1,y1,x2,y2,label,prob]
接着解析模型输出的所有行:
python">boxes = [row for row in [parse_row(row) for row in output] if row[5] > 0.5]
len(boxes)
输出为:
python">20
这里我们解析了所有的行,并过滤掉置信度低于0.5的边框,共得到20个边框。这20个框比8400的结果更接近预期结果,但仍然太多,因为我们的图像只有一只猫和一只狗。这是为什么?让我们显示这些数据:
python">[261.28302669525146, 95.53291285037994, 461.15666942596437, 313.4492515325546, 'dog', 0.9220365]
[261.16701192855834, 95.61400711536407, 460.9202187538147, 314.0579136610031, 'dog', 0.92195505]
[261.0219168663025, 95.50403118133545, 460.9265221595764, 313.81584787368774, 'dog, 0.9269446]
[260.7873046875, 95.70514416694641, 461.4101188659668, 313.7423722743988, 'dog', 0.9269207]
[139.5556526184082, 169.4101345539093, 255.12585411071777, 314.7275745868683, 'cat', 0.8986903]
[139.5316062927246, 169.63674533367157, 255.05698356628417, 314.6878091096878, 'cat', 0.90628827]
[139.68495998382568, 169.5753903388977, 255.12413234710692, 315.06962299346924, 'cat', 0.88975877]
[261.1445414543152, 95.70124578475952, 461.0543995857239, 313.6095304489136, 'dog', 0.926944]
[260.9405124664307, 95.77976751327515, 460.99450263977053, 313.57664155960083, 'dog', 0.9247296]
[260.49400663375854, 95.79500484466553, 461.3895306587219, 313.5762457847595, 'dog', 0.9034922]
[139.59658827781678, 169.2822597026825, 255.2673086643219, 314.9018738269806, 'cat', 0.88215613]
[139.46405625343323, 169.3733571767807, 255.28112654685975, 314.9132820367813, 'cat', 0.8780577]
[139.633131980896, 169.65343713760376, 255.49261894226075, 314.88970375061035, 'cat', 0.8653987]
[261.18754177093507, 95.68838310241699, 461.0297842025757, 313.1688747406006, 'dog', 0.9215225]
[260.8274451255798, 95.74608707427979, 461.32597131729125, 313.3906273841858, 'dog', 0.9093932]
[260.5131794929504, 95.89693665504456, 461.3481791496277, 313.24405217170715, 'dog', 0.8848127]
[139.4986301422119, 169.38371658325195, 255.34583129882813, 314.9019331932068, 'cat', 0.836439]
[139.55282192230223, 169.58951950073242, 255.61378440856933, 314.92880630493164, 'cat', 0.87574947]
[139.65414333343506, 169.62119138240814, 255.79856758117677, 315.1192432641983, 'cat', 0.8512477]
[139.86577434539797, 169.38782274723053, 255.5904968261719, 314.77193105220795, 'cat', 0.8271704]
这些框都有很高的置信度,并且它们的坐标相互重叠。让我们在图像上画出这些框来看看:
python">from PIL import ImageDraw
img = Image.open("cat_dog.jpg")
draw = ImageDraw(img)
循环画出20个框
python">for box in boxes:
    x1,y1,x2,y2,class_id,prob = box
    draw.rectangle((x1,y1,x2,y2),None,"#00ff00")
结果如下:
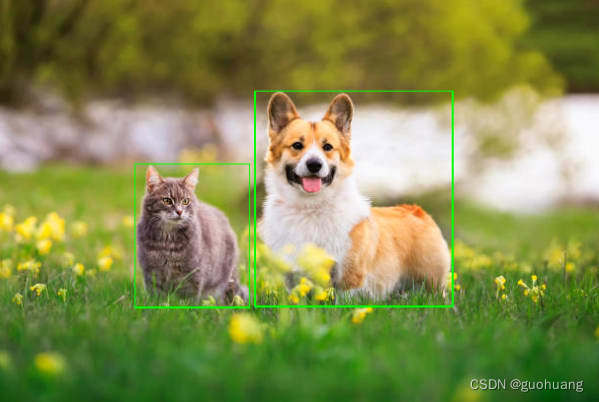
所有的 20 个边界框都绘制在了一起,因此它们看起来只是 2 个边界框。对用户而言,可以看到所有的 20 个结果都属于相同的对象,但是对于程序而言,它认为它发现了 20 种不同的相互重叠的猫和狗。
我们需要从结果里过滤掉不需要的内容,这要怎么能做呢?比如:我们可以保留狗概率最高的框和猫概率最高的框,并删除其他框。但是,这并不是适用于所有的情况,比如图片上有很多不同的猫和狗。我们需要使用一些通用算法来删除所有彼此紧密重叠的框,可以使用非极大值抑制方法(简称:nms),它有以下一些步骤:
- 创建一个空的结果数组,其中包含要保留的框的列表。
- 开始循环。
- 从源框数组中,选择概率最高的框并将其移动到结果数组中。
- 将所选框与源数组中的每个其他框进行比较,并删除与所选框重叠过多的所有框。
- 如果源数组包含更多框,从步骤 2 重复。
循环完成后,源框数组将为空,结果数组仅包含不同的框。具体描述下如何实现步骤4,如何比较两个框并发现它们彼此重叠太多。我们使用一个叫oU的概念:
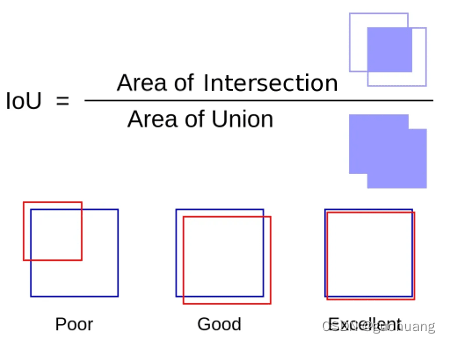
核心思想是:
- 计算两个边框的交集面积。
- 计算两个边框的并集面积。
- 用交集面积除以并集面积。
结果越接近 1,两个边框相互重叠的程度就越大。同时可以直观地看到这一点:两个边框的交集区域与其并集区域越接近,它看起来就越像同一个盒子。在公式下方的左侧框中,这些框彼此重叠,但不会太多,这种情况下的 IoU 可能约为 0.3。当然,这两个边框可以被视为不同的对象,即使它们重叠。在第二个例子中,很明显,交集的面积更接近它们并集的面积,也许这里的 IoU 约为 0.8。很有可能这些边框里的某一个应该被移除。最后,例子右侧上的方框代表几乎相同的区域,并且只应保留其中一个。
现在让我们在代码中实现 IoU 和非极大值抑制:
- 计算交集面积:
python">def intersection(box1,box2):
    box1_x1,box1_y1,box1_x2,box1_y2 = box1[:4]
    box2_x1,box2_y1,box2_x2,box2_y2 = box2[:4]
    x1 = max(box1_x1,box2_x1)
    y1 = max(box1_y1,box2_y1)
    x2 = min(box1_x2,box2_x2)
    y2 = min(box1_y2,box2_y2)

    return (x2-x1)*(y2-y1)
- 计算并集面积:
python">def union(box1,box2):
    box1_x1,box1_y1,box1_x2,box1_y2 = box1[:4]
    box2_x1,box2_y1,box2_x2,box2_y2 = box2[:4]
    box1_area = (box1_x2-box1_x1)*(box1_y2-box1_y1)
    box2_area = (box2_x2-box2_x1)*(box2_y2-box2_y1)

    return box1_area + box2_area - intersection(box1,box2)
- 用交集面积除以并集面积:
python">def iou(box1,box2):
    return intersection(box1,box2) / union(box1,box2)
非极大值抑制
因此,我们在变量中有一个边框数组boxes,我们只需要在其中保留不同的项目,使用创建的iou函数作为差异标准。假设如果IoU两个盒子中的一个小于 0.7,那么它们都应该留下。否则,其中一个可能性较小的应该删除。具体实现如下:
python">boxes.sort(key=lambda x: x[5], reverse=True)
result = []
while len(boxes) > 0:
    result.append(boxes[0])
    boxes = [box for box in boxes if iou(box,boxes[0])<0.7]
为了方便起见,在第一行中,我们按相反的顺序对所有边框进行排序,将概率最高的框移动到顶部。
然后代码定义结果框的数组。在循环中,将第一个框(概率最高的框)放入结果数组中,并在下一行中仅使用框覆盖框数组,这些框与所选框的“IoU”小于 0.7 。它继续循环执行此操作,直到boxes不包含任何内容。
运行后,可以打印result数组:
python">print(result)
python">[
[261.0219168663025, 95.50403118133545, 460.9265221595764, 313.81584787368774, 'dog', 0.9269446],
[139.5316062927246, 169.63674533367157, 255.05698356628417, 314.6878091096878, 'cat', 0.90628827]
]
现在它只有 2 个内容,IoU 发挥了作用,以最高的概率为猫和狗选择了最好的边框。
目前为止,我们已经了解了model.predict()的工作原理。现在,我们使用 ONNX 支持的任何编程语言创建使用 YOLOv8 模型的应用程序,接着我们来讨论要如何做。
在接下来的部分中,我们将重构上一篇文章中编写的对象检测 Web 服务,以使用 ONNX 而不是 PyTorch。我们将使用 Python、Node.js、Go 重写它。
8. 在 Python 上创建 Web 服务
8.1 创建项目
我们将使用上一篇文章中创建的项目作为基础。
创建一个新文件夹并将以下文件从上面的项目复制到其中:
- index.html
- object_detector.py
- requirements.txt
- yolov8m.onnx
打开requirements.txt文件并将ultralytics依赖项替换为onnxruntime. 另外,将该numpy包添加到列表中。之后,文件内容如下:
python">onnxruntime
flask
waitress
pillow
numpy
使用 pip 安装依赖:
python">pip install -r requirements.txt
我们不修改index.html,唯一要修改的文件是object_detector.py,我们将在其中重写之前使用 Ultralytics的API 来使用 ONNX 的对象检测代码。
python">import onnxruntime as ort
from flask import request, Flask, jsonify
from waitress import serve
from PIL import Image
import numpy as np
import json

app = Flask(__name__)

def main():
    serve(app, host='0.0.0.0', port=8080)

 @app.route("/")
 def root():
     with open("index.html") as file:
         return file.read()

@app.route("/detect", methods=["POST"])
def detect():
    buf = request.files["image_file"]
    boxes = detect_objects_on_image(buf.stream)
    return jsonify(boxes)

def detect_objects_on_image(buf):
    model = YOLO("best.pt")
    results = model.predict(buf)
    result = results[0]
    output = []
    for box in result.boxes:
        x1, y1, x2, y2 = [round(x) for x in box.xyxy[0].tolist()]
        class_id = box.cls[0].item()
        prob = round(box.conf[0].item(), 2)
        output.append([x1, y1, x2, y2, result.names[class_id], prob])
        return output

 main()
我们将仅重写detect_objects_on_image,以使用 ONNX 而不是 Ultralytics,实现会比现在更复杂。
dected_objects_on_image函数分为三个部分:
- 准备输入 prepare_input
- 运行模型 run_model
- 处理输出 process_output
每个阶段我们都会放入一个单独的函数,该函数detect_objects_on_image将被调用。更新后文件内容如下:
python">def detect_objects_on_image(buf):
    input, img_width, img_height = prepare_input(buf)
    output = run_model(input)
    return process_output(output,img_width,img_height)

def prepare_input(buf):
    pass

def run_model(input):
    pass

def process_output(output,img_width,img_height):
    pass
8.2 准备输入
把以下代码放入到prepare_input中:
python">def prepare_input(buf):
    img = Image.open(buf)
    img_width, img_height = img.size
    img = img.resize((640, 640))
    img = img.convert("RGB")
    input = np.array(img)
    input = input.transpose(2, 0, 1)
    input = input.reshape(1, 3, 640, 640) / 255.0
    return input.astype(np.float32), img_width, img_height
- 加载图像
- 调整其大小到640*640,转换为 RGB 来删除透明度。
- 然后,转置并重塑数组,将其从 (640,640,3) 转换为 (1,3,640,640) ,将所有值除以 255.0 以对其归一化处理。
- 最后,返回Float32的数组以及原始图片的宽高。
8.3 运行模型
将以下代码放入run_model中:
python">def run_model(input):
    model = ort.InferenceSession("yolov8m.onnx", providers=['CPUExecutionProvider'])
    outputs = model.run(["output0"], {"images":input})

    return outputs[0]
首先,加载模型yolov8m.onnx,然后使用run方法做模型推理。最后,返回第一个输出,它是一个 (1,84,8400) 的数组。
8.4 处理输出
将一下代码放入process_output中:
python">def process_output(output, img_width, img_height):
    output = output[0].astype(float)
    output = output.transpose()
    boxes = []

    for row in output:
        prob = row[4:].max()
        if prob < 0.5:
            continueclass_id = row[4:].argmax()
            label = yolo_classes[class_id]
            xc, yc, w, h = row[:4]
            x1 = (xc - w/2) / 640 * img_width
            y1 = (yc - h/2) / 640 * img_height
            x2 = (xc + w/2) / 640 * img_width
            y2 = (yc + h/2) / 640 * img_height
            boxes.append([x1, y1, x2, y2, label, prob])
            boxes.sort(key=lambda x: x[5], reverse=True)

            result = []
            while len(boxes) > 0:
                result.append(boxes[0])
                boxes = [box for box in boxes if iou(box, boxes[0]) < 0.7]
                return result
- 前两行将输出从 (1,84,8400) 转换为 (8400,84)。
- 第一个循环用于遍历行。对于每一行,计算此预测的概率,如果概率小于 0.5,则跳过所有行。
- 对于通过概率检查的行,确定检测到的对象和对应的class_id标签等信息。
- 然后它使用边界框的中心、宽和高的坐标来计算边界框的角坐标。之后,还缩放到原始图像尺寸。
- 然后它将计算出的边界框写入到boxes数组中。
- 该函数的最后一部分boxes使用“非极大值抑制”算法过滤检测到的结果,它会过滤所有与框重叠的概率最高的边界框。
- 最后,所有通过过滤器的框都以result数组形式返回。
其中使用到的其他相关代码如下:
python">def iou(box1,box2):
    return intersection(box1,box2)/union(box1,box2)

def union(box1,box2):
    box1_x1,box1_y1,box1_x2,box1_y2 = box1[:4]
    box2_x1,box2_y1,box2_x2,box2_y2 = box2[:4]
    box1_area = (box1_x2-box1_x1)*(box1_y2-box1_y1)
    box2_area = (box2_x2-box2_x1)*(box2_y2-box2_y1)
    return box1_area + box2_area - intersection(box1,box2)

def intersection(box1,box2):
    box1_x1,box1_y1,box1_x2,box1_y2 = box1[:4]
    box2_x1,box2_y1,box2_x2,box2_y2 = box2[:4]
    x1 = max(box1_x1,box2_x1)
    y1 = max(box1_y1,box2_y1)
    x2 = min(box1_x2,box2_x2)
    y2 = min(box1_y2,box2_y2)
    return (x2-x1)*(y2-y1)

yolo_classes = [
    "person", "bicycle", "car", "motorcycle", "airplane",
    "bus", "train", "truck", "boat","traffic light", "fire hydrant",
    "stop sign", "parking meter", "bench", "bird", "cat", "dog",
    "horse","sheep", "cow", "elephant", "bear", "zebra", "giraffe",
    "backpack", "umbrella", "handbag", "tie","suitcase", "frisbee",
    "skis", "snowboard", "sports ball", "kite", "baseball bat",
    "baseball glove","skateboard", "surfboard", "tennis racket",
    "bottle", "wine glass", "cup", "fork", "knife", "spoon","bowl",
    "banana", "apple", "sandwich", "orange", "broccoli", "carrot",
    "hot dog", "pizza", "donut","cake", "chair", "couch", "potted plant",
    "bed", "dining table", "toilet", "tv", "laptop", "mouse",
    "remote", "keyboard", "cell phone", "microwave", "oven", "toaster",
    "sink", "refrigerator", "book","clock", "vase", "scissors",
    "teddy bear", "hair drier", "toothbrush"
]
接着,我们可以通过以下命令来运行任务:
python">python object_detector.py
然后在浏览器中访问http://localhost:8080即可获取服务了。
Onnxruntime 是一个低级库,因此需要更多代码才能使模型工作,但是,这种方式更适合在生产中部署,因为它使用的硬盘空间减少了 10 倍。
9. 在 Node.js 上创建 Web 服务
在本节中,我将展示如何使用 onnxruntime 库时在 Node.js 上重写我们的对象检测 Web 服务。
9.1 创建项目
为项目创建新文件夹,如object_detector,在其中创建新的Node.js项目。
python">npm init
安装所需的依赖项:
python">npm i --save onnxruntime-node
npm i --save express
npm i --save multer
npm i --save sharp
同样我们不修改index.html,只修改后端文件。
创建一个object_detector.js文件,内容如下:
const ort = require("onnxruntime-node");
const express = require('express');
const multer = require("multer");
const sharp = require("sharp");
const fs = require("fs");

function main() {
    const app = express();
    const upload = multer();

    app.get("/", (req,res) => {
        res.end(fs.readFileSync("index.html", "utf8"))
    })

    app.post('/detect', upload.single('image_file'), async function (req, res) {
        const boxes = await detect_objects_on_image(req.file.buffer);
        res.json(boxes);
    });

    app.listen(8080, () => {
        console.log('Server is listening on port 8080')
    });
}

async function detect_objects_on_image(buf) {
    const [input,img_width,img_height] = await prepare_input(buf);
    const output = await run_model(input);
    return process_output(output,img_width,img_height);
}

async function prepare_input(buf) {
}

async function run_model(input) {
}

async function process_output(output, img_width, img_height) {
}

main()
- 在第一行中,require导入所有必需的外部模块:ort用于 ONNX 模型处理、express用于 Web 框架、multer支持 Express 框架中的文件上传、sharp将上传的文件作为图像加载并将其转换为像素颜色数组以及fs读取文件。
- 在main函数中,创建一个新的 Express Web 应用程序app。
- 然后定义了两个路由:根路由index.html和/detect用于上传文件的路由,将其传递给函数detect_objects_on_image并将检测到的对象的边界框返回给客户端。
- 看起来与Python的detect_objects_on_image逻辑几乎相同:首先它将上传的文件转换为数字数组,将其传递给模型,处理输出并返回检测到的对象的数组。
- 最后,main()调用该函数在端口 8080 上启动 Web 服务器。
项目已经准备好了,是时候实现prepare_input、run_model和process_output等功能了。
9.2 准备输入
使用Sharp库将图像加载为像素数组。但是,JavaScript 没有像 NumPy 这样支持多维数组的包。JavaScript 中的所有数组都是扁平的。我们可以制作“数组的数组”,但它不是真正的多维数组。例如,我们不能制作 (3,640,640) 的数组。相反,Javascript 的 onnxruntime 需要具有 3640640=1228800 个元素的平面数组,其中红色位于开头部分,绿色位于中间部分,蓝色位于末尾部分。这是函数应该返回的结果prepare_input。现在让我们一步一步来做。
首先,让我们对图像执行与其他语言中相同的操作:
function prepare_input(buf) {
    const img = sharp(buf);
    const md = await img.metadata();
    const [img_width,img_height] = [md.width, md.height];
    const pixels = await img.removeAlpha()
        .resize({width:640,height:640,fit:'fill'})
        .raw()
        .toBuffer();
- 使用sharp加载文件图像。
- 删除alpha通道。
- 将图像大小调整为 640x640。
- 将图像原始像素数组返回到缓冲区。
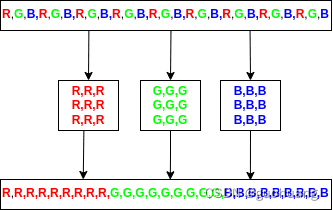
Sharp 也无法返回像素矩阵,因为 JavaScript 中没有矩阵。这就是为什么现在有pixels包含图像像素的一维数组,其中红色先排列,接着是绿色部分,最后是蓝色部分。其排列如图所示:
接着我们来处理像素,第一步是创建 3 个红色、绿色和蓝色数组:
const red = [], green = [], blue = [];
然后,遍历pixels数组并将数字收集到适当的数组中:
for (let index=0; index<pixels.length; index+=3) {
    red.push(pixels[index]/255.0);
    green.push(pixels[index+1]/255.0);
    blue.push(pixels[index+2]/255.0);
}
在每次迭代中,index等于当前像素的红色分量,index+1等于绿色分量,index+2等于蓝色分量。同时,将分量除以 255.0 进行归一化处理。
这是完整的prepare_input代码:
async function prepare_input(buf) {
    const img = sharp(buf);
    const md = await img.metadata();
    const [img_width,img_height] = [md.width, md.height];
    const pixels = await img.removeAlpha()
        .resize({width:640,height:640,fit:'fill'})
        .raw()
        .toBuffer();

   const red = [], green = [], blue = [];
   for (let index=0; index<pixels.length; index+=3) {
       red.push(pixels[index]/255.0);
       green.push(pixels[index+1]/255.0);
       blue.push(pixels[index+2]/255.0);
   }

   const input = [...red, ...green, ...blue];
   return [input, img_width, img_height];
}
接着让我们来运行模型。
9.3 运行模型
run_model代码如下:
async function run_model(input) {
    const model = await ort.InferenceSession.create("yolov8m.onnx");
    input = new ort.Tensor(Float32Array.from(input),[1, 3, 640, 640]);
    const outputs = await model.run({images:input});
    return outputs["output0"].data;
 }
- 在第一行,从文件加载模型yolov8m.onnx。
- 在第二行,准备输入数组。将其转换为内部ort.Tensor对象。
- 在第三行,运行模型并接收outputs。
- 最后,我们返回第一个输出的数据。在 JavaScript 版本中,我们需要指定此输出的名称,而不是索引。
结果,该函数返回形为 (1,84,8400) 的数组,或者可以将其看做 84x8400 的矩阵。然而,JavaScript 不支持矩阵,这就是为什么它以一维数组的形式返回输出。该数组中的数字按 84x8400 排序,但作为包含 705600 个数据的一维数组。因此,不能转置它,也不能在循环中按行遍历它,接着我们将学习如何处理它。
9.4 处理输出
该process_output函数的代码将使用IoU算法来过滤掉所有重叠的框。将iou、intersect 和 union 函数从 Python重写为 JavaScript 很容易。将它们包含到函数下方的代码中process_output:
function iou(box1,box2) {
    return intersection(box1,box2)/union(box1,box2);
}

function union(box1,box2) {
    const [box1_x1,box1_y1,box1_x2,box1_y2] = box1;
    const [box2_x1,box2_y1,box2_x2,box2_y2] = box2;
    const box1_area = (box1_x2-box1_x1)*(box1_y2-box1_y1);
    const box2_area = (box2_x2-box2_x1)*(box2_y2-box2_y1);
    return box1_area + box2_area - intersection(box1,box2);
}

function intersection(box1,box2) {
    const [box1_x1,box1_y1,box1_x2,box1_y2] = box1;
    const [box2_x1,box2_y1,box2_x2,box2_y2] = box2;
    const x1 = Math.max(box1_x1,box2_x1);
    const y1 = Math.max(box1_y1,box2_y1);
    const x2 = Math.min(box1_x2,box2_x2);
    const y2 = Math.min(box1_y2,box2_y2);
    return (x2-x1)*(y2-y1);
}
另外,需要通过 ID 查找 YOLO 类标签,因此将数组添加yolo_classes到代码中:
const yolo_classes = [
    'person', 'bicycle', 'car', 'motorcycle', 'airplane', 'bus', 'train',
    'truck', 'boat','traffic light', 'fire hydrant', 'stop sign',
    'parking meter', 'bench', 'bird', 'cat', 'dog', 'horse','sheep',
    'cow', 'elephant', 'bear', 'zebra', 'giraffe', 'backpack', 'umbrella',
    'handbag', 'tie', 'suitcase','frisbee', 'skis', 'snowboard',
    'sports ball', 'kite', 'baseball bat', 'baseball glove', 'skateboard',
    'surfboard', 'tennis racket', 'bottle', 'wine glass', 'cup', 'fork',
    'knife', 'spoon', 'bowl', 'banana', 'apple','sandwich', 'orange', 'broccoli',
    'carrot', 'hot dog', 'pizza', 'donut', 'cake', 'chair', 'couch',
    'potted plant','bed', 'dining table', 'toilet', 'tv', 'laptop', 'mouse',
    'remote', 'keyboard', 'cell phone', 'microwave', 'oven','toaster',
    'sink', 'refrigerator', 'book', 'clock', 'vase', 'scissors', 'teddy bear',
    'hair drier', 'toothbrush'
];
现在我们来实现process_output。如上所述,该函数的输入是 84x8400 矩阵排列的一维数组。在Python中工作时,我们使用NumPy将其转换为8400x84,然后逐行循环遍历。这里,我们不能这样转换它,所以,我们需要按列遍历它。
boxes=[];
for (index=0;index<8400;index++) {

}
而且,没有行索引和列索引,只有绝对索引。只能在头脑中将这个一维数组虚拟地重塑为 84x8400 矩阵,并使用这些“虚拟行”和“虚拟列”使用此表示来计算这些绝对索引。
如下图所示:

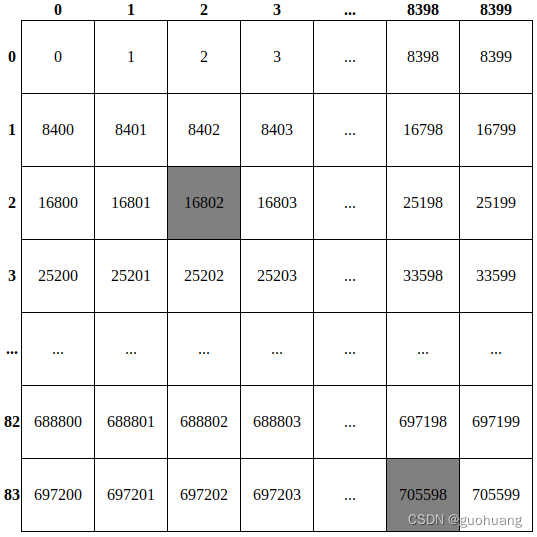
在这里,我们实际上将output包含 705600 个项目的数组重塑为 84x8400 矩阵。它有 8400 列,索引从 0 到 8399,84 行,索引从 0 到 83。数据的绝对索引写在方框内。每个检测到的对象都由该矩阵中的一列表示。每列的前 4 行索引从 0 到 3 对应的是对象的边界框的坐标:x_center、y_center、宽、高。其他 80 行中的单元格(从 4 到 83)包含对象属于 80 个 YOLO 类中每个类的概率。
这张表是为了了解如何在知道行索引和列索引的情况下计算其中任何数据的绝对索引。例如,如何计算位于第 2 行第 2 列的第一个灰色数据的索引?要计算该数据,需要将行索引乘以行的长度 (8400),然后再加列索引。我们来算一下:84002+2=16802,对同一对象来说,他的边界框高度是:84003+2=25202。
这样,刚才那个空循环代码如下:
boxes=[];
for (index=0;index<8400;index++) {
    const xc = output[8400*0+index];
    const yc = output[8400*1+index];
    const w = output[8400*2+index];
    const h = output[8400*3+index];
}
然后可以计算边界框并将其缩放到原始图像的大小:
const x1 = (xc-w/2)/640*img_width;
const y1 = (yc-h/2)/640*img_height;
const x2 = (xc+w/2)/640*img_width;
const y2 = (yc+h/2)/640*img_height;
现在,需要获取第 4 行到第 83 行中的对象的概率,找到其中哪一个最大以及该概率的索引,并将这些值保存起来。代码如下:
let class_id = 0, prob = 0;
for (let col=4;col<84;col++) {
    if (output[8400*col+index]prob) {
        prob = output[8400*col+index];
        class_id = col - 4;
     }
 }
换一种性能更高的写法:
const [class_id,prob] = [...Array(80).keys()]
    .map(col => [col, output[8400*(col+4)+index]])
    .reduce((accum, item) => item[1]accum[1] ? item : accum,[0,0]);
如果概率小于 0.5,您可以跳过该对象,或者找到该类的标签。
最终代码如下:
let boxes = [];
for (let index=0;index<8400;index++) {
    const [class_id,prob] = [...Array(80).keys()]
        .map(col => [col, output[8400*(col+4)+index]])
        .reduce((accum, item) => item[1]accum[1] ? item : accum,[0,0]);
    if (prob < 0.5) {
        continue;
    }
    const label = yolo_classes[class_id];
    const xc = output[index];
    const yc = output[8400+index];
    const w = output[2*8400+index];
    const h = output[3*8400+index];
    const x1 = (xc-w/2)/640*img_width;
    const y1 = (yc-h/2)/640*img_height;
    const x2 = (xc+w/2)/640*img_width;
    const y2 = (yc+h/2)/640*img_height;
    boxes.push([x1,y1,x2,y2,label,prob]);
}
boxes最后一步是使用“非极大值抑制”过滤数组,以排除其中所有重叠的框。
boxes = boxes.sort((box1,box2) => box2[5]-box1[5]);
const result = [];
while (boxes.length0) {
    result.push(boxes[0]);
    boxes = boxes.filter(box => iou(boxes[0],box)<0.7);
}
- 按相反的顺序对输出框进行排序,将概率最高的框放在顶部
- 通过一个循环,把概率最高的框放入result
- 然后过滤掉所有与所选框重叠过多的框(与该框IoU>0.7的所有框)
完整代码如下:
function process_output(output, img_width, img_height) {
    let boxes = [];
    for (let index=0;index<8400;index++) {
        const [class_id,prob] = [...Array(80).keys()]
            .map(col => [col, output[8400*(col+4)+index]])
            .reduce((accum, item) => item[1]accum[1] ? item : accum,[0,0]);

        if (prob < 0.5) {
            continue;
        }
        const label = yolo_classes[class_id];
        const xc = output[index];
        const yc = output[8400+index];
        const w = output[2*8400+index];
        const h = output[3*8400+index];
        const x1 = (xc-w/2)/640*img_width;
        const y1 = (yc-h/2)/640*img_height;
        const x2 = (xc+w/2)/640*img_width;
        const y2 = (yc+h/2)/640*img_height;
        boxes.push([x1,y1,x2,y2,label,prob]);
    }
    boxes = boxes.sort((box1,box2) => box2[5]-box1[5]);
    const result = [];
    while (boxes.length0) {
        result.push(boxes[0]);
        boxes = boxes.filter(box => iou(boxes[0],box)<0.7);
     }
     return result;
}
通过运行以下命令来启动此 Web 服务:
node object_detector.js
打开浏览器并输入http://localhost:8080即可访问服务。
10. 在 Go 上创建 Web 服务
10.1 创建项目
创建一个新项目目录,进入并初始化项目
go mod init object_detector
安装所需的外部模块:
go get github.com/yalue/onnxruntime_go
go get github.com/nfnt/resize
- github.com/yalue/onnxruntime_go: Golang 的 ONNX 库。
- github.com/nfnt/resize: 处理图像的库。
同Python和Node.js,我们只需要修改后端程序即可。
我们创建一个main.go的文件,内容如下:
package main

import (
    "encoding/json"
    "github.com/nfnt/resize"
    ort "github.com/yalue/onnxruntime_go"
    "image"
    _ "image/gif"
    _ "image/jpeg"
    _ "image/png"
    "io"
    "math"
    "net/http"
    "os"
    "sort"
)

func main() {
    server := http.Server{Addr: "0.0.0.0:8080",}
    http.HandleFunc("/", index)
    http.HandleFunc("/detect", detect)
    server.ListenAndServe()
}

func index(w http.ResponseWriter, _ *http.Request) {
    file, _ := os.Open("index.html")
    buf, _ := io.ReadAll(file)
    w.Write(buf)
}

func detect(w http.ResponseWriter, r *http.Request) {
    r.ParseMultipartForm(0)
    file, _, _ := r.FormFile("image_file")
    boxes := detect_objects_on_image(file)
    buf, _ := json.Marshal(&boxes)
    w.Write(buf)
}

func detect_objects_on_image(buf io.Reader) [][]interface{} {
    input, img_width, img_height := prepare_input(buf)
    output := run_model(input)
    return process_output(output, img_width, img_height)
}

func prepare_input(buf io.Reader) ([]float32, int64, int64) {

}

func run_model(input []float32) []float32 {

}

func process_output(output []float32, img_width, img_height int64) [][]interface{} {

}
首先,我们导入所需的包:
- encoding/json在发送响应之前将边界框编码为 JSON
- github.com/nfnt/resize将图像大小调整为 640x640
- ort "github.com/yalue/onnxruntime_go"ONNX 运行时库,我们将其重命名为ort
- image, image/gif, image/jpeg, image/png图片库和支持不同格式图片的库
- io从本地文件读取数据
- math对于Max一个Min函数
- net/http创建并运行网络服务器
- os打开本地文件
- sort对边界框进行排序
然后,该main函数定义两个 HTTP 服务,并在端口 8080 上启动Web 服务。
index函数仅返回文件的内容index.html。
detect函数接收上传的图像文件,将其传递给函数detect_objects_on_image,然后利用 YOLOv8 模型推了,获得输出的边界框,接着将它们编码为 JSON 并返回到前端。
这detect_objects_on_image与之前的语言的项目相同。唯一的区别是它返回的值的类型,即[][]interface{},表示边界框数组。每个边界框都是一个包含 6 个项目的数组(x1,y1,x2,y2,种类标签,置信度)。
10.2 准备输入
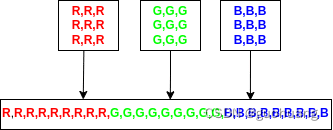
要准备 YOLOv8 模型的输入,首先加载图像,调整其大小并转换为 (3,640,640) 的张量,其中第一项是图像像素的红色分量数组,第二项是绿色分量数组,最后一个是蓝色数组。此外,Go 的 ONNX 库要求输入这个张量作为一维数组,例如将这三个数组一个接一个地连接起来,就像下一张图像上显示的那样。
代码如下:
func prepare_input(buf io.Reader) ([]float32, int64, int64) {
    img, _, _ := image.Decode(buf)
    size := img.Bounds().Size()
    img_width, img_height := int64(size.X), int64(size.Y)
    img = resize.Resize(640, 640, img, resize.Lanczos3)
这段代码完成了加载图像,并将其大小调整为 640x640 像素。
然后将像素的颜色分到不同的数组中:
 red := []float32{}
 green := []float32{}
 blue := []float32{}
接着需要从图像中提取像素及其颜色,并把他们归一化,代码如下:
for y := 0; y < 640; y++ {
    for x := 0; x < 640; x++ {
        r, g, b, _ := img.At(x, y).RGBA()
        red = append(red, float32(r/257)/255.0)
        green = append(green, float32(g/257)/255.0)
        blue = append(blue, float32(b/257)/255.0)
    }
}
最后,以正确的顺序将这些数组连接成一个数组:
input := append(red, green...)
input = append(input, blue...)
完整的prepare_input代码如下:
func prepare_input(buf io.Reader) ([]float32, int64, int64) {
    img, _, _ := image.Decode(buf)
    size := img.Bounds().Size()
    img_width, img_height := int64(size.X), int64(size.Y)
    img = resize.Resize(640, 640, img, resize.Lanczos3)
    red := []float32{}
    green := []float32{}
    blue := []float32{}
    for y := 0; y < 640; y++ {
        for x := 0; x < 640; x++ {
            r, g, b, _ := img.At(x, y).RGBA()
            red = append(red, float32(r/257)/255.0)
            green = append(green, float32(g/257)/255.0)
            blue = append(blue, float32(b/257)/255.0)
         }
     }
     input := append(red, green...)
     input = append(input, blue...)
     return input, img_width, img_height
}
10.3 运行模型
run_model的代码如下:
func run_model(input []float32) []float32 {
    ort.SetSharedLibraryPath("./libonnxruntime.so")
    _ = ort.InitializeEnvironment()

    inputShape := ort.NewShape(1, 3, 640, 640)
    inputTensor, _ := ort.NewTensor(inputShape, input)

    outputShape := ort.NewShape(1, 84, 8400)
    outputTensor, _ := ort.NewEmptyTensor[float32](outputShape)

    model, _ := ort.NewSession[float32]("./yolov8m.onnx",
        []string{"images"},
        []string{"output0"},
        []*ort.Tensor[float32]{inputTensor},
        []*ort.Tensor[float32]{outputTensor}
    )
    _ = model.Run()
    return outputTensor.GetData()
}
- 我们从ONNX官网上下载了对应的库,并命名为libonnxruntime.so,在程序中加载使用。
- 然后,库需要将其转换input为形状为 (1,3,640,640) 的内部张量格式。
- 为输出创建一个空结构。ONNX 库不返回输出,而是将其写入预先定义的变量中。在这里,我们将outputTensor变量定义为形状为 (1,84,8400) 的张量,用于接收来自模型的数据。
- 然后我们创建一个NewSession,接收输入和输出名称数组以及输入和输出张量数组。
- 然后我们运行这个模型,处理输入并将输出写入变量outputTensor。
- 该outputTensor.GetData()方法以浮点数字的一维数组形式返回输出数据。
结果,该函数返回形状为 (1,84,8400) 的数组,可以将其视为大约 84x8400 矩阵。它以一维数组的形式返回。所以,你不能转置它。
10.4 处理输出
该process_output函数的代码将使用 IoU 算法来过滤掉所有重叠的框。将 Python 中的iou、intersect 和 union 函数重写为 Go 很容易。将它们包含到函数的代码中process_output:
func iou(box1, box2 []interface{}) float64 {
    return intersection(box1, box2) / union(box1, box2)
}

func union(box1, box2 []interface{}) float64 {
    box1_x1, box1_y1, box1_x2, box1_y2 := box1[0].(float64), box1[1].(float64), box1[2].(float64), box1[3].(float64)
    box2_x1, box2_y1, box2_x2, box2_y2 := box2[0].(float64), box2[1].(float64), box2[2].(float64), box2[3].(float64)
    box1_area := (box1_x2 - box1_x1) * (box1_y2 - box1_y1)
    box2_area := (box2_x2 - box2_x1) * (box2_y2 - box2_y1)

    return box1_area + box2_area - intersection(box1, box2)
}

func intersection(box1, box2 []interface{}) float64 {
    box1_x1, box1_y1, box1_x2, box1_y2 := box1[0].(float64), box1[1].(float64), box1[2].(float64), box1[3].(float64)
    box2_x1, box2_y1, box2_x2, box2_y2 := box2[0].(float64), box2[1].(float64), box2[2].(float64), box2[3].(float64)
    x1 := math.Max(box1_x1, box2_x1)y1 := math.Max(box1_y1, box2_y1)
    x2 := math.Min(box1_x2, box2_x2)y2 := math.Min(box1_y2, box2_y2)

    return (x2 - x1) * (y2 - y1)
}
同样创建种类标签:
var yolo_classes = []string{
    "person", "bicycle", "car", "motorcycle", "airplane", "bus", "train",
    "truck", "boat","traffic light", "fire hydrant", "stop sign",
    "parking meter", "bench", "bird", "cat", "dog", "horse","sheep",
    "cow", "elephant", "bear", "zebra", "giraffe", "backpack", "umbrella",
    "handbag", "tie","suitcase", "frisbee", "skis", "snowboard", "sports ball",
    "kite", "baseball bat", "baseball glove","skateboard", "surfboard",
    "tennis racket", "bottle", "wine glass", "cup", "fork", "knife",
    "spoon","bowl", "banana", "apple", "sandwich", "orange", "broccoli",
    "carrot", "hot dog", "pizza", "donut","cake", "chair", "couch",
    "potted plant", "bed", "dining table", "toilet", "tv", "laptop", "mouse",
    "remote", "keyboard", "cell phone", "microwave", "oven", "toaster", "sink",
    "refrigerator", "book","clock", "vase", "scissors", "teddy bear",
    "hair drier", "toothbrush",
}
如上所述,该函数接收以 84x8400 矩阵排序的平面数组形式的输出。这里类同前述Node.js版本的处理。只能在头脑中将这个一维数组虚拟地重塑为 84x8400 矩阵,并使用这些“虚拟行”和“虚拟列”使用此表示来计算这些绝对索引。
如下图所示:
在这里,我们实际上将output包含 705600 个项目的数组重塑为 84x8400 矩阵。它有 8400 列,索引从 0 到 8399,84 行,索引从 0 到 83。数据的绝对索引写在方框内。每个检测到的对象都由该矩阵中的一列表示。每列的前 4 行索引从 0 到 3 对应的是对象的边界框的坐标:x_center、y_center、宽、高。其他 80 行中的单元格(从 4 到 83)包含对象属于 80 个 YOLO 类中每个类的概率。
代码如下:
boxes := [][]interface{}{}
for index := 0; index < 8400; index++ {
    xc := output[index]
    yc := output[8400+index]
    w := output[2*8400+index]
    h := output[3*8400+index]
}
然后,计算边界框的角并将其缩放到原始图像的大小:
x1 := (xc - w/2) / 640 * float32(img_width)
y1 := (yc - h/2) / 640 * float32(img_height)
x2 := (xc + w/2) / 640 * float32(img_width)
y2 := (yc + h/2) / 640 * float32(img_height)
现在,类似地,获取第 4 行到第 83 行中的对象的概率,找到其中哪一个最大以及该概率的索引,并将这些值保存到 和prob变量中class_id:
class_id, prob := 0, float32(0.0)
for col := 0; col < 80; col++ {
    if output[8400*(col+4)+index] > prob {
        prob = output[8400*(col+4)+index]
        class_id = col
    }
}
然后,有了最大概率和 class_id,如果概率小于 0.5,您可以跳过该对象,找到该类的标签。
最终代码如下:
boxes := [][]interface{}{}
for index := 0; index < 8400; index++ {
    class_id, prob := 0, float32(0.0)
    for col := 0; col < 80; col++ {
        if output[8400*(col+4)+index] > prob {
            prob = output[8400*(col+4)+index]
            class_id = col
         }
    }
    if prob < 0.5 {
        continue
    }
    label := yolo_classes[class_id]
    xc := output[index]
    yc := output[8400+index]
    w := output[2*8400+index]
    h := output[3*8400+index]
    x1 := (xc - w/2) / 640 * float32(img_width)
    y1 := (yc - h/2) / 640 * float32(img_height)
    x2 := (xc + w/2) / 640 * float32(img_width)
    y2 := (yc + h/2) / 640 * float32(img_height)
    boxes = append(boxes, []interface{}{float64(x1), float64(y1), float64(x2), float64(y2), label, prob})
}
boxes最后一步是使用“非极大值抑制”过滤数组,以排除其中所有重叠的框。此代码与Python 实现相同,但由于 Go 语言的具体情况而看起来略有不同:
sort.Slice(boxes, func(i, j int) bool {
    return boxes[i][5].(float32) < boxes[j][5].(float32)
})

result := [][]interface{}{}
for len(boxes) > 0 {
    result = append(result, boxes[0])
    tmp := [][]interface{}{}
    for _, box := range boxes {
        if iou(boxes[0], box) < 0.7 {
            tmp = append(tmp, box)
        }
     }
     boxes = tmp
}
- 首先,我们按相反的顺序对框进行排序,将概率最高的框放在顶部。
- 在循环中,我们将概率最高的输入框放入数组result中
- 然后我们创建一个临时tmp数组,并在所有框的内部循环中,仅将不会与所选内容重叠太多的框(IoU<0.7)放入该数组中。
- 然后我们boxes用tmp数组覆盖数组。这样,就可以从boxes数组中过滤掉所有重叠的框。
- 如果过滤后存在一些框,则循环继续进行,直到boxes数组变空。
最后,该result变量包含应返回的所有边界框。
完整的代码如下:
func process_output(output []float32, img_width, img_height int64) [][]interface{} {
    boxes := [][]interface{}{}
    for index := 0; index < 8400; index++ {
        class_id, prob := 0, float32(0.0)
        for col := 0; col < 80; col++ {
            if output[8400*(col+4)+index] > prob {
                prob = output[8400*(col+4)+index]
                class_id = col
            }
         }
         if prob < 0.5 {
             continue
         }
         label := yolo_classes[class_id]
         xc := output[index]
         yc := output[8400+index]
         w := output[2*8400+index]
         h := output[3*8400+index]
         x1 := (xc - w/2) / 640 * float32(img_width)
         y1 := (yc - h/2) / 640 * float32(img_height)
         x2 := (xc + w/2) / 640 * float32(img_width)
         y2 := (yc + h/2) / 640 * float32(img_height)
         boxes = append(boxes, []interface{}{float64(x1), float64(y1), float64(x2), float64(y2), label, prob})
     }

     sort.Slice(boxes, func(i, j int) bool {
         return boxes[i][5].(float32) < boxes[j][5].(float32)
     })

     result := [][]interface{}{}
     for len(boxes) > 0 {
         result = append(result, boxes[0])
         tmp := [][]interface{}{}
         for _, box := range boxes {
             if iou(boxes[0], box) < 0.7 {
                 tmp = append(tmp, box)
              }
          }
          boxes = tmp
      }
      return result
}
通过运行以下命令来启动此 Web 服务:
go run main.go
打开浏览器并访问地址http://localhost:8080获取服务。
11. 总结
在本文中,展示了如何在不需要PyTorch和官方API的情况下使用 YOLOv8 模型,需要将模型部署在不同的端上,让模型使用的资源减少十倍,并且使用了如何在 Node.js、和 Go 上创建由 YOLOv8 的 Web 服务。