引言
目标检测是计算机视觉中一个非常流行的任务,在这个任务中,给定一个图像,你预测图像中物体的包围盒(通常是矩形的) ,并且识别物体的类型。在这个图像中可能有多个对象,而且现在有各种先进的技术和框架来解决这个问题,例如 Faster-RCNN 和 YOLOv3。
本文讨论将讨论图像中只有一个感兴趣的对象的情况。这里的重点更多是关于如何读取图像及其边界框、调整大小和正确执行增强,而不是模型本身。目标是很好地掌握对象检测背后的基本思想,你可以对其进行扩展以更好地理解更复杂的技术。
本文中的所有代码都在下面的链接中:https://jovian.ai/aakanksha-ns/road-signs-bounding-box-prediction
问题陈述
给定一个由路标组成的图像,预测路标周围的包围盒,并识别路标的类型。这些路标包括以下四种:
· 红绿灯
· 停止
· 车速限制
· 人行横道
这就是所谓的多任务学习问题,因为它涉及执行两个任务: 1)回归找到包围盒坐标,2)分类识别道路标志的类型

数据集
我使用了来自 Kaggle 的道路标志检测数据集,链接如下:https://www.kaggle.com/andrewmvd/road-sign-detection
它由877张图像组成。这是一个相当不平衡的数据集,大多数图像属于限速类,但由于我们更关注边界框预测,因此可以忽略不平衡。
加载数据
每个图像的注释都存储在单独的 XML 文件中。我按照以下步骤创建了训练数据集:
· 遍历训练目录以获得所有.xml 文件的列表。
· 使用xml.etree.ElementTree解析.xml文件。
· 创建一个由文件路径、宽度、高度、边界框坐标( xmin 、 xmax 、 ymin 、 ymax )和每个图像的类组成的字典,并将字典附加到列表中。
· 使用图像统计数据字典列表创建一个 Pandas 数据库。
python">def filelist(root, file_type):
    """Returns a fully-qualified list of filenames under root directory"""
    return [os.path.join(directory_path, f) for directory_path, directory_name,
            files in os.walk(root) for f in files if f.endswith(file_type)]

def generate_train_df (anno_path):
    annotations = filelist(anno_path, '.xml')
    anno_list = []
    for anno_path in annotations:
        root = ET.parse(anno_path).getroot()
        anno = {}
        anno['filename'] = Path(str(images_path) + '/'+ root.find("./filename").text)
        anno['width'] = root.find("./size/width").text
        anno['height'] = root.find("./size/height").text
        anno['class'] = root.find("./object/name").text
        anno['xmin'] = int(root.find("./object/bndbox/xmin").text)
        anno['ymin'] = int(root.find("./object/bndbox/ymin").text)
        anno['xmax'] = int(root.find("./object/bndbox/xmax").text)
        anno['ymax'] = int(root.find("./object/bndbox/ymax").text)
        anno_list.append(anno)
    return pd.DataFrame(anno_list)
· 标签编码类列
python">#label encode target
class_dict = {'speedlimit': 0, 'stop': 1, 'crosswalk': 2, 'trafficlight': 3}
df_train['class'] = df_train['class'].apply(lambda x:  class_dict[x])
调整图像和边界框的大小
由于训练一个计算机视觉模型需要的图像是相同的大小,我们需要调整我们的图像和他们相应的包围盒。调整图像的大小很简单,但是调整包围盒的大小有点棘手,因为每个包围盒都与图像及其尺寸相关。
下面是调整包围盒大小的工作原理:
· 将边界框转换为与其对应的图像大小相同的图像(称为掩码)。这个掩码只有 0 表示背景,1 表示边界框覆盖的区域。
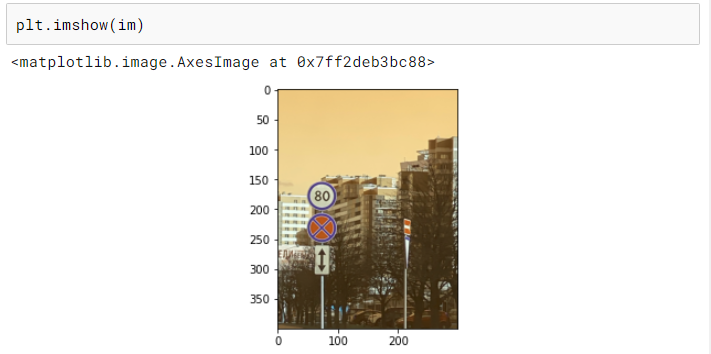
· 将掩码调整到所需的尺寸。
· 从调整完大小的掩码中提取边界框坐标。
python">def create_mask(bb, x):
    """Creates a mask for the bounding box of same shape as image"""
    rows,cols,*_ = x.shape
    Y = np.zeros((rows, cols))
    bb = bb.astype(np.int)
    Y[bb[0]:bb[2], bb[1]:bb[3]] = 1.
    return Y

def mask_to_bb(Y):
    """Convert mask Y to a bounding box, assumes 0 as background nonzero object"""
    cols, rows = np.nonzero(Y)
    if len(cols)==0:
        return np.zeros(4, dtype=np.float32)
    top_row = np.min(rows)
    left_col = np.min(cols)
    bottom_row = np.max(rows)
    right_col = np.max(cols)
    return np.array([left_col, top_row, right_col, bottom_row], dtype=np.float32)

def create_bb_array(x):
    """Generates bounding box array from a train_df row"""
    return np.array([x[5],x[4],x[7],x[6]])

def resize_image_bb(read_path,write_path,bb,sz):
    """Resize an image and its bounding box and write image to new path"""
    im = read_image(read_path)
    im_resized = cv2.resize(im, (int(1.49*sz), sz))
    Y_resized = cv2.resize(create_mask(bb, im), (int(1.49*sz), sz))
    new_path = str(write_path/read_path.parts[-1])
    cv2.imwrite(new_path, cv2.cvtColor(im_resized, cv2.COLOR_RGB2BGR))
    return new_path, mask_to_bb(Y_resized)


#Populating Training DF with new paths and bounding boxes
new_paths = []
new_bbs = []
train_path_resized = Path('./road_signs/images_resized')
for index, row in df_train.iterrows():
    new_path,new_bb = resize_image_bb(row['filename'], train_path_resized, create_bb_array(row.values),300)
    new_paths.append(new_path)
    new_bbs.append(new_bb)
df_train['new_path'] = new_paths
df_train['new_bb'] = new_bbs
数据增强
数据增强是一种通过使用现有图像的不同变体创建新的训练图像来更好地概括我们的模型的技术。我们当前的训练集中只有 800 张图像,因此数据增强对于确保我们的模型不会过拟合非常重要。
对于这个问题,我使用了翻转、旋转、中心裁剪和随机裁剪。
这里唯一需要记住的是确保包围盒也以与图像相同的方式进行转换。
python"># modified from fast.ai
def crop(im, r, c, target_r, target_c):
return im[r:r+target_r, c:c+target_c]
# random crop to the original size
def random_crop(x, r_pix=8):
""" Returns a random crop"""
r, c,*_ = x.shape
c_pix = round(r_pix*c/r)
rand_r = random.uniform(0, 1)
rand_c = random.uniform(0, 1)
start_r = np.floor(2*rand_r*r_pix).astype(int)
start_c = np.floor(2*rand_c*c_pix).astype(int)
return crop(x, start_r, start_c, r-2*r_pix, c-2*c_pix)
def center_crop(x, r_pix=8):
r, c,*_ = x.shape
c_pix = round(r_pix*c/r)
return crop(x, r_pix, c_pix, r-2*r_pix, c-2*c_pix)
def rotate_cv(im, deg, y=False, mode=cv2.BORDER_REFLECT, interpolation=cv2.INTER_AREA):
""" Rotates an image by deg degrees"""
r,c,*_ = im.shape
M = cv2.getRotationMatrix2D((c/2,r/2),deg,1)
if y:
return cv2.warpAffine(im, M,(c,r), borderMode=cv2.BORDER_CONSTANT)
return cv2.warpAffine(im,M,(c,r), borderMode=mode, flags=cv2.WARP_FILL_OUTLIERS+interpolation)
def random_cropXY(x, Y, r_pix=8):
""" Returns a random crop"""
r, c,*_ = x.shape
c_pix = round(r_pix*c/r)
rand_r = random.uniform(0, 1)
rand_c = random.uniform(0, 1)
start_r = np.floor(2*rand_r*r_pix).astype(int)
start_c = np.floor(2*rand_c*c_pix).astype(int)
xx = crop(x, start_r, start_c, r-2*r_pix, c-2*c_pix)
YY = crop(Y, start_r, start_c, r-2*r_pix, c-2*c_pix)
return xx, YY
def transformsXY(path, bb, transforms):
x = cv2.imread(str(path)).astype(np.float32)
x = cv2.cvtColor(x, cv2.COLOR_BGR2RGB)/255
Y = create_mask(bb, x)
if transforms:
rdeg = (np.random.random()-.50)*20
x = rotate_cv(x, rdeg)
Y = rotate_cv(Y, rdeg, y=True)
if np.random.random() > 0.5:
x = np.fliplr(x).copy()
Y = np.fliplr(Y).copy()
x, Y = random_cropXY(x, Y)
else:
x, Y = center_crop(x), center_crop(Y)
return x, mask_to_bb(Y)
def create_corner_rect(bb, color='red'):
bb = np.array(bb, dtype=np.float32)
return plt.Rectangle((bb[1], bb[0]), bb[3]-bb[1], bb[2]-bb[0], color=color,
fill=False, lw=3)
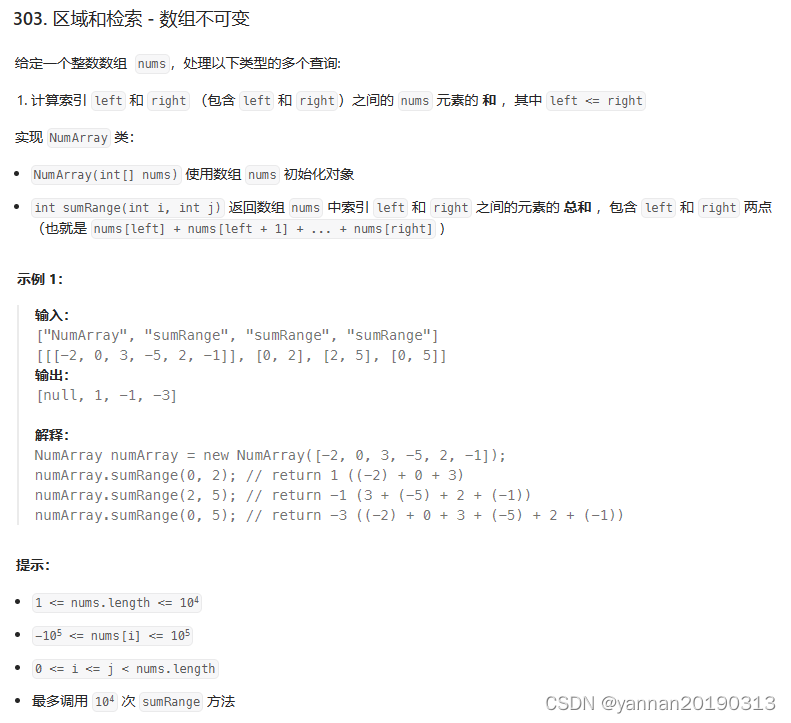
def show_corner_bb(im, bb):
plt.imshow(im)
plt.gca().add_patch(create_corner_rect(bb))
PyTorch 数据集
现在我们已经有了数据增强,我们可以进行训练验证拆分并创建我们的 PyTorch 数据集。我们使用 ImageNet 统计数据对图像进行标准化,因为我们使用的是预训练的 ResNet 模型并在训练时在我们的数据集中应用数据增强。
python">X_train, X_val, y_train, y_val = train_test_split(X, Y, test_size=0.2, random_state=42)

def normalize(im):
    """Normalizes images with Imagenet stats."""
    imagenet_stats = np.array([[0.485, 0.456, 0.406], [0.229, 0.224, 0.225]])
    return (im - imagenet_stats[0])/imagenet_stats[1]
python">class RoadDataset(Dataset):
def __init__(self, paths, bb, y, transforms=False):
self.transforms = transforms
self.paths = paths.values
self.bb = bb.values
self.y = y.values
def __len__(self):
return len(self.paths)
def __getitem__(self, idx):
path = self.paths[idx]
y_class = self.y[idx]
x, y_bb = transformsXY(path, self.bb[idx], self.transforms)
x = normalize(x)
x = np.rollaxis(x, 2)
return x, y_class, y_bbpython">train_ds = RoadDataset(X_train['new_path'],X_train['new_bb'] ,y_train, transforms=True)
valid_ds = RoadDataset(X_val['new_path'],X_val['new_bb'],y_val)python">batch_size = 64
train_dl = DataLoader(train_ds, batch_size=batch_size, shuffle=True)
valid_dl = DataLoader(valid_ds, batch_size=batch_size)PyTorch 模型
对于这个模型,我使用了一个非常简单的预先训练的 resNet-34模型。由于我们有两个任务要完成,这里有两个最后的层: 包围盒回归器和图像分类器。
python">class BB_model(nn.Module):
    def __init__(self):
        super(BB_model, self).__init__()
        resnet = models.resnet34(pretrained=True)
        layers = list(resnet.children())[:8]
        self.features1 = nn.Sequential(*layers[:6])
        self.features2 = nn.Sequential(*layers[6:])
        self.classifier = nn.Sequential(nn.BatchNorm1d(512), nn.Linear(512, 4))
        self.bb = nn.Sequential(nn.BatchNorm1d(512), nn.Linear(512, 4))

    def forward(self, x):
        x = self.features1(x)
        x = self.features2(x)
        x = F.relu(x)
        x = nn.AdaptiveAvgPool2d((1,1))(x)
        x = x.view(x.shape[0], -1)
        return self.classifier(x), self.bb(x)
训练
对于损失,我们需要同时考虑分类损失和边界框回归损失,因此我们使用交叉熵和 L1 损失(真实值和预测坐标之间的所有绝对差之和)的组合。我已经将 L1 损失缩放了 1000 倍,因为分类和回归损失都在相似的范围内。除此之外,它是一个标准的 PyTorch 训练循环(使用 GPU):
python">def update_optimizer(optimizer, lr):
    for i, param_group in enumerate(optimizer.param_groups):
        param_group["lr"] = lr


def train_epocs(model, optimizer, train_dl, val_dl, epochs=10,C=1000):
    idx = 0
    for i in range(epochs):
        model.train()
        total = 0
        sum_loss = 0
        for x, y_class, y_bb in train_dl:
            batch = y_class.shape[0]
            x = x.cuda().float()
            y_class = y_class.cuda()
            y_bb = y_bb.cuda().float()
            out_class, out_bb = model(x)
            loss_class = F.cross_entropy(out_class, y_class, reduction="sum")
            loss_bb = F.l1_loss(out_bb, y_bb, reduction="none").sum(1)
            loss_bb = loss_bb.sum()
            loss = loss_class + loss_bb/C
            optimizer.zero_grad()
            loss.backward()
            optimizer.step()
            idx += 1
            total += batch
            sum_loss += loss.item()
        train_loss = sum_loss/total
        val_loss, val_acc = val_metrics(model, valid_dl, C)
        print("train_loss %.3f val_loss %.3f val_acc %.3f" % (train_loss, val_loss, val_acc))
    return sum_loss/total


def val_metrics(model, valid_dl, C=1000):
    model.eval()
    total = 0
    sum_loss = 0
    correct = 0
    for x, y_class, y_bb in valid_dl:
        batch = y_class.shape[0]
        x = x.cuda().float()
        y_class = y_class.cuda()
        y_bb = y_bb.cuda().float()
        out_class, out_bb = model(x)
        loss_class = F.cross_entropy(out_class, y_class, reduction="sum")
        loss_bb = F.l1_loss(out_bb, y_bb, reduction="none").sum(1)
        loss_bb = loss_bb.sum()
        loss = loss_class + loss_bb/C
        _, pred = torch.max(out_class, 1)
        correct += pred.eq(y_class).sum().item()
        sum_loss += loss.item()
        total += batch
    return sum_loss/total, correct/total

model = BB_model().cuda()
parameters = filter(lambda p: p.requires_grad, model.parameters())
optimizer = torch.optim.Adam(parameters, lr=0.006)


train_epocs(model, optimizer, train_dl, valid_dl, epochs=15)
测试
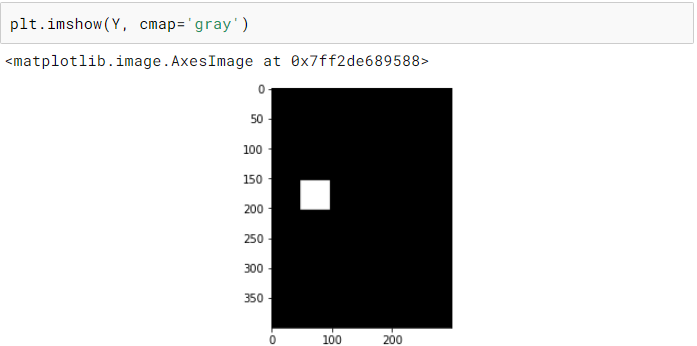
现在我们已经完成了训练,我们可以选择一个随机图像并在上面测试我们的模型。尽管我们只有相当少量的训练图像,但是我们最终在测试图像上得到了一个相当不错的预测。
使用手机拍摄真实照片并测试模型将是一项有趣的练习。另一个有趣的实验是不执行任何数据增强并训练模型并比较两个模型。
python">
# resizing test image
im = read_image('./road_signs/images_resized/road789.png')
im = cv2.resize(im, (int(1.49*300), 300))
cv2.imwrite('./road_signs/road_signs_test/road789.jpg', cv2.cvtColor(im, cv2.COLOR_RGB2BGR))


# test Dataset
test_ds = RoadDataset(pd.DataFrame([{'path':'./road_signs/road_signs_test/road789.jpg'}])['path'],pd.DataFrame([{'bb':np.array([0,0,0,0])}])['bb'],pd.DataFrame([{'y':[0]}])['y'])
x, y_class, y_bb = test_ds[0]

xx = torch.FloatTensor(x[None,])
xx.shape


# prediction
out_class, out_bb = model(xx.cuda())
out_class, out_bb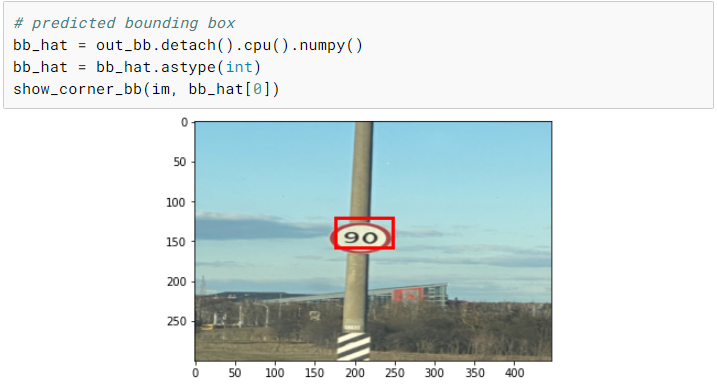
总结
现在我们已经介绍了目标检测的基本原理,并从头开始实现它,您可以将这些想法扩展到多对象情况,并尝试更复杂的模型,如 RCNN 和 YOLO!